background image

English

Label the portions with at least the following 
information:

„

Product name (e.g. beef fillet) 

„

Weight of portion 

„

Quantity (

total of pieces)

„

Freezing date 

„

Use by date (

consumption date)

  (

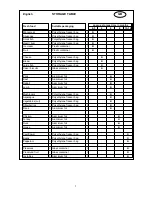
see “storage 

table”)

Then continue as follows 

a) We recommend you place fresh foods in the pre-
freezing compartment at the side 

(I)

 (not all models are 

equipped) or on the bottom of the freezer. This is the 
coldest part. 

Avoid to put fresh foods directly in contact with deep 
frozen food. Deep frozen food could defrost and may 
not outlast the foreseen storage time.   

b)  Fill in within 24 hours, only the quantities of fresh 

food that are suitable for the freezing capacity of 
your appliance. 
See information on the rating plate 

(XX kg/24h)

.

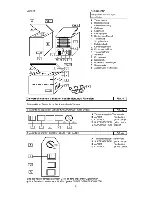
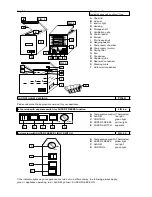
c)  If available, switch on the SUPER FREEZE 

SWITCH 

(FIG.4)

 (not absolutely necessary when 

filling in already  frozen (e.g. deep-frozen food) 
items.

d)  After 24 hours, shift deep-frozen goods from the 

freezer bottom or the pre-freeze shelf to a hung 
basket

(K),

 so that the pre-freeze shelf or freezer 

bottom are available for freezing additional fresh 
foods.

e)  Turn off the SUPER FREEZE SWITCH (yellow 

light goes off). 

f)  Set the temperature control to one of the 

appliance’s relevant filling capacities (

see

“Maximum stacking height”).

g)  Keep the temperature in the storage shelf (E) 

under control, preferably by placing a thermometer 
with a scale range of up to –26°C.

 The storage 

temperature must always be at least -18°C.

Refilling of fresh food 

(not frozen)

Make sure that you refill fresh food, in quantities 
adequate to the freezing capacity (XXkg/24h) earliest 
24 hours after the previous filling.  

(do not exceed maximum stacking height) 

Maximum stacking height  

To ensure correct storage of frozen food, never fill the 
storage shelf 

(E)

 up to the edge. Always allow space 

between the lid and the frozen foods. 

Set the temperature control 

(FIG.4)

 strictly according to 

the filling capacity. 

To save energy when operating in normal ambient 
temperature (+18 to + 22°C), we recommend the 
following settings for the temperature control: 

Capacity  Stacking 

mark 

 Setting 

pos.
Full 

 upper 

  12,00 

Half 

full 

 medium 

  10.00 

1/4 or less 

lower 


08.00 h 

Instruction for use 

10 Storage 

time 

The storage time for purchased deep-frozen products  
varies and  depends on the type of product and its 
packaging.  Therefore, strictly observe the producer’s 
instructions on the packaging. 
For fresh food that you like to deep freeze, consult the 

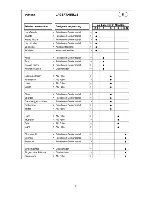
storage table

 at the back of this user manual. 

After being defrosted, food must be consumed 
immediately but latest within the next 24 hours. 

11  Precautions and advice 

„

Whenever cleaning or defrosting, remove the 

power plug. 

„

After closing the freezer lid, do not open it 

immediately and do not force it open under any 
circumstances. Any vacuum remaining on the  

„

seal (B) is released after about 1 or 2 minutes, so 

that the lid can be opened normally once again. 

„

To prevent condensation and ice forming, allow 

cooked food to cool down to ambient temperature 
before closing the lid of the dish and before 
storage.

„

Leave the freezer lid open as briefly as possible to 

avoid waste of energy and to prevent an excessive 
amount of ice forming in the appliance. 

„

ice forming in the appliance. 

„

If the red indicator-light goes on unexpectedly or 

stays on for a long period, do not open the lid on 
any account and take the appropriate measures 
immediately (

see guide “what is when ....” at the 

back of the this user manual)

.

„

Do not use a screwdriver or other metal objects to 

remove the layer of ice. The interior walls are very 
delicate and will not tolerate any sharp edges. Use 
only plastic or wooden scrapers. 

12  Cleaning and maintenance 

For the upkeep of the external appearance of your 
appliance, now and again clean with furniture polish or 
other enamel protecting product (never, on any 
account, use it in the inside. Clean the seal 

(B)

 with 

warm water now and again without using any cleaning 
product.

If your appliance has a condenser 

(R)

 in the rear inside, 

from time to time remove dirt and dust. Dust and dirt 
impede release of heat from the inner compartment and 
considerably increases consumption of energy. For 
best results, use a light brush or duster to remove dust 
from the condenser on the rear wall. 

If you leave your appliance out of use for an extended 
period (e.g. when on holidays), leave it open to prevent 
odours building up inside. For appliances with locks: 
when the chest lid is open, always set the lock in 
“closed” position and keep the key well away from small 
children to prevent accidents. 

When

 ice and frost layers

 form on the inner walls up 

to a certain thickness, they act as an insulation element 
and prevent the coldness being released from the inner 
walls. They must be removed from time to time. 

4

Summary of Contents for BD-103G

Page 1: ...GB Bedienungsanleitung Gefriertruh D Instructions pour l emploi Gongélateur coffre F Istruzioni per l uso Congelatore orizzontale I Instrucciones de uso Congelador E Manual de instruções Arca congelador P Gebruiksaanwijzing Vrieskist NL ...

Page 2: ......

Page 3: ......

Page 4: ...1 ...

Page 5: ...2 ...

Page 6: ...3 ...

Page 7: ...4 ...

Page 8: ...5 ...

Page 9: ...6 ...

Page 10: ...7 ...

Page 11: ...8 ...

Page 12: ...9 ...

Page 13: ...1 ...

Page 14: ... containing soda Before connecting the appliance make sure that the inner area especially the corners is absolutely dry Danger warning Depending on its composition the refrigerant is easily inflammable The refrigerant circuit is hermetically sealed and the density has been subject to repeated tests An improper intervention can cause acute fire hazard Instruction for use Omit any mechanical influen...

Page 15: ...mixture of lukewarm water and vinegar and dry thoroughly with a cloth 5 Close the appliance 6 Insert the plug in the socket 7 Switch on the appliance by turning the temperature control FIG 4 to the right For the time being turn the controller fully to the right to Max position green and red lights go on 8 If equipped with a SUPER FREEZE SWITCH turn it on yellow light goes on too 9 Do not open the ...

Page 16: ...roduct and its packaging Therefore strictly observe the producer s instructions on the packaging For fresh food that you like to deep freeze consult the storage table at the back of this user manual After being defrosted food must be consumed immediately but latest within the next 24 hours 11 Precautions and advice Whenever cleaning or defrosting remove the power plug After closing the freezer lid...

Page 17: ...5 ...

Page 18: ...en the chest is closed lift the chest for a brief moment and then put it back down to its original position After 2 hours put the plug back in Do not open the chest during this period and a further 12 hours afterwards i e until the red light goes off Is the plug in good condition and is it properly plugged into the socket Is the socket under current if necessary test by connecting a small applianc...

Page 19: ...Rabbit Aluminium foil z Lamb Aluminium foil z Mushrooms Polyethylene freezer bag z Asparagus Polyethylene freezer bag z Vegetables cut Polyethylene freezer bag z Strawberries Polyethylene freezer bag z Flans Aluminium foil z Chicken Aluminium foil z Turkey Aluminium foil z Duck Aluminium foil z Goose Aluminium foil z Cauliflower Polyethylene freezer bag z Beans Polyethylene freezer bag z Pepperoni...

Page 20: ...rsion for your appliance 1st version with separate switch for SUPER FREEZE function FIG 4a A Temperature control Thermostat B ALARM red light C CONTROL green light D SUPER FREEZE yellow light E SUPER SWITCH separate 2nd version with SUPER FREEZE LIGHT SWITCH FIG 4b A Temperature control Thermostat B SUPER FREEZE yellow light C ALARM red light D CONTROL green light If the indicator lights on your a...

Page 21: ...1 ...

Page 22: ...tamment dans les coins Avertissements concernant la sécurité Suivant sa composition le réfrigérant s avère facilement inflammable Le circuit du réfrigérant est étanche et sa densité a été vérifiée à plusieurs reprises Les interventions effectuées par un personnel non qualifié comportent un sérieux danger d incendie S abstenir de toute contrainte mécanique sur le système réfrigérant notamment les c...

Page 23: ... régulateur de température sur la droite FIG 4 tourner d abord le régulateur à l extrême droite en position maximale Les voyants vert et rouge s allument 8 S il y en a un enclencher l interrupteur de SUPER CONGÉLATION le voyant jaune s allume 9 Ne pas ouvrir l appareil pendant environ 4 heures ou jusqu à ce que le voyant rouge soit éteint pour que le compartiment interne soit suffisamment refroidi...

Page 24: ... 10h Un quart plein ou moins Bas Sur 8h 10 Durée de conservation La durée de conservation des produits pré congelés diffère beaucoup selon le type d aliment et sa composition À ce propos respecter les instructions du producteur se trouvant sur l emballage du produit Quant aux aliments frais que vous congelez vous mêmes respectez les indications du tableau de conservation dans ce mode d emploi Il f...

Page 25: ...5 ...

Page 26: ...6 ...

Page 27: ...ier d aluminium z Agneau Papier d aluminium z Champignons Sachet de congélation en polyéthylène z Asperges Sachet de congélation en polyéthylène z Légumes coupés Sachet de congélation en polyéthylène z Fraises Sachet de congélation en polyéthylène z Tartes Papier d aluminium z Poulet Papier d aluminium z Dindonneau Papier d aluminium z Canard Papier d aluminium z Oie Papier d aluminium z Chou fleu...

Page 28: ...riantes concernant votre appareil 1ère variante avec interrupteur séparé pour fonction super congélation FIG 4a A Régulateur de température thermostat B ALARM Voyant rouge C CONTROL en marche Voyant vert D Indicateur de super congélation Voyant jaune E Interrupteur de super congélation séparé 2e variante avec interrupteur de super congélation FIG 4b A Régulateur de température thermostat B Interru...

Page 29: ...1 ...

Page 30: ...nato di sodio Prima del collegamento dell apparecchio il vano interno deve essere completamento secco soprattutto negli angoli Avvertenze di sicurezza A seconda della composizione del gas refrigerante questo risulta essere facilmente infiammabile Il circuito refrigerante è chiuso in maniera ermetica e la sua densità è stata sottoposta a più prove Eventuali interventi non eseguiti a regola d arte p...

Page 31: ...listirolo nel vano compressore se presenti 3 Rimuovere dal vano interno dell apparecchio tutta la documentazione e gli accessori eventualmente presenti 4 Pulire il vano interno con acqua tiepida addizionata di aceto ed asciugarlo a fondo con uno straccio 5 Chiudere l apparecchio 6 Inserire la spina nella presa 7 Mettere in funzione l apparecchio ruotando verso destra il regolatore della temperatur...

Page 32: ...Altezza massima di caricamento Per garantire una conservazione ottimale dei prodotti congelati si consiglia di non riempire mai il vano di congelamento E fino al margine superiore Tra il coperchio ed i prodotti congelati deve essere sempre presente un certo margine di distanza Impostare sempre il regolatore della temperatura FIG 4 a seconda della quantità di riempimento In caso di temperatura ambi...

Page 33: ...5 ...

Page 34: ...apparecchio consente un tempo di conservazione di 10 12 ore dall insorgere dell anomalia Negli apparecchi dotati di isolamenti maggiori il tempo di conservazione risulta prolungato Richiedete al Vostro 6 rivenditore il tempo di conservazione del Vostro apparecchio Tempo di conservazione in caso di guasto In caso di guasto duraturo gli alimenti congelati cominciano a scongelarsi nel congelatore A q...

Page 35: ...z Coniglio Foglio d alluminio z Carne d agnello Foglio d alluminio z Funghi Sacchetto in polietilene z Asparagi Sacchetto in polietilene z Verdure tagliate Sacchetto in polietilene z Fragole Sacchetto in polietilene z Torte Foglio d alluminio z Pollo Foglio d alluminio z Tacchino Foglio d alluminio z Anitra Foglio d alluminio z Oca Foglio d alluminio z Cavolfiore Sacchetto in polietilene z Fagioli...

Page 36: ...di segnare le varianti pertinenti al Vostro apparecchio 1 variante con interruttore separato per funzione di supercongelamento FIG 4a A Regolatore della temperatura termostato B ALARME Spia rossa C CONTROLLO in funzione Spia verde D SUPER GONGELAMENTO Spia gialla E INTERRUTORE SUPER separato 2 variante con interruttore di supercongelamento FIG 4b A Regolatore della temperatura termostato B SUPER G...

Page 37: ...1 ...

Page 38: ...r totalmente seco Aviso de peligro Dada la composición del líquido refrigerante éste puede resultar ligeramente inflamable La circulación del líquido refrigerante está herméticamente cerrada y la densidad ha sido sometida a sucesivas pruebas Una manipulación inadecuada conlleva peligro de incendio Absténgase de accionar los mecanismos del sistema de congelación sobre todo los siguientes componente...

Page 39: ...oja así se enfriará adecuadamente el compartimento interior 10 Entonces puede llenarlo con la cantidad que desee de alimentos de congelación rápida artículos comprados ya congelados Véase el siguiente capítulo Capacidad Máxima 11 Apague el interruptor de SUPERCONGELACIÓN pasadas como máximo 24 horas 12 Si desea congelar alimentos frescos y por tanto no congelados aún proceda según el capítulo Cong...

Page 40: ...lo sumo dentro de un plazo de 24 horas 11 Medidas de seguridad e indicaciones Desconecte la clavija de conexión cada vez que vaya a limpiar o descongelar Después de haber cerrado la puerta del arcón no la fuerce inmediatamente para abrirla En la junta B se forma un vacío que desaparece después de 1 2 minutos pudiéndose abrir la puerta de nuevo normalmente Antes de tapar o guardar productos cocinad...

Page 41: ...5 ...

Page 42: ...n el arcón cerrado desenchufe vuelque a un lado el arcón por poco tiempo y vuelva a colocarlo en su posición normal Después de 2 horas vuelva a conectar el enchufe No abra el arcón durante este tiempo y hasta pasadas 12 horas o bien cuando la luz roja se apague La clavija del aparato se encuentra en buen estado y está bien conectada al enchufe Tiene el enchufe corriente compruébelo eventualmente c...

Page 43: ...e buey Papel de aluminio z Conejo Papel de aluminio z Cordero Papel de aluminio z Setas Bolsa polietileno congelación z Espárragos Bolsa polietileno congelación z Verduras cortadas Bolsa polietileno congelación z Fresones Bolsa polietileno congelación z Tortas Papel de aluminio z Pollo Papel de aluminio z Pavo Papel de aluminio z Pato Papel de aluminio z Ganso Papel de aluminio z Coliflor Bolsa po...

Page 44: ... para su aparato la variante correspondiente 1 Variante con interruptor separado para la función de SUPERCONGELACIÓN FIG 4a A Regulador de temperatura termostato B ALARMA luz roja C CONTROL en uso luz verde D Indicador de supercongelación luz amarilla E Interruptor de supercongelación aparte 2 Variante con interruptor de SUPERCONGELACIÓN FIG 4b A Regulador de temperatura termostato B I nt er r upt...

Page 45: ...1 ...

Page 46: ...ntes da loiça ou detergentes fortes abrasivos nem produtos que contenham bicarbonatos Antes de ligar o aparelho o interior deverá estar seco principalmente nos cantos Manual de instruções Indicações de perigos Dependendo da sua composição o fluido frigorígeno é facilmente inflamável O circuito do fluido frigorígeno está hermeticamente fechado e foi várias vezes testado em termos de estanqueidade E...

Page 47: ...O alarme desliga automaticamente quando ligar o BOTÃO DE REFRIGERAÇÃO RÁPIDA 7 Colocar em funcionamento 1 Desempacotar completamente o aparelho 2 Tirar os elementos em esferovite da câmara do compressor quando existente 3 Retirar a documentação e todos os acessórios existentes do interior do aparelho 4 Lavar o interior do aparelho com água morna e vinagre e secar cuidadosamente com um pano 5 Fecha...

Page 48: ...s o abastecimento de alimentos frescos é que poderá reabastecer o seu aparelho com quantidades adequadas XX kg 24h à capacidade de congelação do mesmo Não ultrapassar a altura máxima de empilhamento Manual de instruções 9 Altura máxima de empilhamento Para garantir uma armazenagem adequada dos produtos congelados não deverá nunca encher o compartimento E até em cima Entre a tampa e o produto conge...

Page 49: ...5 ...

Page 50: ...se motivo pedimos que compreenda que reservamos o direito de proceder a alterações na forma no equipamento e nos aspectos técnicos 6 Manual de instruções 18 O que fazer quando a Nenhuma função aparelho não funciona Atenção O isolamento das paredes do aparelho possibilita em caso de avaria ou falha de energia um tempo de armazenamento de 10 a 12 horas após ocorrência da mesma Em aparelhos com isola...

Page 51: ...olha de alumínio z Carne de carneiro Folha de alumínio z Cogumelos Saco de congelação de polietileno z Aspáragos Saco de congelação de polietileno z Legumes cortados Saco de congelação de polietileno z Morangos Saco de congelação de polietileno z Tortas Folha de alumínio z Frango Folha de alumínio z Perú Folha de alumínio z Pato Folha de alumínio z Ganso Folha de alumínio z Couve flor Saco de cong...

Page 52: ...e a variante correspondente ao seu aparelho 1 Variante com botão para função de congelação rápida em separado FIG 4a A Regulador da temperatura Termóstato B ALARME vermelha C CONTROLO a funcionar verde D INDICADOR DE CONGELAÇÃO RÁPIDA amarela E BOTÃO DE CONGELAÇÃO RÁPIDA Em separado 2 Variante com botão luminoso de congelação rápida FIG 4b A Regulador da temperatura Termóstato B BOT O DE CONGELA O...

Page 53: ...1 ...

Page 54: ...n Voordat het apparaat wordt aangesloten moet de binnenzijde vooral in de hoeken volledig droog zijn Mogelijke gevaren Het koelmiddel is al naar gelang de samenstelling licht ontvlambaar Het koelmiddelcircuit is hermetisch afgesloten en meerdere malen getest op dichtheid Bij ondeskundige ingrepen bestaat acuut brandgevaar Elke mechanische inwerking op koelsysteem moet worden vermeden in het bijzon...

Page 55: ...innenzijde reinigen met een lauwwarme oplossing van azijn in water en met een doek volledig droog vegen 5 Apparaat sluiten 6 Stekker in stopcontact steken 7 Apparaat inschakelen door de temperatuurregelaar Afb 4 rechtsom te draaien De regelaar in eerste instantie volledig rechtsom draaien op de stand max De groene en de rode controlelamp gaan nu branden 8 Indien aanwezig de supervries schakelaar i...

Page 56: ... apparaat Bij normale omgevingstemperatuur 18 tot 22 C raden wij de volgende instellingen van de temperatuur aan voor een minimaal stroomverbruik vullingsgraad merkstreep instelling vol bovenste richting 12 uur halfvol middelste richting 10 uur kwart of minder onderste richting 8 uur 11 Houdbaarheidstermijn De houdbaarheidstermijn voor reeds ingevroren diepvriesproducten is sterk afhankelijk van h...

Page 57: ...5 ...

Page 58: ... de storing op te heffen Breng zonodig de producten over in een andere vrieskist bijvoorbeeld bij de buren b Apparaat koelt niet voldoende Invriezen duurt te lang Compressor draait te vaak Mogelijke oorzaken oplossingen Hebt u het apparaat na plaatsing minimaal 2 uur tot rust laten komen voordat u het heeft ingeschakeld Tot rust laten komen van het koelcircuit zie In bedrijf nemen van het apparaat...

Page 59: ...uminiumfolie z Haas Aluminiumfolie z Lamsvlees Aluminiumfolie z Paddestoelen Polyethyleen vrieszakje z Asperges Polyethyleen vrieszakje z Groente gesneden Polyethyleen vrieszakje z Aardbeien Polyethyleen vrieszakje z Taart Aluminiumfolie z Kip Aluminiumfolie z Kalkoen Aluminiumfolie z Eend Aluminiumfolie z Gans Aluminiumfolie z Bloemkool Polyethyleen vrieszakje z Bonen Polyethyleen vrieszakje z Pa...

Page 60: ...et welk bedieningspaneel uw apparaat is uitgerust 1 Uitvoering met aparte schakelaar voor supervries stand FIG 4a A temperatuurregelaar thermostaat B ALARM rode lamp C CONTROL in bedrijf groene lamp D supervries indicator gele lamp E supervries schakelaar apart 2 Uitvoering met gecombineerde schakelaar lamp voor supervries stand FIG 4b A temperatuurregelaar thermostaat B supervries schakelaar gele...

Page 61: ......
Reviews: