background image

2

Record Model/ 

Serial Numbers

Record Model/Serial Numbers.....................2
Important Safety Instructions.......................2
Warranty Information.................................5
Master Protection Agreements......................6
Features at a Glance...................................7
Installation...............................................8
Door Removal Instructions...........................9
Leveling Instructions.................................10
Controls..................................................12
Changing the Filter...................................15
LED Lighting............................................16
Storage Features......................................16
Storing Food ..........................................18
Care & Cleaning........................................18
Before You Call........................................20

Table of Contents

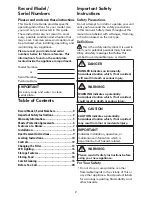
For Your Safety

• Do not store or use gasoline or other 

flammable liquids in the vicinity of this or 
any other appliance. Read product labels 
for warnings regarding flammability and 
other hazards.

WARNING

Please read all safety instructions before 
using your new appliance.

IMPORTANT

Use only soap and water to clean 


serial plate.

IMPORTANT

Indicates installation, operation, or 
maintenance information which is 
important but not hazard-related.

CAUTION

CAUTION indicates a potentially 
hazardous situation which, if not avoided, 
may result in minor or moderate injury.

WARNING

WARNING indicates a potentially 
hazardous situation which, if not avoided, 
could result in death or serious injury.

DANGER

DANGER indicates an imminently 
hazardous situation which, if not avoided, 
will result in death or serious injury.

Please read and save these instructions

This Use & Care Guide provides specific 

operating instructions for your model. Use 

your unit only as instructed in this guide. 

These instructions are not meant to cover 

every possible condition and situation that 

may occur. Common sense and caution must 

be practiced when installing, operating, and 

maintaining any appliance.

Please record your model and serial 

numbers below for future reference. This 

information is found on the serial plate 

located inside the appliance compartment. 
 

Model Number:

 or

Serial Number:
Purchase Date:

Safety Precautions

Do not attempt to install or operate your unit 

until you have read the safety precautions 

in this manual. Safety items throughout this 

manual are labeled with a Danger, Warning, 

or Caution based on the risk type.

Definitions


This is the safety alert symbol. It is used to 

alert you to potential personal injury hazards. 

Obey all safety messages that follow this 

symbol to avoid possible injury or death.

Important Safety  

Instructions

Summary of Contents for 970R44843 Series

Page 1: ...sh Español Français P N A01061002 1410 Sears Brands Management Corporation Hoffman Estates IL 60179 U S A www kenmore com www sears com Sears Canada Inc Toronto Ontario Canada M5B 2C3 www sears ca Kenmore Elite Refrigerator Refrigerador Réfrigérateur Model Modelo Modèle 970R44843 ...

Page 2: ...tion which if not avoided could result in death or serious injury DANGER DANGER indicates an imminently hazardous situation which if not avoided will result in death or serious injury Please read and save these instructions This Use Care Guide provides specific operating instructions for your model Use your unit only as instructed in this guide These instructions are not meant to cover every possi...

Page 3: ... technician If you intentionally release refrigerant you may be subject to fines and imprisonment under the provisions of environmental legislation Child Safety Destroy or recycle the carton plastic bags and any exterior wrapping material immediately after the unit is unpacked Children should never use these items to play Cartons covered with rugs bedspreads plastic sheets or stretch wrap may beco...

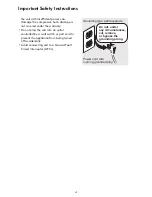
Page 4: ...ove or bypass the grounding prong the unit with insufficient power can damage the compressor Such damage is not covered under the warranty Do not plug the unit into an outlet controlled by a wall switch or pull cord to prevent the appliance from being turned off accidentally Avoid connecting unit to a Ground Fault Circuit Interruptor GFCI ...

Page 5: ...not in accord with electrical gas or plumbing codes 5 Damage to or failure of this appliance including discoloration or surface rust if it is not correctly operated and maintained according to all supplied instructions 6 Damage to or failure of this appliance including discoloration or surface rust resulting from accident alteration abuse misuse or use for other than its intended purpose 7 Damage ...

Page 6: ...rge Fast help by phone we call it Rapid Resolution phone support from a Sears representative on all products Think of us as a talking owner s manual Power surge protection against electrical damage due to power fluctuations 250 Food Loss Protection annually for any food spoilage that is the result of mechanical failure of any covered refrigerator or freezer Rental reimbursement if repair of your co...

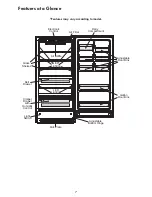
Page 7: ...ding to model Electronic Control Dairy Compartment Air Filter Air Baffle Glass Shelves LED Lighting LED Lighting Light Switch Kick Plate Adjustable Bottom Hinge Deli Drawer Crisper Drawer with Humidity Control Gallon Door Bins Adjustable Door Bins ...

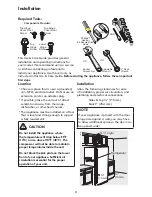
Page 8: ...ION Do not install the appliance where the temperature will drop below 55 F 13 C or rise above 110 F 43 C The compressor will not be able to maintain proper temperatures inside the unit Do not block the kick plate on the lower front of your appliance Sufficient air circulation is essential for the proper operation of your unit Installation Allow the following clearances for ease of installation pr...

Page 9: ... wrench 4 Repeat steps 2 and 3 to install freezer handle if installing the matching freezer Ensure the holes for the set screws are facing towards the refrigerator door NOTE All set screws should be tightened and sub flush of handle end cap Allen set screw should be seated just below the surface of the end cap The end caps should be drawn tight to appliance door with no gaps A B Single Unit Instal...

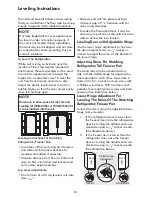
Page 10: ...inge adjustment to fine tune the door alignment Use a 7 16 socket or wrench to adjust the screw at the bottom of the lower hinge Adjusting Doors For Matching Refrigerator Tall Freezer Pair The doors may also be adjusted side to side with the slotted hinge for aligning the doors parallel to each other Loosen the 2 bolts with a wrench and one screw with a Phillips screwdriver Shift the doors until p...

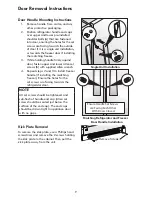
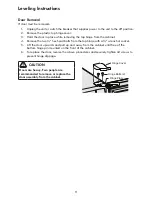
Page 11: ... 4 Remove the two hex head bolts from the top hinge with a wrench or socket 5 Lift the door upwards and pull up and away from the cabinet until free of the bottom hinge pin mounted on the front of the cabinet 6 To replace the door reverse the above procedures and securely tighten all screws to prevent hinge slippage CAUTION Doors are heavy Two people are recommended to remove or replace the door a...

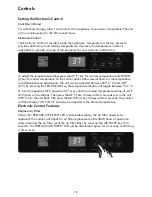
Page 12: ...pliance Temperature is factory preset to provide satisfactory food storage temperatures However the temperature control is adjustable to provide a range of temperatures for your personal satisfaction To adjust the temperature setting press the UP key for warmer temperature and DOWN v key for colder temperature on the control panel Allow several hours for the temperature to stabilize between adjust...

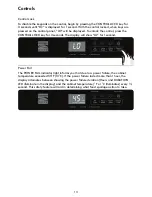
Page 13: ...OCK key for 3 seconds The display will show UL for 1 second Power Fail The POWER FAIL indicator light informs you that due to a power failure the cabinet temperature exceeded 55 F 13 C If the power failure lasted more than 1 hour the display alternates between showing the power failure duration Hours and DURATION LED illuminate in the display and the cabinet temperature F or C illuminates every se...

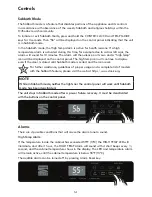
Page 14: ...e Sabbath mode is a feature that disables portions of the appliance and its controls in accordance with observance of the weekly Sabbath and religious holidays within the Orthodox Jewish community To initiate or exit Sabbath Mode press and hold the CONTROL LOCK and TEMP MODE keys for 3 seconds Then Sb will be displayed on the control panel indicating that the unit is in Sabbath mode In the Sabbath...

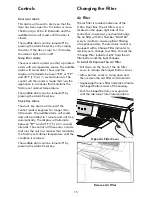
Page 15: ...F 1 C at second intervals The control will then enter a mode that runs the unit in a manner that maintains the factory set cabinet temperature until the condition is resolved The audible alarm can be turned off by pressing the Alarm Reset key Changing the Filter Air Filter The air filter is located inside one of the 2 Liter Door Bins The air filter cover is located on the upper right side of the c...

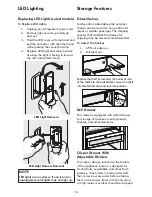
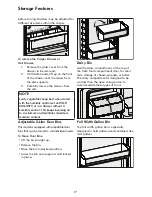
Page 16: ...ion for larger or smaller packages The shipping spacers that stabilize the shelves for shipping may be removed and discarded To Adjust The Shelves 1 Lift front edge up 2 Pull shelf out Replace the shelf by inserting the hooks at rear of the shelf into the wall bracket Lower the shelf into the desired slots and lock into position Insert into slots Deli Drawer This model is equipped with a Deli Draw...

Page 17: ...air to a minimum and maintains maximum moisture content Adjustable 2 Liter Door Bins This model is equipped with adjustable door bins that can be moved to suit individual needs To Move Door Bins Lift the bin straight up Remove the bin Place the bin in desired position Lower the bin onto supports until locked in place Dairy Bin Use the dairy compartment at the top of the fresh food compartment door...

Page 18: ...ge the glass Do Not block Air Flow From Air Baffle Care Cleaning Protecting Your Investment Keeping your refrigerator clean maintains its appearance and prevents odor build up Wipe up any spills immediately and clean the freezer and fresh food compartments at least twice a year NOTE Do not use abrasive cleaners such as window sprays scouring cleansers flammable fluids cleaning waxes concentrated d...

Page 19: ...sive Glass Cleaner Do not use commercial household cleaners ammonia or alcohol to clean handles Use a soft cloth to clean smooth handles Do not use a dry cloth to clean smooth doors Exterior Handles Stainless Steel Models Only Soap and water Ammonia Stainless Steel Cleaners Never use CHLORIDE to clean stainless steel Clean stainless steel front and handles with non abrasive soapy water and a dishc...

Page 20: ...rder under these conditions It takes 24 hours for the appliance to cool down completely Warm food will cause appliance to run more until the desired temperature is reached Warm air entering the appliance causes it to run more Open doors less often See DOOR PROBLEMS in Before You Call Section Turn control knob to a warmer setting Allow several hours for the temperature to stabilize Clean or change ...

Page 21: ...ater boiling Refrigerant used to cool appliance is circulating throughout the system This is normal Vibrating or rattling noise Appliance is not level It rocks on the floor when it is moved slightly Floor is uneven or weak Appliance rocks on floor when it is moved slightly Appliance is touching the wall Level the unit Refer to Leveling in the Leveling Instructions Section Ensure floor can adequate...

Page 22: ...r to the Leveling Instructions Section Level the floor by using wood or metal shims under the appliance or brace floor supporting the appliance LIGHT IS NOT ON Light is not on The light is burned out or LED light is damaged No electric current is reaching the appliance Control system has disabled lights because the door was left open too long Follow directions under LED Lighting section See Applia...

Page 23: ......

Page 24: ......

Reviews: