background image

ENGLISH

29

To Operate the Warmer (Warm &
Ready™) Drawer

Always start with hot food. It is not recommended to
heat cold food in the warmer drawer.

All food placed in the warmer drawer should be
covered with a lid or aluminum foil to maintain
quality. Do not use plastic wrap to cover food.
Plastic may melt onto the drawer and be very
difficult to clean.

Use only dishes, utensils and cookware
recommended for oven use in the warmer drawer.

 Always use pot holders or oven mitts

when removing food from the warmer drawer as
cookware and plates will be HOT.

The warmer drawer is equipped with a catch which may require extra force when opening and closing the drawer.

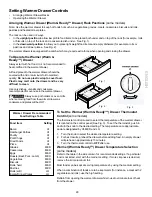
Arranging Warmer Drawer (Warm & Ready™ Drawer) Rack Positions (some models)

Note: Use the warmer drawer to keep hot foods hot such as: vegetables, gravies, meats, casseroles, biscuits and rolls,
pastries and heated dinner plates.

The rack can be used in 2 ways:

In the upright position to allow low profile food items to be placed both under and on top of the rack (for example, rolls
or biscuits on top of the rack and a casserole dish under - See Fig. 1).

In the downward position to allow you to place light weight food items and empty dishware (for example, rolls or
pastries and dinner plates - See Fig. 2).

Fig. 1

Fig. 2

Fig. 3

Setting Warmer Drawer Controls

Arranging Warmer Drawer Racks

Operating the Warmer Drawer

Warmer Drawer Recommended

Food Settings Table

Food Item

Setting

Bacon

HI

Hamburger Patties

HI

Poultry

HI

Pork Chops

HI

Fried Foods

HI

Pizza

HI

Gravies

MED

Casseroles

MED

Eggs

MED

Roasts (Beef, Pork, Lamb)

MED

Vegetables

MED

Biscuits

MED

Rolls, hard

MED

Pastries

MED

Rolls (soft)

LO

Empty Dinner Plates

LO

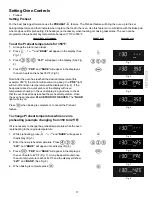
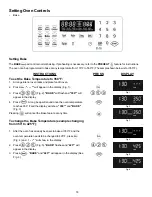
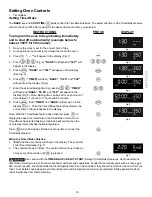
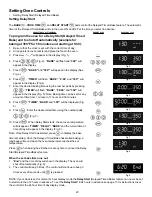
To Set the Warmer (Warm & Ready™) Drawer Thermostat
Control 
(some models)

The thermostat control is used to select the temperature of the warmer drawer.
It is located on the control panel (See Fig. 3). To set the thermostat, push in
and turn the knob to the desired setting. The temperatures are approximate,
and are designated by HI, MED and LO.

1.

Turn the knob to select the desired temperature setting.

2.

For best results, preheat the drawer before adding food. An empty drawer
will preheat in approximately 15 minutes.

3.

Turn the thermostat control to OFF after use.

Warmer (Warm & Ready™) Drawer Temperature Selection
(some models)

Refer to the table in the side column for recommended settings. If a particular
food is not listed, start with the medium setting. If more crispness is desired,
remove the lid or aluminum foil.

Most foods can be kept at serving temperatures by using the medium setting.

When a combination of foods are to be kept warm (for instance, a meat with 2
vegetables and rolls), use the high setting.

Refrain from opening the warmer drawer while in use to eliminate loss of heat
from the drawer.

Summary of Contents for 970-3370 series

Page 1: ...08 Sears Canada Inc Toronto Ontario Canada M5B 2B8 Visit our webpage at www sears ca Models Modèles 970 3370 color number numéro de couleur Gas Range Use Care Guide Cuisinière à gaz Guide d utilisation et d entretien FRANÇAIS ...

Page 2: ...s used for other than private family purposes this warranty applies for only 90 days from the date of purchase This warranty covers only defects in material and workmanship Sears will NOT pay for 1 Expendable items that can wear out from normal use including but not limited to filters belts light bulbs and bags 2 A service technician to instruct the user in correct product installation operation o...

Page 3: ...ot allow children to climb or play around the range The weight of a child on an open door may cause the range to tip resulting in serious burns or other injury Do not use the oven or warmer drawer if equipped for storage Do not store items of interest to children in the cabinets above a range or on the backguard of a range Children climbing on the range to reach items could be seriously injured St...

Page 4: ...he fire with a pan lid or use baking soda a dry chemical or foam type extinguisher When heating fat or grease watch it closely Fat or grease may catch fire if allowed to become too hot Use Only Dry Potholders Moist or damp potholders on hot surfaces may result in burns from steam Do not let potholders touch hot heating burners Do not use a towel or other bulky cloth instead of a potholder DoNotHea...

Page 5: ...rd must be plugged into an electrical outlet that is correctly polarized and properly grounded If a 2 prong wall receptacle is the only available outlet it is the personal responsibility of the consumer to have it replaced with a properly grounded 3 prong wall receptacle installed by a qualified electrician See the INSTALLATION INSTRUCTIONS packaged with this range for complete installation and gr...

Page 6: ...tien préventif annuel à votre demande pour vous assurer que votre produit est en bon état de marche Certaines limites s appliquent Pour de plus amples renseignements sur les contrats d Entretien Sears Canada composez le 1 800 361 6665 Maintenance Agreements Your purchase has added value because you can depend on Sears Home Central for service With over 2400 Service Technicians and more than a mill...

Page 7: ... Oven interior 16 Convection Bake Fan Cover 17 Adjustable Oven Racks styles vary with model 18 Large 1 piece Oven Door Handle 19 Full width Oven Door styles vary with model 20 Warmer Drawer with Handle Warmer Drawer Rack some models or Storage Drawer some models 21 5 000 BTU Simmer Burner some models 22 9 500 BTU Standard Burner some models 23 12 000 BTU Power Burner some models 24 14 200 BTU Powe...

Page 8: ...rack place cookware on oven rack position 2 or 3 Refer to Figs 2 6 Air Circulation in the Oven Fig 5 Fig 6 8 For best air circulation and baking results allow 2 4 5 10 cm around the cookware for proper air circulation and be sure pans and cookware do not touch each other the oven door sides or back of the oven cavity The hot air must be able to circulate around the pans and cookware in the oven fo...

Page 9: ...ktop Lockout indicator light is ON unlock the cooktop some models If your model does not have this feature or if the cooktop is unlocked proceed to step 2 2 Place cooking utensil on gas surface burner 3 Push the surface control knob in turn counterclockwise out of the OFF position 4 Release the knob rotate to the LITE position Note All four electronic surface ignitors will spark at the same time H...

Page 10: ...NOTE The markings between the 2nd HI and LO settings on the middle rear control knob adjust the flame size for both burners together Use the guide marks between the 2nd HI and LO settings and adjust the flame size as needed Refer to Fig 3 7 Add the Front center Burner if desired Once lit visually adjust the flame size of the Front center Burner to match the flame size of the Bridge Burner 8 Place ...

Page 11: ...as surface control knobs are set to the OFF position before unlocking or locking the cooktop IMPORTANT NOTE Starting a Self Clean cycle will automatically turn the Cooktop Lockout feature ON The cooktop will remain locked after the Self Clean cycle Once the SeIf Cleaning cycle has completed and the Door Locked Indicator Light has turned OFF you MUST unlock the cooktop before the gas surface burner...

Page 12: ... time PREHEAT Use to pre condition the oven temperature See page 18 Minimum Maximum Control Pad Settings All of the features listed have minimum and maximum time or temperature settings that may be entered into the control An ENTRY acceptance beep will sound each time a control pad is touched the Oven Lockout pad is delayed by 3 seconds An ENTRY ERROR tone 3 short beeps will sound if the entry of ...

Page 13: ...ress CLO will disappear and the clock will start Fig 4 Changing between 12 or 24 hour time of day display 1 Press and hold for 6 seconds Fig 3 While holding the pad down the current time of day will remain and CLO will disappear from the display Fig 4 CONTINUE holding the pad until a beep is heard 2 The display will show either 12Hr Fig 5 or 24Hr Fig 6 3 Press to switch between the 12 and 24 hour ...

Page 14: ... set time has run out Press The display will return to the time of day for 6 seconds or Setting Continuous Bake or 12 Hour Energy Saving The TIMER SET OFF and FLEX CLEAN pads control the Continuous Bake or 12 Hour Energy Saving features The oven control has a factory preset built in 12 Hour Energy Saving feature that will shut off the oven if the oven control is left on for more than 11 hours and ...

Page 15: ...ain fully operational Setting Oven Controls OvenLockout TemperatureDisplay Setting Temperature Display Fahrenheit or Celsius The BROIL and CLEAN pads control the Fahrenheit or Celsius temperature display modes The oven control can be programmed to display temperatures in Fahrenheit or Celsius The oven has been preset at the factory to display in Fahrenheit To change display from Fahrenheit to Cels...

Page 16: ... beeps for 7seconds To change control from normal sound operation to silent control operation 1 To tell if your range is set for normal or silent operation press and hold for 7 seconds 0 00 will appear and DELAY will flash in the display Fig 1 2 Press to switch between normal sound operation and silent operation mode The display will show either SP Fig 2 or Fig 3 If SP appears Fig 2 the control wi...

Page 17: ...e Preheat feature To change Preheat temperature while oven is preheating example changing from 350 to 425 F If it is necessary to change the preheat temperature while the oven is preheating to the original temperature 1 While preheating press and BAKE will appear in the display Fig 5 2 Enter the new preheat temperature Press 425 and BAKE will appear in the display Fig 6 3 Press PRE and BAKE will a...

Page 18: ...ature at any time To change the Bake Temperature example changing from 350 to 425 F 1 After the oven has already been set to bake at 350 F and the oven temperature needs to be changed to 425 F press Fig 4 and will show in the display 2 Press Fig 5 BAKE flashes and 425 will appear in the display 3 Press BAKE and 425 will appear in the display See Fig 6 INSTRUCTIONS PRESS DISPLAY Setting Bake The BA...

Page 19: ...oth TIMED and BAKE will remain on in the display Fig 6 Once the Timed Bake feature has started the current time of day will appear in the display Note After the Timed Bake feature has activated press to display the bake time remaining in the Timed Bake mode Once Timed Bake has started baking a long beep will sound when the oven temperature reaches the set temperature Press when baking has finished...

Page 20: ...art time using the number pads Fig 7 10 Press When Delay Start starts the set oven temperature will disappear TIMED DELAY BAKE and the current time of time of day will appear in the display Fig 8 Note Once Delay Start has started press to display the bake time remaining Once the Delayed Timed Bake has started baking a long beep will sound when the oven temperature reaches the set temperature Press...

Page 21: ...n 3rd 450 F 25 00 15 00 Well Chicken Boneless 4th 450 F 10 00 8 00 Well Fish 4th 500 F as directed as directed Well Shrimp 3rd 550 F as directed as directed Well Hamburger 3 4 thick 5th 550 F 12 00 10 00 Well 4th 550 F 14 00 12 00 Well INSTRUCTIONS PRESS DISPLAY Should an oven fire occur leave the oven door closed and turn the oven OFF If the fire continues throw baking soda on the fire or use a f...

Page 22: ...essary when cooking casseroles with Convection Bake 3 When using Convection Bake with a single rack place oven rack in position 2 or 3 If cooking on multiple racks place the oven racks in positions 1 and 4 using 2 oven racks and in the Roasting Shelf 3 and 5 using 3 oven racks Refer to Fig 1 4 Cakes have better results when baked using the BAKE pad Setting Convection Bake The CONV BAKE pad control...

Page 23: ...vent grease splattering DO NOT use the roasting rack when broiling 1 Place oven rack on bottom or next to the bottom rack position See Arranging Oven Racks in the Before Setting Oven Controls section 2 Place the insert in the broiler pan The roasting rack fits on the insert allowing the heated air to circulate under the food for even cooking and helps to increase browning on the underside Make sur...

Page 24: ...imer is not active and the pad is pressed the Kitchen Timer feature will become active and will begin counting down from 1 minute When the Kitchen Timer reaches the end of the set time the timer will display End and signal 3 long beeps at regular intervals until is pressed If a Kitchen Timer function has ended pressing will restart the timer at 1 minute For further information on how to set the Ki...

Page 25: ...shes 1 and appears in the display See Fig 2 4 Press BAKE flashes 1 and 350 appears in the display See Fig 3 5 Press and hold pad for at least 3 seconds or until a beep sounds The beep indicates that the recipe setting has been recorded for future recall The display will show 350 and BAKE See Fig 4 NOTE The oven will continue to bake unless is pressed To Begin Baking recalled setting example below ...

Page 26: ... open when checking foods If the oven heat escapes often the Slow Cook time may need to extended Cover the foods to keep them moist or use a loose or vented type cover to allow foods to turn crisp or brown Roasts may be left uncovered so browning can occur Cook times will vary depending on the weight fat content bone the shape of the roast Use the recipe s recommended food temperature and a food t...

Page 27: ...ivate the Sabbath feature 1 Be sure that the clock is set with the correct time of day 2 Arrange the oven racks and place the food in the oven 3 Press will appear in the display Fig 1 3 Press Fig 2 BAKE will flash and 350 will appear in the display 4 Press The display will show 350 and BAKE The oven will turn ON and begin heating See Fig 3 5 If a Timed Bake or Delay Start Delayed Timed Bake is nee...

Page 28: ...y Feature cont d Setting the Warm Hold Feature OvenLight Should you experience a power failure or interruption the oven will shut off When power is returned the oven will not turn back on automatically The oven will remember that it is set for the Sabbath and the food may be safely removed from the oven while still in the Sabbath feature however the oven cannot be turned back on until after the Sa...

Page 29: ... Warmer Drawer Controls ArrangingWarmerDrawerRacks OperatingtheWarmerDrawer Warmer Drawer Recommended Food Settings Table Food Item Setting Bacon HI HamburgerPatties HI Poultry HI Pork Chops HI Fried Foods HI Pizza HI Gravies MED Casseroles MED Eggs MED Roasts Beef Pork Lamb MED Vegetables MED Biscuits MED Rolls hard MED Pastries MED Rolls soft LO Empty Dinner Plates LO To Set the Warmer Warm Read...

Page 30: ... the drawer to the fully opened position 3 Locate glide lever on each side of drawer pull up on the left glide lever and push down on the right glide lever See Fig 1 4 Pull the drawer away from the range To Replace Warmer Warm Ready Drawer 1 Pull the bearing glides to the front of the chassis glide See Fig 2 2 Align the glide on each side of the drawer with the glide slots on the range 3 Push the ...

Page 31: ...n not to rub damage or remove the gasket DO NOT use any cleaning materials on the oven door gasket Doing so could cause damage Remove the broiler pan and insert all utensils and any aluminum foil These items cannot withstand high cleaning temperatures Remove oven racks If they are not removed during the Self Clean cycle their color will turn slightly blue and the finish will be dull After the cycl...

Page 32: ... display See Fig 1 2 4 hours of Self Cleaning time may be choosen by pressing any amount of time from 2 hours through 4 hours in one minute increments You may also skip the time entry and accept the default cleaning time of 3 hours by pressing the Start key pad See Step 3 3 Press The DOOR LOCKED icon will flash CLEAN and the letters CLn will remain on in the display Fig 2 4 As soon as the control ...

Page 33: ...d IMPORTANTNOTES whenusingtheSelf Cleanfeature 1 Do not use the surface burners after setting for a Self Clean cycle 2 A Self Clean cycle cannot be started if Oven Lockout feature is active 3 If a Self Cleaning Cycle has started but not finished and a power failure occurs the appliance may not have thoroughly cleaned Once power is restored set for another Self Clean cycle to finish 4 If your clock...

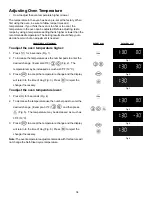
Page 34: ...red change Example 30 F Fig 2 The temperature may be increased as much as 35 F 19 C 3 Press to accept the temperature change and the display will return to the time of day Fig 3 Press to reject the change if necessary To adjust the oven temperature lower 1 Press for 6 seconds Fig 4 2 To decrease the temperature use the number pads to enter the desired change Example 30 F and then press Fig 5 The t...

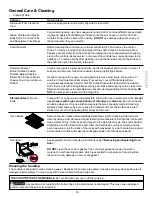
Page 35: ... pad Rinse and wipe dry with a clean cloth Remove all cleaners or the porcelain may become damaged during furture heating DO NOT use spray oven cleaners on the range top Clean with hot soapy water and a dishcloth Rinse with clean water and a cloth Do not use cleaners with high concentrations of chlorides or chlorines Do not use harsh scrubbing cleaners Only use kitchen cleaners that are especially...

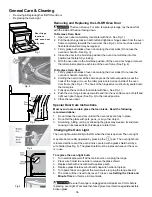
Page 36: ... to the locked position 5 Close the oven door Special Door Care Instructions Most oven doors contain glass that can break Read the following recommendations 1 Do not close the oven door until all the oven racks are fully in place 2 Do not hit the glass with pots pans or any other object 3 Scratching hitting jarring or stressing the glass may weaken its structure causing an increased risk of breaka...

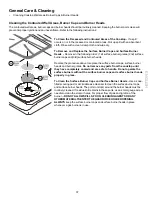
Page 37: ...rface Burner Caps and Surface Burner Heads Use a soap filled scouring pad or a mild abrasive cleanser to clean the surface burner caps and surface burner heads The ports or slots around the burner heads must be routinely cleaned If residue still remains in these ports use a small gauge wire or needle to clean the slots or holes For proper flow of gas and ignition of the burner DO NOT ALLOW SPILLS ...

Page 38: ... outlet electric ignition models only Be sure cord is securely plugged into the outlet Electrical power outage electric ignition models only Burners can be lit manually See Setting Surface Controls Burner ports are clogged With the burner off clean ports by using a small gauge wire or needle Moisture is present after cleaning Lightly fan the flame and allow burner to operate until flame is full Dr...

Page 39: ...recommended temperature or baking time If you feel the oven is cooking too hot or cool see Adjusting Your Oven Temperature Controls are not set properly Follow instructions in Self Cleaning section Self cleaning cycle was interrupted Stop time must be set 2 to 4 hours past the start time Follow steps under Stopping or Interrupting a Self Clean Cycle under SelfCleaning Failure to clean bottom front...

Page 40: ...oning 1 teaspoon salt seasoning 1 tablespoon parsley 6 medium potatoes sliced 1 medium onion sliced In a large mixing bowl combine first 5 ingredients blend well In a roasting pan spread potatoes and onions over the bottom of the pan Pour soup mixture over potatoes and onions topping with the pork chops Sprinkle pepper seasoning and parsley on top of pork chops Cover pan with lid or aluminum foil ...

Page 41: ...ENGLISH 41 ...

Page 42: ...42 ...

Reviews: