background image

24

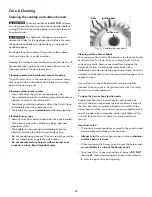
Care & Cleaning

Surface type

Recommendation

Porcelain enamel parts & door
liner

Control knobs
Painted body parts
Painted decorative trim
Aluminum, plastic or vinyl pieces

Gentle scrubbing with a soapy no-scratch cleaning pad will remove most spots. Rinse
with a 1:1 solution of clear water and ammonia. If necessary, cover difficult spots
with an ammonia-soaked paper towel for 30 to 40 minutes. Rinse with clean water
and a damp cloth, and then scrub with a soap-filled no-scratch cleaning pad. Rinse
and wipe dry with a clean cloth. Do not allow food spills with a high sugar or acid
content (milk, tomatoes, sauerkraut, fruit juices or pie filling) to remain on the
surface; they may cause a dull spot even after cleaning.

For oven interior remove excessive spillovers from oven cavity bottom before starting
Select Clean. Clean any soils from oven frame and door liner outside the oven door
gasket. For very important cleaning precautions be sure to read all the instructions in
the Select Clean section.

Oven racks

Oven door

Remove oven racks from oven cavity before starting Select Clean. Clean by using a
mild, abrasive cleaner following manufacturer's instructions. Rinse with clean water,
dry and then replace in oven.

Use soap & water to thoroughly clean the top, sides and front of the oven door.
Rinse well. You may use a glass cleaner on the outside glass of the oven door. 

Do not

immerse the door in water. 

Do not

 spray or allow water or the glass cleaner to enter

the door vents. 

Do not

 use oven cleaners, cleaning powders or any harsh abrasive

cleaning materials on the outside of the oven door.

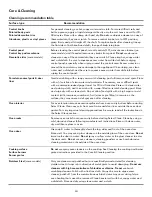
Cleaning recommendation table

Oven interior

Stainless Steel

 (some models)

Only use cleaners and polishes that are specifically manufactured for cleaning

stainless steel. Always rub in direction of metal grain to avoid damaging.

 Do not use

cleaners with high concentrations of chlorides or chlorine

Do not

 use harsh

scrubbing cleaners. Polish with a lint-free cloth. Always be sure to wipe excess
cleaner/polish off from the metal surface as bluish stains may occur during future
oven heating that cannot be removed. Clean heavier soils with hot, soapy water and
a dishcloth. Rinse and dry using clean water and a cloth.

Control panel
Control key pad membrane
Decorative trim

 (some models)

For general cleaning, use hot, soapy water and a cloth. For more difficult soils and
built-up grease, apply a liquid detergent directly onto the soil. Leave on soil for 30-
60 minutes. Rinse with a damp cloth and dry. 

Do not

 use abrasive cleaners on any of

these materials; they can scratch. To remove control knobs, turn to OFF position;
grasp firmly and pull straight off the shaft. To replace knobs after cleaning, line up
the flat sides of both knob and shaft; then push knob into place.

Before cleaning the control panel, turn all controls OFF, activate oven lockout (on
some models) and if needed remove any knobs from panel. 

Do not

 use abrasive

cleaners on any of these materials; they can scratch. Clean using hot, soapy water
and a dishcloth.  Be sure to squeeze excess water from dishcloth before wiping
control panel; especially when wiping around the controls area. Excess water in or
around the controls may cause damage to the appliance. When rinsing, use clean
water and a dishcloth and be sure to squeeze excess water from dishcloth before
wiping the control panel.

Cooktop surface
Surface burners
Burner grates

Do not

 use spray oven cleaners on the cooktop. See Cleaning the cooktop and burner

grates instructions provided in the Care & Cleaning section.

Summary of Contents for 970-3348 Series

Page 1: ...more Use Care Guide Guide d utilisation et d entretien English Français Gas Range 970 3348 3367 P N 316901103 Sears Canada Inc Toronto Ontario Canada M5B 2B8 www sears ca Cuisinière à gaz color number numéro de couleur ...

Page 2: ...ties of merchantability or fitness for a particular purpose are limited to one year or the shortest period allowed by law Sears shall not be liable for incidental or consequential damages Some states and provinces do not allow the exclusion or limitation of incidental or consequential damages or limitation on the duration of implied warranties of merchantability or fitness so these exclusions or l...

Page 3: ... technician and an authorized repair service Know how to disconnect the power to the range at the circuit breaker or fuse box in case of an emergency User servicing Do not repair or replace any part of the appliance unless specifically recommended in the manuals All other servicing should be done only by a qualified technician This may reduce the risk of personal injury and damage to the range All...

Page 4: ...n near surface units or in the storage drawer warmer drawer or lower oven This includes paper plastic and cloth items such as cookbooks plasticware and towels as well as flammable liquids Do not store explosives such as aerosol cans on or near the range Do not use water or flour on grease fires smother the fire with a pan lid or use baking soda a dry chemical or foam type extinguisher When heating...

Page 5: ... a ventilating hood turn the fan on Use Proper Flame Size Adjust flame size so it does not extend beyond the edge of the utensil The use of undersized utensils will expose a portion of the burner flame to direct contact and may result in ignition of clothing Proper relationship of utensil to flame will also improve efficiency IMPORTANT INSTRUCTIONS FOR SELF CLEANING OVENS Clean in the self cleanin...

Page 6: ...al safety the range must be properly grounded For maximum safety the power cord must be plugged into an electrical outlet that is correctly polarized and properly grounded If a 2 prong wall receptacle is the only available outlet it is the personal responsibility of the consumer to have it replaced with a properly grounded 3 prong wall receptacle installed by a qualified electrician Grounding Inst...

Page 7: ...of the oven cavity Hot air must be able to circulate around the cookware in the oven for even heat to reach around the food See Fig 3 Fig 2 The flat oven rack some models or flat handle oven rack some models may be used for most cooking needs The offset oven rack some models is designed to place the base of the rack about 1 2 of a rack position lower than flat oven racks This design provides sever...

Page 8: ...NOT place aluminum foil or ANY material that can melt on the range cooktop If these items melt they may damage the cooktop Fig 1 Setting proper burner flame size Never extend the flame beyond the outer edge of the cooking utensil A higher flame wastes energy and increases your risk of being burned by the flame The color of the flame is the key to proper burner adjustment A good flame is clear blue...

Page 9: ...well as follow their recommendations for home canning procedures Use only quality flat bottom canners when home canning Use a straight edge to check canner bottom Use only a completely flat bottom canner Make sure the diameter of the canner does not exceed 1 inch beyond the surface element markings or burner Start with hot tap water to bring water to boil more quickly Use the highest heat setting ...

Page 10: ...ols Oven control keypads 1 Oven Light Use to turn the oven lights ON and OFF 2 Clock Use to set the time of day 3 Cook Time Use to enter length of cook time desired 4 Select Clean Use to set a 2 3 or 4 hour self clean cycle 5 Timer Set Off Use to set or cancel Timer 6 Delay Start Use with Bake and Select Clean functions to program a delay start time or delay start self cleaning cycle 7 OVEN indica...

Page 11: ... will beep when the set time has run out The timer may be used alone or when any other oven function is active The indicator light located above the Timer Set Off key pad will glow when the timer is active The timer will display hours and minutes until 1 hour remains When less than 1 hour remains the display will count down in minutes and seconds Once the timer has less than 1 minute remaining onl...

Page 12: ...en continuous bake setting or 12 Hour Energy Saving mode for detailed information Dark or dull pans absorb more heat than shiny bakeware resulting in dark or overbrowning of foods It may be necessary to reduce the oven temperature or cook time to prevent overbrowning of some foods Dark pans are recommended for pies Shiny pans are recommended for cakes cookies and muffins Always use pot holders or ...

Page 13: ...the display 7 The oven will turn ON and begin heating When the oven temperature reaches the set temperature the PREHEAT indicator light will turn off and the oven control will beep 3 times To cancel at anytime press Always use pot holders or oven mitts when using the oven When cooking the oven interior oven racks and cooktop will become very hot which can cause burns When the cook time runs out En...

Page 14: ...time appears in the display and release 9 The oven will automatically turn ON at the set delayed starting time and begin heating When the oven temperature reaches the set temperature the PREHEAT indicator light will turn off and the oven control will beep 3 times To cancel at anytime press FOOD POISONING HAZARD Do not let food sit for more than one hour before or after cooking Doing so can result ...

Page 15: ...t any time press Important notes The Convection fan will take 6 minutes to begin rotating after the Convection switch has been turned ON This is normal If the oven door is opened when Convection is active the fan will stop rotating until the oven door is closed Convection will not operate when Select Clean is active When using Convection cook time reductions may vary depending on the amount and ty...

Page 16: ...ven OFF If the fire continues use a fire extinguisher DO NO DO NO DO NO DO NO DO NOT T T T T put water or flour on the fire Flour may be explosive 1 Arrange the oven racks when cool For optimum browning results preheat oven for 5 minutes before adding food 2 Position cookware in oven Close oven door when broiling 3 Press Broil key pad will appear in display 4 Press or key pad until the desired bro...

Page 17: ...ain the oven temperature at 170 F 77 C for 3 hours Adjusting Oven Temperature Your appliance has been factory calibrated and tested to ensure an accurate baking temperature For the first few uses follow your recipe times and temperature recommendations carefully If you think the oven is cooking too hot or too cool for your recipe times you may adjust the control so the oven cooks hotter or cooler ...

Page 18: ...whenever the oven door is closed The interior oven light is located at the upper left rear wall of the oven interior and is covered with a glass shield held by a wire holder The glass shield protects the bulb from high temperatures and should always be in place whenever the oven is in use To change the interior oven light see Changing oven light in the Care Cleaning section ...

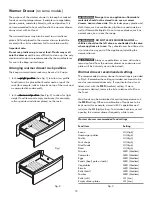
Page 19: ...ing To minimize heat loss avoid opening the warmer drawer frequently while in use Arranging warmer drawer rack positions The keep warmer drawer rack may be used in 2 ways In the upright position upright position upright position upright position upright position See Fig 1 to allow low profile food items to be placed both under and on top of the rack for example rolls or biscuits on top of the rack...

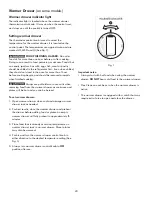
Page 20: ...ontrol knob in either direction to the desired temperature setting See Fig 1 5 Always turn warmer drawer control knob to OFF position after use Fig 1 Important notes Always start with hot food when using the warmer drawer DO NOT heat cold food in the warmer drawer Flex Clean can not be set when the warmer drawer is active The warmer drawer is equipped with a catch that may require extra force to o...

Page 21: ...rails to the outer compartment glide channels located inside the empty warmer drawer compartment See Fig 2 3 While holding the warmer drawer level and square using the warmer drawer handle push do not force the warmer drawer all the way into the outer compartment glide channels all the way into the range Open the warmer drawer again to verify the glides have seated 4 If you do not hear the levers ...

Page 22: ...erior Aluminum foil will melt to the interior of the oven The health of some birds is extremely sensitive to the fumes given off during the self cleaning cycle of any range Move birds to another well ventilated room DO NOT force the oven door open This can damage the automatic door locking system Use caution when opening the oven door after self cleaning The oven may still be VERY HOT and can caus...

Page 23: ...the clean time that was programmed you must allow about 1 additional hour for the oven to cool before you will be able to open the oven door The Select Clean function will not operate whenever a radiant surface element is ON or the oven lockout is active When Select Clean is finished 1 The time of day will appear in the display window and the Select Clean and DOOR LOCKED indicator lights will cont...

Page 24: ...dels Only use cleaners and polishes that are specifically manufactured for cleaning stainless steel Always rub in direction of metal grain to avoid damaging Do not use cleaners with high concentrations of chlorides or chlorine Do not use harsh scrubbing cleaners Polish with a lint free cloth Always be sure to wipe excess cleaner polish off from the metal surface as bluish stains may occur during f...

Page 25: ...brasive plastic scrubbing pad and mild abrasive cleanser or clean in the dishwasher Food soils containing acids may affect the finish Clean immediately after the grates are cool Thoroughly dry grates immediately following cleaning Cleaning surface burner heads For proper gas flow it may be necessary to clean the burner head and slots To clean first use a clean DAMP cloth to soak up any spills Remo...

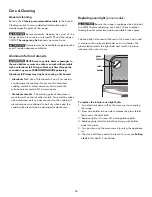
Page 26: ...d To replace the interior oven light bulb 1 Turn electrical power off at the main source or unplug the range 2 Press wire holder to one side to release the glass shield that covers the light bulb 3 Replace light with a new 40 watt appliance bulb 4 Replace glass shield over bulb and snap wire holder back into place 5 Turn power on at the main source or plug the appliance in 6 The clock will then ne...

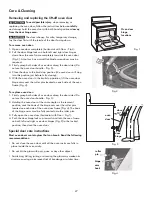
Page 27: ... 4 The hook of the hinge arms must be fully seated onto the roller pins 3 Fully open the oven door horizontal with floor Fig 1 4 Push the door hinge locks up towards and into the oven frame on both left and right oven door hinges Fig 2 to the locked position then close the oven door Special door care instructions Most oven doors contain glass that can break Read the following recommendations Remov...

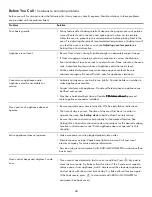
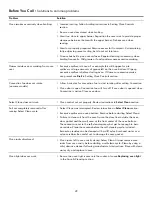
Page 28: ...y make range appear not level Be sure cabinets are square have sufficient room for appliance clearance Before you call for service review the following list It may save you time expense Possible solutions to these problems are provided with the problem listed Entire appliance does not operate Make sure power cord is plugged properly into outlet Electrical power outage Check house lights to be sure...

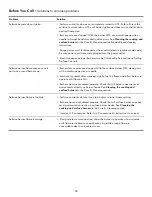
Page 29: ...completely removed after running Select Clean cycle Select Clean was interrupted Review instructions in Select Clean section Excessive spillovers on oven bottom Remove before starting Select Clean Failure to clean soil from the oven frame the door liner outside the oven door gasket and the small area at the front center of the oven bottom These areas are not in the self cleaning area but get hot e...

Page 30: ...p Burner slots or ports are clogged With the surface burner OFF clean ports with a small gauge wire or needle Moisture is present after cleaning Lightly fan the flame and allow burner to operate until flame is full Burner caps are not seated properly Check that all burner caps are level and seated correctly on burner heads See Cleaning the cooktop and surface burners in the Care Cleaning section S...

Page 31: ...énéficier du soutien téléphonique d un représentant Sears pour tous les produits Nous sommes votre guide d utilisation parlant Une protection contre les surtensions pour les dommages électriques causés par des fluctuations électriques Une couverture annuelle de 250 pour la perte d aliments à la suite de toute détérioration d aliments résultant d une défaillance mécanique d un réfrigérateur ou d un...

Page 32: ......

Page 33: ...rs Canada Inc Toronto Ontario Canada M5B 2B8 www sears ca Models Modèles Kenmore Use Care Guide Guide d utilisation et d entretien English Français Gas Range 970 3348 3367 Cuisinière à gaz color number numéro de couleur ...

Page 34: ... peut être tenue responsable des dommages accessoires ou indirects Certains États et certaines provinces ne permettent pas de restriction ou d exemption sur les dommages accessoires ou indirects ni de restriction sur les garanties implicites de qualité marchande ou d adaptation à un usage particulier Dans ce cas ces restrictions ou exemptions pourraient ne pas être applicables Cette garantie est v...

Page 35: ...de réduire les risques de blessures et pour éviter d endommager l appareil toutes les réparations doivent être faites par un technicien qualifié Ne modifiez jamais la cuisinière que ce soit en enlevant des panneaux les pieds de mise à niveau des protège fils des supports ou des vis anti renversement ou toute autre pièce de la cuisinière Enlevez la porte du four si vous rangez ou mettez au rebut la...

Page 36: ...et les chiffons ainsi que tout liquide inflammable Ne rangez pas de produits explosifs comme des bombes aérosol sur la cuisinière ou près de celle ci Ne tentez pas d éteindre les feux de friture avec de l eau ou de la farine étouffez les feux avec un couvercle ou du bicarbonate de soude ou encore avec un extincteur à poudre sèche ou à mousse Lorsque vous faites chauffer de l huile ou de la graisse...

Page 37: ...ites flamber des aliments sous une hotte mettez le ventilateur en marche Utilisez une flamme de dimension appropriée réglez la flamme de façon à ce qu elle ne dépasse pas du bord de l ustensile Si vous utilisez des ustensiles de dimension insuffisante une partie de la flamme du brûleur sera à découvert et pourrait enflammer les vêtements qui entrent en contact avec la flamme Un bon contact entre l...

Page 38: ...orrectement mise à la terre Pour un maximum de sécurité cette cuisinière doit être correctement mise à la terre La fiche doit être branchée dans une prise correctement polarisée et mise à la terre Si une prise murale à deux alvéoles est la seule prise à votre disposition il vous revient de demander à un électricien qualifié de la remplacer par une prise murale à trois alvéoles correctement mise à ...

Page 39: ... plupart de vos cuissons La grille de four surbaissée certains modèles est conçue pour une insertion de la base de la grille à la moitié de la hauteur d une grille de four plate Cette conception de grille permet d augmenter le nombre de positions de grilles supplémentaires possibles entre les positions de grille de four plate Emplacement de l évent du four L évent du four est situé sous le panneau...

Page 40: ...du bord extérieur de l ustensile Une flamme plus haute gaspille l énergie et augmente les risques de brûlure La couleur de la flamme est la clé d un bon réglage Une flamme bien réglée est transparente bleue et à peine visible dans une pièce bien éclairée Chaque cône de la flamme doit être uniforme et précis Réglez ou nettoyez le brûleur si la flamme est jaune orangé Réglage adéquat de la flamme Ré...

Page 41: ...ions disponibles et de suivre les recommandations qu on y trouve pour la mise en conserve N utilisez que des marmites à fond plat de qualité pour la mise en conserve Utilisez une règle droite pour vérifier le fond de la marmite N utilisez qu une marmite au fond parfaitement plat Assurez vous que le diamètre de la marmite ne dépasse pas de plus de 2 5 cm 1 po les cercles incrustés délimitant l élém...

Page 42: ...lect Clean autonettoyage permet de sélectionner un programme d autonettoyage de 2 3 ou 4 heures 5 Timer Set Off minuterie marche arrêt sert à mettre en marche ou à annuler la minuterie 6 Delay Start mise en marche différée utilisez cette fonction avec les fonctions Bake cuisson au four et Select Clean autonettoyage pour programmer une mise en marche différée ou un cycle d autonettoyage différé 7 V...

Page 43: ...mée s est écoulée La minuterie peut être utilisée seule ou lorsqu une autre fonction du four est activée Le voyant lumineux situé au dessus de la touche TIMER SET OFF minuterie marche arrêt s allume quand la minuterie fonctionne La minuterie affiche les heures et les minutes jusqu à ce qu il ne reste qu une heure Lorsqu il reste moins d une heure l afficheur ne montre que les minutes et les second...

Page 44: ...our plus de détails Les casseroles à fini foncé ou mat absorbent davantage la chaleur que les casseroles à fini brillant ce qui peut entraîner le noircissement ou le brunissement trop prononcé des aliments Il pourrait être nécessaire de réduire la température du four ou la durée de cuisson pour empêcher le brunissement excessif de certains aliments Les casseroles au fini foncé sont recommandées po...

Page 45: ...fage s éteint et le régulateur émet 3 bips Pour arrêter la cuisson à tout moment appuyez sur Servez vous toujours de maniques ou de gants isolants pour utiliser les grilles de four Lors de la cuisson l intérieur du four les grilles et la surface de cuisson deviennent très chauds ce qui pourrait causer des brûlures Lorsque le temps de cuisson est écoulé End s affiche La commande du four émet trois ...

Page 46: ... s allume automatiquement à l heure de mise en marche différée et commence à chauffer Lorsque le four atteint la température programmée le voyant lumineux de préchauffage s éteint et le régulateur émet 3 bips Pour arrêter la cuisson à tout moment appuyez sur DANGER D EMPOISONNEMENT ALIMENTAIRE Ne laissez pas la nourriture reposer plus d une heure avant ou après la cuisson Vous risqueriez d être ma...

Page 47: ...ilateur de convection prendra 6 minutes avant de commencer à tourner après avoir mis l interrupteur de cuisson à convection en position de marche Cela est tout à fait normal Si la porte du four est ouverte lorsque la convection est activée le ventilateur de convection arrête de tourner jusqu à ce que la porte soit refermée La convection ne fonctionne pas lorsque la fonction d autonettoyage Select ...

Page 48: ... et ÉTEIGNEZ le Si le feu ne s éteint pas servez vous d un extincteur NE JETEZ PAS d eau ni de farine sur le feu La farine peut être explosive 1 Positionnez les grilles lorsque le four est froid Pour des résultats de brunissage optimaux préchauffez le four pendant 5 minutes avant d ajouter de la nourriture 2 Placez l ustensile dans le four Fermez la porte durant l utilisation du gril 3 Appuyez sur...

Page 49: ...u peut être réglé pour se mettre en marche automatiquement lors du réglage d une cuisson minutée Une mise en marche différée peut également être ajoutée Le maintien au chaud garde la température du four à 77 ºC 170 ºF pendant 3 heures Ajustement de la température du four Votre four a été réglé et testé en usine de façon à fournir une température de cuisson précise Au cours des premières utilisatio...

Page 50: ...ée La lampe du four est située dans le coin supérieur gauche de la paroi arrière du four Elle est protégée par un globe en verre retenu par une tige métallique Le protecteur en verre protège l ampoule des températures élevées et doit toujours être en place lorsque le four fonctionne Pour remplacer l ampoule du four reportez vous au paragraphe Remplacement de l ampoule du four dans la section Entre...

Page 51: ...at en dessous À plat sur le fond fig 2 pour permettre de disposer sur la grille des aliments de moindre poids et de la vaisselle vide par exemple assiettes à dîner petits pains ou pâtisseries Fig 1 Rangement à l intérieur de l appareil ou sur l appareil les articles inflammables ne doivent pas être rangés dans le four dans le tiroir chauffant et près des brûleurs de surface Cela inclut les article...

Page 52: ...ig 1 5 Placez toujours le bouton de commande du tiroir chauffant à la position OFF arrêt après toute utilisation Fig 1 Remarques importantes Commencez toujours l utilisation du tiroir chauffant avec des aliments chauds NE RÉCHAUFFEZ PAS des aliments froids dans le tiroir chauffant L autonettoyage Flex Clean peut être réglé lorsque le tiroir chauffant est utilisé Le tiroir chauffant est muni d un l...

Page 53: ...roite Pour remettre le tiroir chauffant en place 1 Tirez les glissières à roulement vers l avant des profilés des glissières du compartiment extérieur jusqu à ce qu elles s enclenchent fig 3 2 Alignez soigneusement les deux côtés des rails des glissières du tiroir chauffant avec les profilés des glissières du compartiment de la cuisinière prévu pour le tiroir chauffant fig 2 3 En tenant le tiroir ...

Page 54: ...ente Le papier d aluminium fondra à l intérieur du four Certains oiseaux sont extrêmement sensibles aux fumées dégagées pendant l autonettoyage d une cuisinière Déplacez les oiseaux dans une pièce bien ventilée NE TENTEZ PAS d ouvrir la porte du four par la force Vous pourriez endommager le système de verrouillage automatique de la porte Faites preuve de prudence en ouvrant la porte du four après ...

Page 55: ...isser 1 heure supplémentaire pour que le four refroidisse avant de pouvoir ouvrir la porte du four La fonction d autonettoyage Select Clean ne fonctionne pas lorsqu un élément de surface radiant est EN MARCHE ou que le verrouillage du four est activé Lorsque l autonettoyage Select Clean est terminé 1 L heure du jour apparaît sur l afficheur et les voyants Select Clean autonettoyage et DOOR LOCKED ...

Page 56: ...du four Acier inoxydable certains modèles Utilisez seulement des nettoyants et des produits à polir qui sont spécialement conçus pour le nettoyage de l acier inoxydable Frottez toujours dans le sens du grain du métal pour éviter de l endommager N utilisez pas de produit de nettoyage à concentration élevée en chlore ou en chlorure N utilisez pas de produit de récurage trop puissant Procédez au poli...

Page 57: ...ez un tampon à récurer non abrasif en plastique et un produit de nettoyage légèrement abrasif ou nettoyez les au lave vaisselle Les résidus d aliments acides peuvent endommager le fini des grilles Nettoyez les immédiatement lorsque les grilles sont refroidies Essuyez complètement les grilles immédiatement après le nettoyage Nettoyage des têtes de brûleur de surface Pour que le débit de gaz soit ap...

Page 58: ...erre Pour remplacer l ampoule de la lampe intérieure du four 1 Coupez l alimentation électrique ou débranchez la cuisinière 2 Poussez la tige métallique d un côté pour libérer le protecteur en verre qui recouvre l ampoule 3 Remplacez l ampoule par une nouvelle ampoule de 40 W pour électroménagers 4 Remettez le protecteur en verre par dessus l ampoule et enclenchez la tige métallique 5 Mettez le co...

Page 59: ...Ouvrez complètement la porte du four parallèlement au sol fig 1 4 Poussez les verrous des charnières de droite et de gauche vers le haut et dans le cadre du four fig 2 jusqu à ce qu ils soient en position verrouillée puis refermez la porte du four Instructions spéciales pour l entretien de la porte La plupart des portes de four possèdent une vitre qui peut se casser Lisez les recommandations suiva...

Page 60: ...pas de niveau Assurez vous que les armoires sont à l équerre et qu il y a assez d espace libre pour l appareil Avant de faire une demande de service consultez la liste suivante Elle pourrait vous faire économiser temps et argent Les solutions possibles sont fournies à la suite de la description du problème La cuisinière ne fonctionne pas Assurez vous que le cordon d alimentation est bien branché d...

Page 61: ...este de la saleté après le cycle d autonettoyage Select Clean L autonettoyage Select Clean a été interrompu Lisez les instructions de la section sur l autonettoyage Select Clean Il y a trop de résidus de cuisson sur la sole du four Éliminez les avant d utiliser l autonettoyage Select Clean Vous n avez pas bien nettoyé la saleté qui se trouve sur le cadre de la porte du four autour du joint et la p...

Page 62: ...struées Lorsque le brûleur de surface est ÉTEINT débouchez les orifices à l aide d un fil métallique fin ou d une aiguille Il reste de l humidité après le nettoyage Ventilez légèrement la flamme et laissez le brûleur fonctionner jusqu à ce que la flamme soit complète Les chapeaux de brûleur ne sont pas placés correctement Vérifiez que tous les chapeaux de brûleur sont de niveau et placés correctem...

Page 63: ...énéficier du soutien téléphonique d un représentant Sears pour tous les produits Nous sommes votre guide d utilisation parlant Une protection contre les surtensions pour les dommages électriques causés par des fluctuations électriques Une couverture annuelle de 250 pour la perte d aliments à la suite de toute détérioration d aliments résultant d une défaillance mécanique d un réfrigérateur ou d un...

Page 64: ......

Reviews: