background image

41

FUNCIONES Y VENTAJAS

PIEZAS Y COMPONENTES CLAVE

PANEL DE CONTROL DE FÁCIL USO

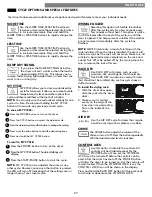
Gire el mando selector de ciclo para seleccionar el ciclo 

de secado que desee. Añada opciones de ciclo o


ajuste 

los valores tocando un botón.

PANTALLA DE TIEMPO Y ESTADO

La pantalla LED de fácil lectura muestra el estado 

del


ciclo y el tiempo restante estimado.

MODIFICADORES DE CICLO

Ajuste los valores predeterminados del ciclo como 

la


temperatura y nivel de secado tocando un botón.

NOTA:

 No todos los ajustes están disponibles para todos 

los ciclos.

COMPROBAR VENTILACIÓN

(Sistema de detección de bloqueo del conducto)
La COMPROBACIÓN DE VENTILACIÓN (sistema de 

detección de bloqueo del conducto) detecta y alerta 

sobre la existencia de bloqueos en el sistema de 

ventilación que reducen el flujo de aire de la secadora. 

Al mantener limpios los conductos del sistema de 

ventilación, mejora el rendimiento y necesitará una 

menor asistencia técnica, ahorrándole dinero.

TAMBOR DE ACERO DE CAPACIDAD GRANDE 

CON ILUMINACIÓN

El tambor de acero inoxidable de capacidad ultra 

grande proporciona una durabilidad superior. La 

iluminación del tambor se puede encender durante un 

ciclo pulsando el botón DRUM LIGHT situado en el


panel 

de control. La luz también se enciende al abrir la puerta, 

si el control está activado.

PUERTA REVERSIBLE DE FÁCIL ACCESO

La puerta de cristal transparente de amplia apertura 

facilita el acceso para realizar la carga y descarga. 

El giro de apertura de la puerta puede cambiarse 

de


sentido para ajustarse al lugar de instalación.

FILTRO DE PELUSAS DE MONTAJE FRONTAL

El filtro de pelusas de montaje frontal permite un acceso 

y limpieza más sencillos entre cargas.

PIES DE NIVELACIÓN

Los cuatro pies de nivelación (dos frontales y dos 

posteriores) se pueden ajustar para mejorar la 

estabilidad de la secadora sobre suelos irregulares.

Existen varios componentes importantes a los que se hace 

referencia en este manual.

A

B

C

D

E

F

G

H

Parte posterior de la secadora

Terminal 

block

access panel

(Electric 

models)

Gas 

connection

location

(Gas models)

Power cord 
location
(Gas 
models)

Exhaust 
duct
outlet

Water Inlet 
Valve

ACCESORIOS

Ubicación del 

cable

de alimentación

(modelos de gas)

Panel de acceso al

bloque de terminales

(modelos eléctricos)

Ubicación de la

toma de gas

(modelos de gas)

Salida del conducto

de evacuación


H

G

A D B

E

F

C


Included accessories

Optional accessories

Y connector

Hose

Drying rack

Side vent kit

(sold separately)

Kit No. 

17025

Use the side vent kit for venting 

directly to either side or to the 

bottom. Gas dryers can not be 

vented to the right. 

Utilice el kit de ventilación lateral para 

ventilar directamente a cualquiera 

de los lados o a la parte inferior. Las 

secadoras de gas sólo pueden ventilar 

a la izquierda. 

Accesorios incluidos

Accesorios opcionales

Y conector

Secado en parrilla

Manguera

Summary of Contents for 796.6141 Series

Page 1: ...7141 Kenmore Elite Dryer Secadora P N MFL67731011 Sears Brand Management Corporation Hoffman Estates IL 60179 U S A www kenmore com www sears com Use Care Guide Manual de Uso y Cuidado English Español color number numero de color ...

Page 2: ... is a risk free purchase If you cancel for any reason during the product warranty period we will provide a full refund or a prorated refund anytime after the product warranty period expires Purchase your Master Protection Agreement today Some limitations and exclusions apply For prices and additional information in the U S A call 1 800 827 6655 Coverage in Canada varies on some items For full deta...

Page 3: ...igarette or turn on any gas or electrical appliance 2 Do not touch any electrical switches Do not use any phones in your building 3 Clear the room building or area of all occupants 4 Immediately call your gas supplier from a neighbor s phone Carefully follow the gas supplier s instructions 5 If you cannot reach your gas supplier call the fire department Your safety and the safety of others is very...

Page 4: ... having an equipment grounding conductor and a grounding plug The plug must be plugged into an appropriate outlet that is properly installed and grounded in accordance with all local codes and ordinances Improper connection of the equipment grounding conductor can result in a risk of electric shock Check with a qualified electrician or service person if you are in doubt as to whether the appliance...

Page 5: ...ent backdraft when the dryer is not in use Failure to follow these instructions can result in fire or death Remove all packing items and dispose of all shipping materials properly Failure to do so can result in death fire explosion burns or death Place dryer at least 18 inches above the floor for a garage installation Failure to do so can result in fire explosion burns or death Keep all packaging ...

Page 6: ...ctrician to make sure the outlet is properly grounded Failure to follow these instructions can create an electrical shock hazard and or a fire hazard The dryer should always be plugged into its own individual electrical outlet which has a voltage rating that matches the rating plate This provides the best performance and also prevents overloading house wiring circuits which could cause a fire haza...

Page 7: ...rned on during a cycle by using the DRUM LIGHT button on the control panel The light also comes on when the door is opened if the control is ON EASY ACCESS REVERSIBLE DOOR The wide opening see through glass door provides easy access for loading and unloading Door swing can be reversed to adjust for installation location FRONT MOUNT LINT FILTER The front mount lint filter allows for easy access and...

Page 8: ...garage place the dryer at least 18 inches 45 7cm above the floor If using a pedestal you will need 18 inches 46 cm to the bottom of the dryer To reduce the risk of electric shock do not install the dryer in damp or wet locations Do not operate your dryer at temperatures below 45 F 7 C At lower temperatures the dryer might not shut off at the end of an automatic cycle This can result in longer dryin...

Page 9: ...8 6 cm 14 max 35 6 cm 21 1 4 54 cm 28 15 16 73 4 cm 50 1 4 127 5 cm 5 12 7 cm 40 3 16 102 cm INSTALLATION INSTRUCTIONS CLEARANCES continued Recommended installation spacing for cabinet installation For cabinet installation with a door minimum ventilation openings in the top of the cabinet are required Required spacing For side or bottom venting 2 inches 5 1 cm spacing is allowed 28 73 4 cm 7 17 8 ...

Page 10: ... follow this warning can result in fire explosion or death The power cord of this dryer is equipped with a 3 prong grounding plug which mates with a standard 3 prong grounding wall outlet to minimize the possibility of electric shock hazard from this appliance Failure to follow this warning can result in fire explosion or death This dryer must be plugged into a 120 VAC 60 Hz grounded outlet protec...

Page 11: ... fitting at the back of the dryer Be careful not to damage the threads of the gas connector when removing the shipping cap Connect the dryer to your laundry room s gas supply using a new flexible stainless steel connector with a inches NPT fitting NOTE DO NOT use old connectors Securely tighten all connections between the dryer and your laundry room s gas supply Turn on your laundry room s gas sup...

Page 12: ...least 2 inches 5 cm and when venting the dryer to the outdoors the dryer can be installed with a clearance of 1 inch 2 5 cm at the sides and back of the dryer Please be aware that venting materials are not supplied with the dryer You should obtain the venting materials necessary for proper installation This dryer must be connected to a grounded metal permanent wiring system or an equipment groundi...

Page 13: ...N ALL SCREWS SECURELY Reinstall the terminal block access cover Attach the two hot leads black and red of the power cord to the outer terminal block screws Attach the neutral white wire to the center terminal block screw Connect the external ground if required by local codes to the green ground screw TIGHTEN ALL SCREWS SECURELY Reinstall the terminal block access cover Grounding through the neutra...

Page 14: ...ve the duct routed to another location that is within the venting guidelines DO NOT USE PLASTIC OR FOIL VENTING The transition duct from your dryer to the wall must be rigid or semi rigid metal ducting If your old transition duct is plastic or foil REPLACE IT with semi rigid metal ducting Using the DUCT LENGTH CHART below Find your vent hood type in the chart below Select the row that matches the ...

Page 15: ...s may result in unsatisfactory dryer performance All venting and ductwork beyond the exterior of the dryer is the responsibility of the consumer Product failure as a result of improper venting is not covered by the manufacturer s warranty Connecting the Dryer Vent Verify all ducts and elbows are clean and free from any blockages Measure duct length DO NOT exceed the maximum length listed in the Du...

Page 16: ...nd remove the washer hose b Connect the short hose to the Y conncetor using one of the hose washers c Connect the other end of the short hose to the cold water faucet d Connect the long dryer hose to one side of theY con nector and connect the washer hose to the other side WITHOUT WASHER If the dryer does not share the cold water tap with a washer a Connect the straight end of the long hose to the...

Page 17: ...ding the leveling feet more than necessary can cause the dryer to vibrate WARNING Level Leveling Feet Position the dryer in the final location Place a level across the top of the dryer All four leveling feet must rest solidly on the floor Gently push on the top corners of the dryer to make sure that the dryer does not rock from corner to corner 1 Use a wrench to turn the leveling feet Turn the lev...

Page 18: ... damage to the door or the work surface With the door on a protected surface remove the 12 screws on each side of the door and lift off the inner door frame using a flat blade screwdriver Remove the latch hook and blank and move them to the opposite side Remove the four screws securing the hinges to the door frame Remove the two plastic cover caps on the side opposite the hinges Reinstall the hinge...

Page 19: ...the dryer on a heat setting When the dryer starts the igniter should ignite the main burner NOTE If all air is not purged from the gas line the gas igniter may turn off before the main burner ignites If this happens the igniter will reattempt gas ignition until all the air is purged from the gas line ELECTRIC MODELS Close the dryer door press the POWER button to turn the dryer on and start the drye...

Page 20: ...DRY cycles are modified using the Dry Level button TIME AND STATUS DISPLAY The display shows the estimated time remaining for auto cycles and actual time for timed cycles The status of the cycle is also displayed The CHECK VENT indicator will illuminate if there is a serious restriction in the exhaust system MORE TIME LESS TIME BUTTONS Use these buttons with the TIMED DRY and other MANUAL DRY cycl...

Page 21: ...ll be the actual time remaining CHECK FILTER LIGHT The CHECK FILTER light will blink before each load as a reminder to check the lint filter Always clean the lint filter before every cycle CYCLE STATUS INDICATORS This portion of the display shows which stage of the drying cycle is currently under way DRYING or COOLING A B CONTROL LOCK INDICATOR When CONTROL LOCK is set the CONTROL LOCK indicator w...

Page 22: ...cle will be shown in the display On MANUAL DRY cycles these settings can be adjusted using the cycle setting buttons anytime before starting the cycle NOTE Not all options or modifiers are available on all cycles Refer to the cycle guide page for default settings and allowable options A different chime will sound and the LED will not illuminate if the selection is not allowed 5 BEGIN CYCLE Press th...

Page 23: ...asoline or other flammable substances Washing clothes will not completely remove oil residues Failure to obey this warning can result in fire explosion or death Loading Tips Combine large and small items in the same load Damp clothes will expand as they dry Do not overload the dryer clothes require room to tumble and dry properly Close zippers hooks and drawstrings to prevent these items from snag...

Page 24: ... corduroys etc Medium Normal 41 Adjustable Delicates Lingerie sheets blouses Low Normal 28 Adjustable Towels Towels heavy cottons denims Extra High Normal 55 Adjustable Small Load Only normal cotton towel fabric type Max 3 lb Extra High Normal 30 Adjustable Bulky Bedding Comforters pillows shirts Medium Normal 55 Adjustable Sanitize Do not use this cycle with delicate fabrics Extra High Extra Dry ...

Page 25: ...ry For small loads with short drying times Extra High Off 25 Adjustable Adjustable Air Dry For items that require heat free drying such as plastics or rubber Air Only Off 30 Adjustable For loads that require a specific dry time Extra High Off 40 Adjustable Adjustable The cycle guide below shows the available options and recommended fabric types for TIMED DRY cycles CYCLE GUIDE available option defaul...

Page 26: ...ly to scroll through available settings Use this button to adjust the dryness of the articles in the load to your preference This option is not available with TIMED DRY cycles The dryer will automatically adjust the cycle time Selecting EXTRA DRY will increase the cycle time and dry level while DAMP DRY will decrease the cycle time and dry level Use the DAMP DRY setting for items that you wish to ...

Page 27: ... LED will turn off indicating that the settings are no longer those of your saved cycle WRINKLE GUARD Selecting this option will tumble the clothes after the cycle ends for a few seconds every few minutes without heat This option is active for 150 minutes after the end of the cycle or until the door is opened This helps prevent wrinkles if the clothes are not removed immediately after the cycle has...

Page 28: ...er to iron STEAM REFRESH can also be used to help reduce odors in fabrics Use this feature with small loads 1 4 items Using the WRINKLE FREE cycle Use the WRINKE FREE cycle to reduce wrinkles including from loads left in the dryer too long This is helpful when you forget to remove items from the dryer immediately The WRINKLE FREE cycle can reduce the wrinkles in 18 minutes using steam Use this fea...

Page 29: ...ol or abrasive cleansers they can scratch or damage the surface Cleaning Around and Under the Dryer Vacuum lint and dust from around the dryer and underneath it regularly Cleaning the Lint Filter ALWAYS make sure the lint filter is clean before every cycle The CHECK FILTER light on the control panel will blink before every cycle to remind you NOTE NEVER operate the dryer without the lint filter To...

Page 30: ... and Duct Cleaning Call 1 800 661 6594 to schedule duct cleaning service from Sears if it is available in your area MAINTAINING THE EXHAUST SYSTEM CHECK VENT Operation The CHECK VENT system uses components already in the dryer By monitoring these components over the course of several cycles the control is able to determine how much restriction there is in the exhaust system If it detects a high le...

Page 31: ...nnect Team This gives you the capability of speaking directly to our specially trained technicians The technician records the data transmitted from your machine and uses it to analyze the issue providing a fast and effective diagnosis If you experience problems with your dryer call 1 800 4 MY HOME Only use the Kenmore Connect System feature when instructed to do so by the Kenmore Connect Team The t...

Page 32: ...e fuse capacity If the problem is a circuit overload have it corrected by a qualified electrician Dryer does not heat House fuse is blown circuit breaker has tripped or power outage has occurred Gas supply or service is turned off gas models only Reset circuit breaker or replace fuse Do not increase fuse capacity If the problem is a circuit overload have it corrected by a qualified electrician NOTE...

Page 33: ...e loads that produce high amounts of lint such as new bath towels it may be necessary to pause the cycle and clean the filter during the cycle Reset circuit breaker or replace fuse Do not increase fuse capacity If the problem is a circuit overload have it corrected by a qualified electrician NOTE Due to the design of electric dryers it is possible for a circuit problem to allow an electric dryer t...

Page 34: ...arge loads into smaller loads for drying Check pockets thoroughly before washing and drying clothes Excess static in clothes after drying Fabric softener is not used or used incorrectly Clothes dried too long over dried Drying synthetics permanent press or synthetic blends Use a fabric softener or the STATIC SHIELD option if equipped to reduce static electricity Be sure to follow the manufacturer ...

Page 35: ...n all instructions supplied with the product 7 Damage to or failure of parts or systems resulting from unauthorized modifications made to this product Disclaimer of implied warranties limitation of remedies Customer s sole and exclusive remedy under this limited warranty shall be product repair as provided herein Implied warranties including warranties of merchantability or fitness for a particula...

Page 36: ...rato durante el plazo de garantía del producto le devolveremos todo el importe o bien una cantidad prorrateada una vez que haya finalizado el plazo de garantía del producto Adquiera hoy mismo su contrato maestro de protección Se aplican ciertas limitaciones y exclusiones Para consultar las tarifas y obtener más información en EE UU llame al 1 800 827 6655 La cobertura en Canadá varía en algunos as...

Page 37: ...abitación edificio o zona 4 Llame inmediatamente a la compañía de gas utilizando el teléfono de un vecino Siga atentamente las instrucciones de la compañía de gas 5 Si no puede ponerse en contacto con la compañía de gas llame a los bomberos Su seguridad y la de los demás es muy importante Hemos incluido numerosos mensajes de seguridad en este manual sobre su electrodoméstico Lea y cumpla siempre t...

Page 38: ...e que disponga de un conductor de conexión a tierra del equipo y un enchufe con conexión a tierra El enchufe debe conectarse a una toma de corriente adecuada que esté correctamente instalada y con conexión a tierra según las normativas y las ordenanzas locales ADVERTENCIA Una conexión inadecuada del conductor de conexión a tierra del equipo puede ocasionar un riesgo de descarga eléctrica Consulte ...

Page 39: ...o de descarga cuando no se usa la secadora Si no se siguen estas instrucciones se podrá producir incendio o muerte Quite todos los elementos de embalaje y deseche adecuadamente todos los materiales de envío Si no se cumple con esto se podrá producir una explosión incendio quemaduras o muerte Coloque la secadora a una altura mínima de 46 cm 18 pulgadas sobre el suelo para una instalación en el gara...

Page 40: ...o que controle la toma de corriente y el circuito eléctrico para asegurarse de que la toma de corriente está correctamente conectada a tierra Si no se siguen estas instrucciones se podrán producir descargas eléctricas y o riesgo de incendio La secadora debe estar siempre enchufada a su toma de corriente individual con la clasificación de tensión correspondiente a la placa de datos de servicio De e...

Page 41: ... DE FÁCIL ACCESO La puerta de cristal transparente de amplia apertura facilita el acceso para realizar la carga y descarga El giro de apertura de la puerta puede cambiarse de sentido para ajustarse al lugar de instalación FILTRO DE PELUSAS DE MONTAJE FRONTAL El filtro de pelusas de montaje frontal permite un acceso y limpieza más sencillos entre cargas PIES DE NIVELACIÓN Los cuatro pies de nivelac...

Page 42: ...ra abrir la puerta Descripción Secadora Secadora gas y eléctrica Requisitos eléctricos Consulte la etiqueta de especificaciones Requerimientos de gas NG 4 10 5 pulgadas de columna de agua Requerimientos de gas LP 8 13 pulgadas de columna de agua Dimensiones 68 6 cm ancho X 73 4 cm largo X 102 cm alto 127 5 cm S con la puerta abierta 27 pulgadas ancho X 28 15 16 pulgadas largo X 40 3 16 pulgadas al...

Page 43: ... 21 1 4 54 cm 28 15 16 73 4 cm 50 1 4 127 5 cm 5 12 7 cm 40 3 16 102 cm INSTRUCCIONES DE INSTALACIÓN DISTANCIAS DE SEPARACIÓN continuación Separación recomendada para la instalación en un habitáculo cerrado Al realizar la instalación en un habitáculo cerrado debe haber salidas de ventilación mínimas en la parte superior e inferior del lugar Espacio requerido Para la ventilación lateral e inferior ...

Page 44: ...alimentación de esta secadora está equipado con un enchufe de tres clavijas de puesta a tierra que coincide con una toma de corriente para tres clavijas de puesta a tierra para así minimizar la posibilidad de descarga eléctrica de este electrodoméstico Si no se sigue esta advertencia podrían ocasionarse riesgos de explosión incendio o incluso muerte Esta secadora debe enchufarse a una toma de pare...

Page 45: ...ese de no dañar las roscas del conector de gas al retirar el tapón de transporte 3 Conecte la secadora al suministro de gas del lavadero utilizando un conector de acero inoxidable flexible con un adaptador NPT de pulgadas NOTA NO utilice conectores viejos 4 Apriete firmemente todas las conexiones entre la secadora y el suministro de gas de su lavadero 5 Abra el suministro de gas del lavadero 6 Com...

Page 46: ...acio libre de 1 pulgadas 2 5 cm a los lados y la parte trasera de la secadora Tenga en cuenta que los materiales de ventilación no se proveen con la secadora Debe obtener los materiales de ventilación necesarios para una instalación adecuada Esta secadora debe conectarse a un sistema de cableado permanente metálico con conexión a tierra o se debe tender un conductor para la conexión a tierra del e...

Page 47: ...a tapa de acceso al bloque de terminales 4 Fije los dos cables activos negro y rojo del cable de alimentación a los tornillos del bloque de terminales exteriores 5 Fije el cable neutro blanco al tornillo central del bloque de terminales 6 Conecte la puesta a tierra externa si lo exigen las normativas locales al tornillo verde de conexión a tierra 7 APRIETE FIRMEMENTE TODOS LOS TORNILLOS 8 Vuelva a...

Page 48: ...s demasiado largo Si lo es rediríjalo de forma que cumpla las directrices de ventilación NO UTILICE CONDUCTOS DE VENTILACIÓN DE PLÁSTICO O LÁMINA METÁLICA El conducto de paso desde su secadora a la pared debe ser rígido o semirrígido Si su viejo conducto de paso es de plástico o de lámina metálica SUSTITÚYALO por un conducto metálico semirrígido Uso del CUADRO DE LONGITUDES DEL CONDUCTO a continua...

Page 49: ...s incluidas en estas instrucciones el rendimiento de la unidad podría no ser satisfactorio Toda la ventilación y conductos externos a la propia secadora son responsabilidad del consumidor Los fallos en el producto como consecuencia de una ventilación inadecuada no quedan cubiertos por la garantía del fabricante Conexión del conducto de ventilación de la secadora 1 Compruebe que todos los conductos...

Page 50: ...lavadora a Cierre el grifo del agua fría y retire la manguera de la lavadora b Conecte la manguera corta al conector Y mediante una de las mangueras de la lavadora c Conecte la otra extremidad de la manguera corta al grifo de agua fría d Conecte la manguera larga de la secadora a un lateral del conector Y y conecte la manguera de la lavadora al otro lateral SIN LAVADORA si la secadora no comparte ...

Page 51: ...s pies de nivelación más de lo necesario se pueden provocar vibraciones en la secadora 1 Coloque la secadora en su ubicación final Coloque un nivel sobre la parte superior de la secadora Los cuatro pies de nivelación deben apoyarse firmemente sobre el suelo Presione ligeramente las esquinas superiores de la secadora para asegurarse de que no existe desequilibrio entre ellas ADVERTENCIA Nivel Pies ...

Page 52: ...cie como la puerta Con la puerta colocada sobre una superficie protegida retire los 16 tornillos de cada lado de la puerta y retire el panel interior de la puerta con un destornillador de punta plana Retire el enganche y la pieza y llévelas al lado opuesto Retire los cuatro tornillos que fijan las bisagras a la estructura de la puerta Retire las dos cubiertas de plástico del lado opuesto a las bis...

Page 53: ...calor Cuando inicia la secadora el encendedor deberá encender el quemador principal NOTA Si no se purga todo el aire procedente de la toma de gas el generador de chispas de gas podría apagarse antes de encender el quemador principal Si esto ocurre el generador de chispas volverá a intentar encender el gas hasta que se purgue todo el aire procedente de la toma de gas MODELOS ELÉCTRICOS Cierre la pu...

Page 54: ...ar manteniendo presionado el botón CONTROL LOCK durante cinco segundos BOTONES MODIFICADORES DEL CICLO Utilice estos botones para seleccionar las configuraciones del ciclo deseado para el ciclo seleccionado Las configuraciones actuales se muestran en el visualizador El ajuste de temperatura por defecto no se puede cambiar en los ciclos de AUTO DRY Ciclos de AUTO DRY se modifican con el botón Dry L...

Page 55: ...EL FILTRO DE PELUSAS El indicador CHECK FILTER parpadeará antes de cada carga para recordarle que compruebe el filtro de pelusas Limpie siempre el filtro de pelusas antes de cada ciclo INDICADORES DE ESTADO DEL CICLO Esta sección de la pantalla muestra la fase del ciclo en curso DRYING o COOLING Secado o enfriamiento INDICADOR DE CERRADURA A PRUEBA CONTROL LOCK Cuando se ha fijado el CONTROL LOCK ...

Page 56: ...ualizarán para ese ciclo Ya se pueden modificar las configuraciones por defecto para el ciclo seleccionado si se desea Refiérase a las configuraciones del ciclo y la página de opciones para más detalles NOTA No todas las opciones o modificadores están disponibles en todos los ciclos Refiérase à la página de la guía sobre Ciclos para configuraciones por defecto y opciones permisibles Una campanilla...

Page 57: ...do de las prendas no eliminará completamente la presencia de residuos de aceite Si no sigue esta advertencia pueden ocasionarse incendios explosiones o incluso peligro de muerte Consejos útiles para cargar la secadora Mezcle prendas grandes y pequeñas en la misma carga Las prendas húmedas aumentarán de volumen al secarse No cargue en exceso la secadora las prendas requieren espacio para girar y se...

Page 58: ...umedad en las prendas y ajusta el tiempo de secado necesario para obtener resultados óptimos La secadora ajusta automáticamente el nivel de secado y la temperatura en los valores recomendados para cada ciclo El tiempo estimado restante aparecerá en la pantalla INSTRUCCIONES DE USO Modifiers Options Tipo Ciclo Tipo de tela Temperatura Nivel de secado Tiempo en Min Más Tiempo Menos Tiempo Cuidado de...

Page 59: ...er sus prendas no todos los niveles de temperatura y opciones están disponibles para todos los ciclos Los ajustes de temperatura no se pueden modificar Sonará un aviso sonoro diferente y el LED no se iluminará si no se permite una determinada selección opción disponible ajuste predeterminado Modificadores Opciones Tipo Ciclo Tipo de tela Temperatura Nivel de secado Tiempo en min Más menos tiempo C...

Page 60: ...ara ajustar el tipo de secado que prefiera para las prendas de la carga Esta opción no está disponible para los ciclos de secado manual La secadora ajustará automáticamente el tiempo de duración del ciclo Seleccionar EXTRA DRY muy seco incrementará el tiempo de duración del ciclo mientras DAMP DRY seco húmedo reducirá el tiempo y el nivel de secado Utilice los ajustes DAMP DRY seco húmedo para pre...

Page 61: ...personalizado se puede ajustar de la misma manera que cualquier otro ciclo No obstante una vez que se presiona cualquier otro botón el LED se apagará para indicar que los ajustes ya no coinciden exactamente con los del ciclo personalizado WRINKLE GUARD ANTIARRUGAS Si selecciona esta opción la secadora continuará girando con las prendas en su interior durante unos segundos cada pocos minutos sin ca...

Page 62: ...ESH también puede usarse para reducir los olores en las telas Utilice esta función con cargas pequeñas 1 a 4 artÍculos Utilizar el ciclo SIN ARRUGAS Utilícelo para reducir las arrugas incluso de las cargas que se quedaron demasiado tiempo en la secadora Esto es útil cuando se olvida de quitarse la ropa de la secadora inmediatamente El ciclo puede reducir las arrugas en 18 minutos con vapor Utilice...

Page 63: ...indicador CHECK FILTER del panel de control parpadeará antes de cada ciclo para recordárselo NOTA No utilice NUNCA la secadora sin el filtro de pelusas instalado Limpieza del filtro de pelusas Para eliminar las pelusas entre ciclos Abra la puerta de la secadora Tire hacia arriba del filtro de pelusas Elimine los restos de pelusa del filtro con los dedos Limpieza exhaustiva periódica Con el paso de...

Page 64: ... o el mantenimiento de la ventilación externa Sears ofrece este servicio mediante Sears Carpet Upholstery and Duct Cleaning Llame al 1 800 661 6594 para solicitar el servicio de manteni miento de conductos de Sears si está disponible en su zona MANTENIMIENTO DEL SISTEMA DE VENTILACIÓN Funcionamiento de CHECK VENT El sistema CHECK VENT utiliza componentes que ya se encuentran en la secadora Mediant...

Page 65: ...nmore Connect Así podrá hablar directamente con nuestros técnicos especializados El técnico graba los datos transmitidos desde la máquina y los utiliza para analizar el problema ofreciendo un diagnóstico rápido y eficaz Si experimenta problemas con la secadora llame al 1 800 4 MY HOME Sólo utilice el sistema Kenmore Connect cuando se lo pida el equipo de Kenmore Connect Los sonidos de transmisión ...

Page 66: ...sible ha saltado el disyuntor o se ha producido un corte de suministro eléctrico en la vivienda Compruebe que el enchufe esté conectado firmemente a una toma de pared con conexión de conexión a tierra que coincida con la placa de especificaciones de la secadora Reinicie el disyuntor o sustituya el fusible No aumente la capacidad del fusible Si el problema es una sobrecarga del circuito haga que lo...

Page 67: ...lusa sujete el filtro al trasluz para comprobar si está sucio u obstruido Si parece sucio siga las instrucciones de limpieza proporcionadas Con ciertas cargas que generan grandes cantidades de pelusa como unas toallas de baño nuevas podría ser necesario detener el ciclo y limpiar el filtro durante el transcurso del mismo Reinicie el disyuntor o sustituya el fusible No aumente la capacidad del fusi...

Page 68: ...da Se han dejado pañuelos papeles etc en los bolsillos Elimine las pelusas del filtro antes de cada carga Tras eliminar la pelusa sujete el filtro al trasluz para comprobar si está sucio u obstruido Si parece sucio siga las instrucciones de limpieza proporcionadas Con ciertas cargas que generan grandes cantidades de pelusa podría ser necesario limpiar el filtro durante el ciclo Algunos tejidos pro...

Page 69: ... voluminosas individuales No mezcle distintos de tejidos El ciclo STEAM REFRESH es más eficaz en tejidos con mezcla 70 30 de algodón poliéster No utilice prendas de algodón 100 Este ciclo está diseñado para eliminar las arrugas Si tras el ciclo STEAM REFRESH desea crear rayas o marcas en sus prendas deberá plancharlas para que así sea El vapor en invisible Sin embargo bajo ciertas condiciones la n...

Page 70: ...l producto 7 Daños o fallas de los componentes o sistemas como resultado de modificaciones hechas sin autorización a este producto Descargo de responsabilidad de garantías implícitas limitación de acciones legales El único y exclusivo recurso del cliente bajo esta garantía limitada será la reparación del producto como se indica en la presente Las garantías implícitas incluyendo garantías de comerc...

Page 71: ...71 ...

Page 72: ... owner s manuals that you need to do it yourself For Sears professional installation of home appliances and items like garage door openers and water heaters 1 800 4 MY HOME 1 800 469 4663 Call anytime day or night U S A and Canada www sears com www sears ca Our Home For repair of carry in items like vacuums lawn equipment and electronics call anytime for the location of your nearest Sears Parts Re...

Reviews: