background image

21

Oven Controls

Changing Temperature Display (ºF or ºC)

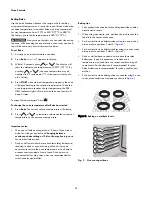
The electronic oven control is set to display °F (Fahrenheit) when 
shipped from the factory. The display may be changed to show 
either Fahrenheit or ºC (Celsius) oven temperatures.

To change temperature display mode from °F to °C or from 
°C to °F

1.

Press 

Broil

HI 

appears in the display.

2.

Press and hold 

Broil

 until 

F

 or 

C

 appears in the display.

3.

Press either 

 or 

 to toggle between 

F

 or 

C

 mode 

choices. 

4.

Press 

START 

to accept change. The display will return to 

the time of day.

Important note:

The temperature display mode cannot be changed when the 
oven is set for cooking.

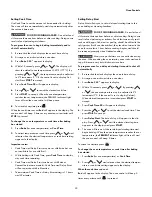
Oven Lock

The OVEN LOCK feature allows you to lock the oven portion of 
the appliance while the oven is not in use.                                 

To activate OVEN LOCK feature

:

1.

Be sure the door is completely closed.

2.

Press and hold 

 and 

 together for 3 seconds.

 Loc 

will appear in the display. The 

OVEN LOCK 

indicator light 

will flash while the motor driven door latch begins locking 
the oven door. Do not open the door during this time. Allow 
15 seconds for the door to completely lock. Once oven 
door is locked, the time of day will appear in the display.

To cancel the OVEN LOCK feature

1.

Press and hold 

 and 

 together for 3 seconds. The 

OVEN LOCK

 indicator light will flash and the motor driven 

door latch will begin to unlock. Do not open the door at this 
time. The door will unlock completely in about 15 seconds.

2.

The oven control keys will be available and the oven door 
can be opened again.

Important notes:

To avoid possible damage to the oven door latch 
mechanism, do not attempt to open of close the oven door 
whenever the OVEN LOCK indicator light is flashing.

If a control key is pressed when the OVEN LOCK is active, 

Loc

 will appear in the display as a reminder that the oven 

keys are inactive when the OVEN LOCK feature is active.

Changing between continuous bake setting or 12-Hour 

Energy Saving feature

The oven control has a factory-preset 12-Hour Energy Saving 
feature that will turn the oven off automatically if the oven is 
left on for more than 12 hours. The control may be programmed 
to override this feature to continuously bake.

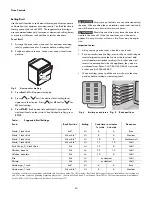
To set continuous bake mode or 12hr Energy Saving:

Press and hold 

Timer Set/Off

 until the control beeps once 

(about 6 seconds). 

- - hr

 will appear in display. The control 

is set for 

continuous bake.

 Press 

Clean

 key to toggle 

between 

continuous bake

 and 

12hr Energy Saving.

To save the selected mode press 

START.

 The display will 

return to idle.

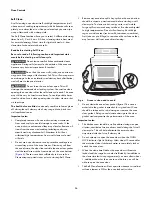
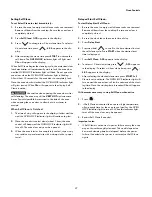
Setting Timer

 The timer may be set from 1 minute up to 11 hours and 59 min-
utes. 

To set the timer

1.

Press 

Timer Set/Off

.

2.

Press and hold 

 to increase the time. Release 


when the desired time appears in the display. 

3.

Press 

START

 and timer will begin to count down.

4.

When the set time has run out, the Timer will sound with 3 
beeps and will continue to beep 3 times every 60 seconds 
until 

Timer Set/Off

 is pressed.

To change time remaining in Timer, press and hold 

 or 

 to increase or decrease any time remaining.

To cancel the Timer before at any time, press 

Timer Set/Off


once.

Important notes:

The timer does not start or stop the cooking process. It 
serves as an extra timer in the kitchen that will beep when 
the set time has run out. The timer may be used alone or 
when any other oven function is active.

The indicator light located above 

Timer Set/Off

 will glow 

when the timer is active.

The timer will display hours and minutes until 1 hour 
remains. When less than 1 hour remains, the display will 
count down in minutes and seconds. Once the timer has less 
than 1 minute remaining only seconds will display.

If the timer is active when oven cooking, the minute timer 
will show in the display by default. To view information of 
any other active oven function, press the key once for the 
active function to view status.

Summary of Contents for 790.9262

Page 1: ...eléctrica color number número de color Use Care Guide Manual de Uso y Cuidado English Español Model Modelo 790 9262 P N 808530004 Rev A Sears Brands Management Corporation Hoffman Estates IL 60179 U S A www kenmore com www sears com ...

Page 2: ...o instruct the user in correct appliance installation operation and maintenance 6 6 Service calls to correct appliance installation not performed by Sears authorized service agents or to repair problems with house fuses circuit breakers house wiring and plumbing or gas supply systems resulting from such installation 7 7 Damage to or failure of this appliance resulting from installation not perform...

Page 3: ...y hazardous situation which if not avoided may result in death or serious injury Indicates a potentially hazardous situation which if not avoided may result in minor or moderate injury IMPORTANT Indicates installation opera tion maintenance or valuable information that is not hazard related NOTE Indicates a short informal reference something written down to assist the memory or for future referenc...

Page 4: ...not use an adapter plug use an extension cord or remove grounding prong from the power cord Failure to follow this warning may cause serious injury fire or death Proper Installation Be sure your appliance is properly installed and grounded by a qualified technician In the United States install in accordance with the National Fuel Gas Code ANSI Z223 1 NPFA No 54 latest edition and National Electric...

Page 5: ...other injury An open drawer when hot may cause burns Stepping leaning or sitting on the door or drawers of this appliance can result in serious injuries and also cause damage to the appliance Never cover any slots holes or passages in the oven bottom or cover and entire rack with materials such as aluminum foil Doing so blocks air flow through the oven and may cause carbon monoxide poisoning Alumi...

Page 6: ... so that it is turned inward and does not extend over other cooking areas Use proper pan size This appliance is equipped with one or more surface units of different sizes Select cookware with flat bottoms that match the surface unit size Using the proper cookware on the cooking area will improve efficiency Glazed cooking utensils Only certain types of glass glass ceramic ceramic earthen ware or ot...

Page 7: ...s allow dripping fat to drain away from the high heat of the broiler Do not cover the broiler insert with aluminum foil exposed fat and grease could ignite Do not cook food on the oven bottom Always cook in proper cookware and always use the oven racks IMPORTANT INSTRUCTIONS FOR CLEANING YOUR APPLIANCE Before manually cleaning any part of the appliance be sure all controls are turned off and the a...

Page 8: ...ce Always contact your dealer distributor service agent or manufacturer about problems or conditions you do not under stand Ask your dealer to recommend a qualified technician and an authorized repair service Know how to disconnect the power to the appliance at the circuit breaker or fuse box in case of an emergency Remove the oven door from any unused oven if it is to be stored or discarded Do no...

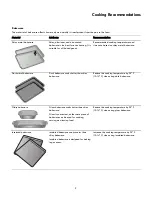
Page 9: ...k metal bakeware Dark bakeware cooks hotter than shiny bakeware Reduce the cooking temperature by 25 F 13 14 C when using dark bakeware Glass bakeware Glass bakeware cooks hotter than shiny bakeware Glass is convenient as the same piece of bakeware can be used for cooking serving and storing food Reduce the cooking temperature by 25 F 13 14 C when using glass bakeware Insulated bakeware Insulated ...

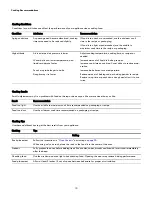
Page 10: ...ature Reduce amount of baking soda or baking powder in recipe Reduce rising time or punch down dough and allow it to rise twice Cooking Results Small adjustments may fix a problem with food not being as done as you like or more done than you like Result Recommendation Food too light Use the middle to maximum cook time recommended on packaging or recipe Food too dark Use the minimum cook time recom...

Page 11: ...esigned to drain the fat from the food help avoid spatter and reduce smoking The broiler pan will catch grease spills and the insert helps prevent grease splatters If a broiler pan and insert are not supplied with this appliance they may be purchased from Sears Call 1 844 553 6667 and order broiler pan kit 5304442087 Cooking Tips ...

Page 12: ...metal Heating characteristics will vary depending on base material Porcelain enamel coating must be smooth to avoid scratching ceramic cooktops Glass Slow heat conductor Not recommended for ceramic cooktop surfaces because it may scratch the glass Important note Do not place empty aluminum glass or porcelain enamel coated cookware on the ceramic cooktop The melting point of cookware made with thes...

Page 13: ...ents the glass surface may discolor when the element is turned off This is normal and the glass will return to its original white color after it has completely cooled down About the Radiant Surface Elements The element temperature rises gradually and evenly As the temperature rises the element will glow red To maintain the selected setting the element will cycle on and off The heating element reta...

Page 14: ...type of element underneath The elements on your cooktop depend on the model A single radiant element has one circle A dual radiant element some models has two circles The dual radiant element may be set using only the smaller inner element or both inner and outer elements may be set to heat together for a larger surface A triple radiant element some models has three circles The element may be set ...

Page 15: ...c cooktop Radiant surface elements may appear to have cooled after they have been turned off The glass surface may still be hot and burns may occur if the glass surface is touched before it has cooled sufficiently Do not place flammable items such as plastic salt and pepper shakers spoon holders or plastic wrappings on top of the range when it is in use These items could melt or ignite Potholders ...

Page 16: ...cooled sufficiently Do not place flammable items such as plastic salt and pepper shakers spoon holders or plastic wrappings on top of the range when it is in use These items could melt or ignite Potholders towels or wooden spoons could catch fire if placed too close to the surface elements Important note Do not allow aluminum foil or ANY material that can melt to make contact with the ceramic glas...

Page 17: ... or ignite Potholders towels or wooden spoons could catch fire if placed too close to the surface elements Important note Do not allow aluminum foil or ANY material that can melt to make contact with the ceramic glass cooktop If these items melt on the cooktop they will damage the ceramic cooktop Home Canning Be sure to read and observe all the following points when home canning with your applianc...

Page 18: ...18 Setting Surface Controls ...

Page 19: ...he slide ability of the oven racks may be damaged and all of the oven racks will lose their shiny finish To prevent possible damage to the oven do not attempt to close the oven door until all the oven racks are fully positioned back inside the oven cavity Types of oven racks Flat oven racks may be used for most cooking needs and may be placed in most oven rack positions The offset oven rack some m...

Page 20: ...specific amount of time needed for cooking Automatically cancels cooking process at end of set time 15 Delay Start Use with Bake and Self Clean functions to program a delayed start bake or delayed start self clean cycle 16 Warm Zone Use to turn the surface Warm Zone on and off Setting Clock When the appliance is first powered up or when the power sup ply to the appliance has been interrupted 12 00...

Page 21: ... when the OVEN LOCK feature is active Changing between continuous bake setting or 12 Hour Energy Saving feature The oven control has a factory preset 12 Hour Energy Saving feature that will turn the oven off automatically if the oven is left on for more than 12 hours The control may be programmed to override this feature to continuously bake To set continuous bake mode or 12hr Energy Saving Press ...

Page 22: ...e the current set temperature to the new oven temperature Important notes The oven will bake no longer than 12 hours If you wish to bake for a longer period see Changing between continuous bake setting or 12 Hour Energy Saving mode for detailed information Dark or dull pans absorb more heat than shiny bakeware resulting in dark or over browning of foods It may be necessary to reduce the oven tempe...

Page 23: ... setting is 11 hours and 59 minutes Setting Delay Start Delay Start allows you to set a delayed starting time to the oven baking or cleaning functions FOOD POISONING HAZARD Do not let food sit for more than one hour before or after cooking Doing so can result in food poisoning or sickness Foods that can easily spoil such as milk eggs fish meat or poultry should be chilled in the refrigerator first...

Page 24: ...ven is cool For best results when broiling use a broil pan with broil pan insert designed to drain the fat from the food and help avoid spatter and reduce smoking If a broiler pan and insert are not supplied with this appliance they may be purchased from Sears Call 1 844 553 6667 and order broiler pan kit 5304442087 When broiling always pull the oven rack out to the stop position before turning or...

Page 25: ...en light see Replacing oven light in the Care and Cleaning section Adjusting oven temperature Your appliance has been factory calibrated and tested to ensure an accurate baking temperature For the first few uses follow your recipe times and temperature recommendations carefully If you think the oven is cooking too hot or too cool for your recipe times you may adjust the UPO user programmable offse...

Page 26: ...eratures from a self clean cycle and will melt Do not use oven cleaners or oven protective coatings in or around any part of the oven interior Clean any soil from the oven frame the door liner outside the oven door gasket and the small area at the front center of the oven bottom Figure 6 These areas heat sufficiently to burn soil on Clean using soap and water prior to starting Self Clean Remove an...

Page 27: ... will beep and the OVEN LOCK indicator light will turn off The oven door may now be opened 3 When the oven interior has completely cooled wipe away any residue or powdered ash with a damp cloth or paper towel Delayed Start Self Clean To start Delay Start Self Clean 1 Be sure the oven is empty and all oven racks are removed Remove all items from the cooktop Be sure oven door is completely closed 2 ...

Page 28: ... or a 50 50 solution of vinegar and water To remove control knobs turn to the OFF position grasp firmly and pull off the shaft To replace knobs after cleaning line up the OFF markings and push the knobs into place Stainless Steel Using a soft cloth clean with mild dish detergent and water or a 50 50 solution of vinegar and water Rinse with clean water dry with a soft clean cloth Do not use cleaner...

Page 29: ...nterior door glass Do not immerse the door in water Do not spray or allow water or cleaners to enter the door vents Do not use oven cleaners cleaning powders or any harsh abrasive cleaning materials on the outside of the oven door Do not clean the oven door gasket The oven door gasket is made of a woven material which is essential for a good seal Do not rub damage or remove this gasket Ceramic coo...

Page 30: ... may cause it to crack Cooktop Cleaning Do not use a cooktop cleaner on a hot cooktop The fumes can be hazardous to your health and can chemically damage the ceramic glass surface Before cleaning the cooktop be sure the controls are turned to OFF and the cooktop is cool The glass surface could be hot and burns may occur if the glass surface is touched before it has cooled sufficiently For light to...

Page 31: ...r any circumstances Aluminum utensils The melting point of aluminum is much lower than that of other metals Care must be taken when aluminum pots or pans are used on the cooktop If aluminum pans are allowed to boil dry when using the cooktop not only will the utensil be damaged or destroyed but it may fuse to break or mark the ceramic glass surface permanently damaging the cooktop surface Cleaning...

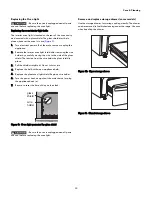
Page 32: ...2 Holding the oven door at the same angle as the removal position seat the hook of the hinge arm over the roller pins located on each side of the oven door frame See Figure 7 and Figure 8 The hook of the hinge arms must be fully seated onto the roller pins 3 Fully open the oven door horizontal with floor See Figure 5 4 Push the door hinge locks up towards and into the oven frame on both left and r...

Page 33: ...ion from the wire holds the glass shield in place 3 Pull the shield straight out Do not twist or turn 4 Replace the bulb with a new appliance bulb 5 Replace the glass oven light shield Replace wire holder 6 Turn the power back on again at the main source or plug the appliance back in 7 Be sure to reset the time of day on the clock Be sure the oven is unplugged and all parts are cool before replaci...

Page 34: ...ling but do not cut into lean Grease build up on oven surfaces Regular cleaning is necessary when broiling frequently Grease or food splatters will cause excessive smoking Oven control panel beeps and displays any F or E code error Oven control has detected a fault or error condition To clear the error press the OFF key on the control panel Once the error code is cleared try the bake or broil func...

Page 35: ...een used Apply cooktop cleaning creme to the ceramic surface Buff with a non abrasive cloth or sponge Cookware with a rough bottom was used Use smooth flat bottomed cookware Metal marks on the cooktop Sliding or scraping of metal utensils on cooktop surface Do not slide metal utensils on the cooktop surface Apply cooktop cleaning creme to the ceramic surface Buff with a non abrasive cloth or spong...

Page 36: ...nge appear not level Be sure cabinets are square and have sufficient room for appliance clearance Cannot move appliance easily Appliance must be accessible for service Cabinets not square or are built in too tightly Contact the builder or installer to make the appliance accessible Carpet interferes with appliance Provide sufficient space so the appliance can be lifted over carpet Installation over...

Page 37: ...Kenmore Customer Care Hotline To schedule in home repair service or order replacement parts Para pedir servicio de reparación a domicilio y ordenar piezas 1 844 553 6667 www kenmore com ...

Reviews: