background image

15

Oven Controls


1. Bake

 - Selects Bake function.

2. Broil 

- Selects Broil function.

3. OVEN ON indicator light

 - Appear above Bake and Broil. 

Lioght glows when oven is on and each time the oven cycles 
to maintain the set oven temperature. 

4. Timer ON/Off

 - Use to set and cancel the timer and to set 

the Continuous Bake feature.

5. CLOCK

 - Use with arrow keys to set time of day.

6. STOP 

- Cancels any active oven function except clock and 

timer. 

7. Up / Down

 arrows - Use with the function keys to accept 

settings and adjust temperature and times.

Minimum and Maximum Control Settings

All of the features listed have minimum and maximum time and 
temperature settings that may be entered into the control. 

Setting Clock

When the appliance is first powered up or when the power sup-
ply to the appliance has been interrupted, 

12:00

 will flash in 

the display. The time of day must first be set before operating 
the oven.

To set the clock

1.

Press 

CLOCK key 

once. 

CLO

 appears in display. 

2.

Press 

 or 

 and the time appears in the display. 

Continue to hold arrow key until the correct time of day 
appears in the display. 

3.

Release key when desired time is reached. Clock will set to 
new time ina few seconds.

Important note:

The time of day cannot be changed when the oven is set for 
cooking.

1

2

3

3

4

5

6

7

Table 2:  Minimum and maximum control settings

Feature

Min. Temp or Time Max. Temp or Time

Bake

170°F (77°C)

550°F (288°C)

Broil

LO

Hi

Timer

1 minute

11 hrs. 59 mins.

Clock 12 Hr.

1:00

12:59

Summary of Contents for 790.9261 Series

Page 1: ...eléctrica color number número de color Use Care Guide Manual de Uso y Cuidado English Español Model Modelo 790 9261 P N 808529905 Rev B Sears Brands Management Corporation Hoffman Estates IL 60179 U S A www kenmore com www sears com ...

Page 2: ...ean or maintain this appliance or to instruct the user in correct appliance installation operation and maintenance 6 Service calls to correct appliance installation not performed by Sears authorized service agents or to repair problems with house fuses circuit breakers house wiring and plumbing or gas supply systems resulting from such installation 7 Damage to or failure of this appliance resultin...

Page 3: ... hazardous situation which if not avoided may result in death or serious injury Indicates a potentially hazardous situation which if not avoided may result in minor or moderate injury IMPORTANT Indicates installation opera tion maintenance or valuable information that is not hazard related NOTE Indicates a short informal reference something written down to assist the memory or for future reference...

Page 4: ...not use an adapter plug use an extension cord or remove grounding prong from the power cord Failure to follow this warning may cause serious injury fire or death Proper Installation Be sure your appliance is properly installed and grounded by a qualified technician In the United States install in accor dance with the National Fuel Gas Code ANSI Z223 1 NPFA No 54 latest edition and National Electri...

Page 5: ...il linings may also trap heat causing a fire hazard Do not use oven or warmer drawer if equipped for storage Never use your appliance as a space heater to heat or warm the room Doing so may result in carbon monoxide poisoning and overheating of the appliance When heating fat or grease watch it closely Grease may catch fire if it becomes too hot Do not use water or flour on grease fires Smother fir...

Page 6: ... fan IMPORTANT INSTRUCTIONS FOR GLASS AND CERAMIC COOKTOPS Do Not Clean or Operate a Broken Cooktop If cooktop should break cleaning solutions and spillovers may penetrate the broken cooktop and create a risk of electric shock Contact a qualified technician immediately Clean cooktop glass with caution If a wet sponge or cloth is used to wipe spills on a hot cooking area be careful to avoid a steam...

Page 7: ...ld be done only by a qualified technician This reduces the risk of personal injury and damage to the appli ance Always contact your dealer distributor service agent or manufacturer about problems or conditions you do not understand Ask your dealer to recommend a qualified tech nician and an authorized repair service Know how to disconnect the power to the appliance at the circuit breaker or fuse b...

Page 8: ...k metal bakeware Dark bakeware cooks hotter than shiny bakeware Reduce the cooking temperature by 25 F 13 14 C when using dark bakeware Glass bakeware Glass bakeware cooks hotter than shiny bakeware Glass is convenient as the same piece of bakeware can be used for cooking serving and storing food Reduce the cooking temperature by 25 F 13 14 C when using glass bakeware Insulated bakeware Insulated ...

Page 9: ...s done as you like Result Recommendation Food too light Use the middle to maximum cook time recommended on packaging or recipe Food too dark Use the minimum cook time recommended on packaging or recipe Cooking Tips Use these additional tips to get the best results from your appliance Cooking Tips Baking Rack placement Follow the instructions in Oven Controls on starting on page 16 When using only ...

Page 10: ... IMPORTANT Do not place empty aluminum glass or porcelain enamel coated cookware on the element The melting point of cookware made with these materials may be reached quickly especially if left empty If the cookware melts it will damage the cooktop Follow all the cookware manufacturer s recommenda tions for use and care of cookware IMPORTANT NEVER place or straddle a cooking utensil over two diffe...

Page 11: ...catch fire if placed too close to the surface elements Do not use aluminum foil to line surface drip bowls or reflector pans Improper installation of these liners may result in risk of electric shock or fire Important notes Radiant elements have a limiter that allows the element to cycle on and off even at the HI setting Be sure to read detailed instructions for coil cooktop cleaning in the Care a...

Page 12: ... been turned off The element may still be hot and burns may occur if the element is touched before it has cooled sufficiently Do not place flammable items such as plastic salt and pepper shakers spoon holders or plastic wrappings on top of the range when it is in use These items could melt or ignite Potholders towels or wooden spoons could catch fire if placed too close to the surface elements Do ...

Page 13: ...ter of the canner does not exceed 1 inch beyond the surface element markings or burner It is recommended to use smaller diameter canners on electric coil and ceramic glass cooktops and to center canners on the burner grates Start with hot tap water to bring water to boil more quickly Use the highest heat setting when first bringing the water to a boil Once boiling is achieved reduce heat to lowest...

Page 14: ... oven do not attempt to close the oven door until all the oven racks are fully positioned back inside the oven cavity Types of oven racks Flat oven racks may be used for most cooking needs and may be placed in most oven rack positions The offset oven rack some models provides additional step down positions from the standard flat rack design The offset design positions the base of the rack about of...

Page 15: ...emperature settings that may be entered into the control Setting Clock When the appliance is first powered up or when the power sup ply to the appliance has been interrupted 12 00 will flash in the display The time of day must first be set before operating the oven To set the clock 1 Press CLOCK key once CLO appears in display 2 Press or and the time appears in the display Continue to hold arrow k...

Page 16: ...how in the display by default To view information of any other active oven function press the key once for the active function to view status Changing Temperature Display to Fahrenheit ºF or Celsius ºC The electronic oven control is set to display F when shipped from the factory The display may be changed to show either F or ºC oven temperatures To change temperature display mode from F to C or fr...

Page 17: ...Bake has started 1 Press Bake The current set oven temperature will display 2 Press or to increase or decrease the current set temperature to the new oven temperature 3 Release arrow key and the oven will start the baking Important notes The oven will bake no longer than 12 hours If you wish to bake for a longer period see Setting Timer on page 16 for detailed information Baking tips Fully preheat...

Page 18: ...eat use rack in the lowest position For optimum browning close broiler drawer and preheat broiler 5 minutes before adding food For best results when broiling use a broil pan with broil pan insert designed to drain the fat from the food and help avoid spatter and reduce smoking To purchase them call Sears at 1 844 553 6667 and order broil pan kit 5304442087 Arranging the broil rack 1 Tilt rack slig...

Page 19: ...perature setting If the control still has the original factory calibration the display will read 0 3 The temperature may be adjusted up or down 35 F 19 C in 1 F increments by pressing and holding or Adjust until the desired amount of temperature offset appears in the display and the oven will save the setting automatically 4 If the STOP key is pressed during the programming mode the UPO value will...

Page 20: ...sing a soft cloth clean with mild dish detergent and water or a 50 50 solution of vinegar and water Rinse with clean water dry with a soft clean cloth Do not use cleaners containing abrasives chlorides chlorine or ammonia Easy Clean Stainless Steel Black Stainless Steel Using a soft cloth clean with mild dish detergent and water or a 50 50 solution of vinegar and water Rinse with clean water dry w...

Page 21: ...the glass surface is touched before it has cooled sufficiently For light to moderate soil Apply a few drops of CookTop Cleaning Creme directly to the cooktop Use a paper towel or use a non abrasive plastic type no scratch cleaning pad to clean the entire cooktop surface Make sure the cooktop is cleaned thoroughly leaving no residue For heavy burned on soil Apply a few drops of CookTop Cleaning Cre...

Page 22: ...iners may result in risk of electric shock or fire Replacing the Oven Light Be sure the oven is unplugged and all parts are cool before replacing the oven light Replacing the oven interior light bulb The interior oven light is located at the rear of the oven cavity Figure 10 1 Turn electrical power off at the main source or unplug the appliance 2 Replace the bulb with a new appliance bulb 3 Turn t...

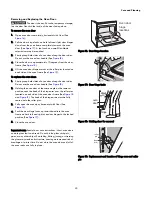
Page 23: ...8 2 Holding the oven door at the same angle as the removal position seat the hook of the hinge arm over the roller pins located on each side of the oven door frame See Figure 18 and Figure 19 The hook of the hinge arms must be fully seated onto the roller pins 3 Fully open the oven door horizontal with floor See Figure 16 4 Push the door hinge locks up towards and into the oven frame on both left ...

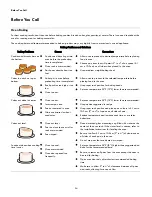
Page 24: ...Set oven temperature 25 F 13 C lower than recommended Cakes not done in center Oven too hot Incorrect pan size Pan not centered in oven Glass cookware slow heat conductor Set oven temperature 25 F 13 C lower than recommended Use pan size suggested in recipe Use proper rack position and place pan so there is 5 1 cm to 10 2 cm 2 to 4 of space on all sides of pan Reduce temperature and increase cook ...

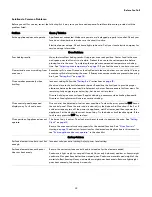
Page 25: ...fat from meat Cut remaining fatty edges to prevent curling but do not cut into lean Grease build up on oven surfaces Regular cleaning is necessary when broiling frequently Grease or food splatters will cause excessive smoking Oven control panel beeps and displays any F or E code error Oven control has detected a fault or error condition To clear the error press the OFF key on the control panel Onc...

Page 26: ...p cleaning in the Care and Cleaning section of this Use Care Guide Areas of discoloration with metallic sheen on cooktop surface Mineral deposits from water and food Remove using the recommended CookTop Cleaning Creme to the ceramic surface on the web visit www sears com for replace ment cooktop cleaner item number 40079 Buff with a non abrasive cloth or no scratch cleaning pad Oven racks discolor...

Page 27: ...Kenmore Customer Care Hotline To schedule in home repair service or order replacement parts Para pedir servicio de reparación a domicilio y ordenar piezas 1 844 553 6667 www kenmore com ...

Reviews: