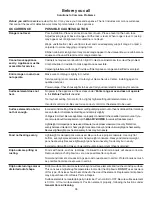
background image

20

Self-Cleaning

 (cont’d)

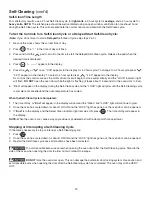
Self-Clean Time Length

For satisfactory results, use a 2 hour Self-Clean cycle for 

light soils

, a 3 hour cycle for 

average

, and a 4 hour cycle for

heavy soils. NOTE:

 The kitchen area should be well ventilated using an open window, ventilation fan or exhaust hood

during the Self-Clean cycle. This will help eliminate the normal odors associated with the Self-Clean cycle.

To Set the Controls for a Self-Clean Cycle or a Delayed Start Self-Clean Cycle:

(

Note:

 If you do not want to start a 

Delayed

 Self-Clean Cycle, skip steps 2 & 3.)

1.

Be sure the clock shows the correct time of day.

2.

Press 

Delay

Start

. The " 

" in the time of day will flash.

3.

Press and hold the 

 pad to scroll to the time to start the delayed Self-Clean cycle. Release the pad when the

desired time is displayed.

4.

Press 

Select

Clean

. "— — —" appears in the display.

5.

Press the 

 or 

 once. "3:00" appears in the display for a 3 hour cycle. To change to a 2 hour cycle press 

.

"2:00" appears in the display. To select a 4 hour cycle press 

. "4:00" appears in the display.

As soon as the controls are set, the motor driven lock will begin to close automatically and the “LOCK” indicator light
will flash. 

DO NOT

 open the oven door while the light is flashing (it takes about 15 seconds for the oven door to lock).

6.

"

CLn

" will appear in the display during the Self-Clean cycle and the "LOCK" light will glow until the Self-Cleaning cycle

is complete or cancelled and the oven temperature has cooled.

When the Self-Clean Cycle is Completed:

1.

The time of day  or "

End

" will appear in the display window and the “Clean” and "LOCK" light will continue to glow.

2.

Once the oven has cooled down for about 1 HOUR and the "LOCK" light has gone out, the oven door can be opened.

3.

If “

End

” is in the display and the Select Clean indicator light remains ON, press 

STOP

Clear

.  The time of day will appear in

the display.

NOTE: 

When the oven is cool, wipe away any residue or powdered ash with a damp cloth or paper towel.

Stopping or Interrupting a Self-Cleaning Cycle

If it becomes necessary to stop or interrupt a Self-Cleaning cycle:

1.

Press 

STOP

Clear

.

2.

Once the oven has cooled down for about 1 HOUR and the "LOCK" light has gone out, the oven door can be opened.

3.

Restart the Self-Clean cycle once all conditions have been corrected.

 To avoid possible burns use care when opening the oven door after the Self-Cleaning cycle. Stand to the

side of the oven when opening the door to allow hot air or steam to escape.


DO NOT

 force the oven door open. This can damage the automatic door locking system. Use caution and

avoid possible burns when opening the door after the Self-Cleaning cycle has completed. The oven may still be VERY
HOT.

Summary of Contents for 790.4658 Series

Page 1: ...5 5 5 5 5 Color number número de color Electric Range Slide in models Use Care Guide Estufa eléctrica Modelos deslizables Manual de uso y cuidado ENGLISH ESPAÑOL Sears Roebuck and Co Hoffman Estates IL 60179 U S A P N 318203800 Rev D 0712 www sears com ...

Page 2: ...ppliance is ever used for other than private family purposes This warranty covers only defects in material and workmanship Sears will NOT pay for 1 Cracks in a ceramic glass cooktop that are not a result of thermal shock 2 Stains and scratches on a ceramic glass cooktop resulting from accident or improper operation or maintenance 3 Expendable items that can wear out from normal use including but n...

Page 3: ...injuries and also cause damage to the range Do not allow children to climb or play around the range The weight of a child on an open door may cause the range to tip resulting in serious burns or other injury An open drawer when hot may cause burns Do not use the oven or warmer drawer if equipped for storage Do not store items of interest to children in the cabinets above a range Children climbing ...

Page 4: ...isk of burns ignition of flammable materials and spillage due to unintentional contact with the utensil Never leave surface burners unattended at high heat settings Boilovers cause smoking and greasy accu mulations that may ignite or a pan that has boiled dry may melt Protective liners Do not use aluminum foil to line oven bottom or any other part of the appliance Only use aluminum foil as recomme...

Page 5: ...light bulb IMPORTANT INSTRUCTIONS FOR CLEAN ING YOUR RANGE Clean the range regularly to keep all parts free of grease that could catch fire Exhaust fan ventilation hoods and grease filters should be kept clean Do not allow grease to accumulate on hood or filter Greasy deposits in the fan could catch fire When you are flaming food under the hood turn the fan on Refer to the hood manufacturer s inst...

Page 6: ...r la durabilidad de su nuevo producto El acuerdo incluye lo siguiente Piezas y mano de obra necesarias para contribuir a mantener el funcionamiento adecuado de los productos utilizados en condiciones normales de uso no sólo en caso de defectos de los productos Nuestra cobertura va mucho más allá que la garantía del producto No se aplican deducibles ni exclusiones por fallas del funcionamiento es d...

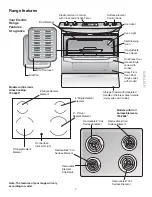
Page 7: ...ert Storage Drawer with Integrated Handle or Stainless Steel Handle style varies with model Note The features of your range will vary according to model OvenVent Removable 6 Coil Surface Element Removable 8 Coil Surface Element Removable Element Drip Bowls Removable 8 Coil Surface Element Removable 6 Coil Surface Element Models with Ceramic GlassCooktop 790 4659 6 9 Dual Radiant Element Models wit...

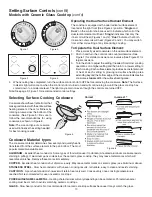
Page 8: ...he Radiant Surface Elements The element temperature rises gradually and evenly As the temperature rises the element will glow red To maintain the selected setting the element will cycle on and off The heating element retains enough heat to provide a uniform and consistent heat during the off cycle For efficient cooking turn off the element several minutes before cooking is complete This will allow...

Page 9: ...he indicator light has turned off Do not place plastic items such as salt andpeppershakers spoon holders or plastic wrappings on top of the range when it is in use These items could melt or ignite Potholders towels or wooden spoons could catch fire if placed too close to the surface elements Operating Single Radiant Surface Elements The cooktop has single radiant surface elements at 3 locations th...

Page 10: ... using cookware as shown in Figure 6 Note The size and type of cookware used will influence the setting needed for best cooking results 4 When cooking has completed turn the surface control knob to OFF before removing the cookware Note The Surface Indicator light will come on when the control knob is turned on and will continue to glow until the glass cooktop has cooled down to a moderate level Th...

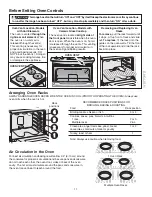
Page 11: ... around the food Air Circulation in the Oven 1 Oven Rack Multiple Oven Racks Oven Vent Location Models with Coil Elements The oven is vented through the right rear coil element When the oven is on warm air is released through the vent s This venting is necessary for proper air circulation in the oven and good baking results DO NOT block the vent s Doing so may cause cooking failures fire or damage...

Page 12: ...ht to show which feature is in use CLOCK SET PAD Used to set the time of day STOP CLEAR PAD Used to clear any function previously entered except the time of day and minute timer Press STOP CLEAR to stop cooking Also the STOP CLEAR pad is used to activate oven door lockout setting TIMER SET OFF PAD Used to set or cancel the minute timer The minute timer does not start or stop cooking Also TIMER SET...

Page 13: ... will beep 3 times It will then continue to beep 3 times every 60 seconds until Timer Set Off is pressed Note The indicator light located above the Timer Set Off pad will glow while the minute timer is active Note The minute timer does not start or stop cooking It serves as an extra timer in the kitchen that will beep when the set time has run out The minute timer can be used alone or during any o...

Page 14: ...ammed to override this feature for continuous baking To set control for continuous baking 1 Press and hold Timer Set Off down for 5 seconds until tone is heard hr will appear in display for continuous cooking The current time of day will return to the display 2 To cancel the Continuous Bake function press Timer Set Off and hold for 5 seconds until tone is heard 12hr will appear in display indicati...

Page 15: ... increments 1 C if the control is set to display Celsius 6 Press Cook Time 0 00 will flash in the display HR MIN 7 Press the or until the desired baking time appears in the display To Program Oven for a Delayed Start Time and to Shut Off Automatically Delayed Start Bake 1 Be sure that the clock shows the correct time of day 2 Place the food in the oven 3 Press Bake Bake appears in the display 4 Wi...

Page 16: ... frequently Corrections Allow oven to preheat to the selected temperature before placing food in oven Choose pan sizes that will permit 2 to 4 5 1 cm to 10 2 cm of air space on all sides when placed in the oven Use a medium weight aluminum baking sheet Allow oven to preheat to the selected temperature before placing food in the oven Use proper rack position for baking needs Set oven temperature 25...

Page 17: ...ss STOP Clear Broil Rack Position Table Refer to Figure 3 Note It is recommended to cook food from 3 to 5 of the broil element RackPosition Foodcategory 3rd rack position Medium rare steaks hamburgers 2nd rack position Fish medium steaks pork chops 2nd rack position Well done foods such as chicken lobster Should an oven fire occur close the oven door and turn the oven OFF If the fire continues use...

Page 18: ...arm Hold OFF at any time press STOP Clear The Warm Hold indicator light above the pad will turn OFF Adjusting the Oven Temperature Your oven control has been precisely set at the factory This setting may differ from your previous oven however so your recipe times may not give you the results you expect If you think that the oven is cooking too hot or too cool for your recipe times you can adjust t...

Page 19: ...do not have to be removed If they are not removed during the Self Clean cycle their color will turn slightly blue and the finish will be dull If left in after the cycle is complete and the oven has cooled rub the sides of the oven racks with wax paper or a cloth containing a small amount of salad oil this will make the racks glide easier into the rack position Remove any excessive spillovers in th...

Page 20: ... seconds for the oven door to lock 6 CLn will appear in the display during the Self Clean cycle and the LOCK light will glow until the Self Cleaning cycle is complete or cancelled and the oven temperature has cooled When the Self Clean Cycle is Completed 1 The time of day or End will appear in the display window and the Clean and LOCK light will continue to glow 2 Once the oven has cooled down for...

Page 21: ...ts with an ammonia soaked paper towel for 30 to 40 minutes Rinse with clean water and a damp cloth and then scrub with a soap filled scouring pad Rinse and wipe dry with a clean cloth Remove all cleaners or the porcelain may become damaged during future heating DO NOT use spray oven cleaners on the cooktop Remove racks See Removing and Replacing Oven Racks under Before Setting Oven Controls Use a ...

Page 22: ...g cream leaves a protective coating which helps in preventing scratches and abrasions For sugary spillovers Sugary spills can chemically damage your cooktop surface Therefore you must begin cleaning the spills while the cooktop is still hot Use caution when following the steps below 1 Turn off all surface units and remove all pans immediately 2 Put on an oven mitt wipe up carefully or move hot spi...

Page 23: ...e anything metal or glass across the cooktop Do not use your cooktop as a cutting board or work surface in the kitchen Do not cook foods directly on the cooktop surface without a pan Do not drop heavy or hard objects on the glass cooktop because they may cause it to crack Cleaning Recommendations for the Ceramic Glass Cooktop Before cleaning the cooktop be sure the controls are turned to OFF and t...

Page 24: ... the door flat with the inside of the door facing down To Remove Oven Door 1 Open the door to the fully opened position 2 Pull up the lock located on both hinge supports and engage it in the hinge lever hooks Figure 1 You may have to apply a little downward pressure on the door to pull the locks fully over the hinge lever hooks 3 Grab the door by the sides and pull the bottom of the door up and to...

Page 25: ...are COOL before replacing the oven light bulb Do not turn the oven light on during a self cleaning cycle High temperature will reduce lamp life On some models an interior oven light will turn on automatically when the oven is opened The oven light may be turned on when the door is closed by using the oven light switch located on the Electronic Oven control The oven light bulb is covered with a gla...

Page 26: ...panswereused Besuretousepropercookware Useonlyflatbottom evenlybalancedmediumorheavyweightcookware Heavyandmediumweightpansheatevenly Because lightweight pans heat unevenly foods may burn easily Lightweight or warped pans were used Be sure to use proper cookware Use only flat bottom evenly balanced medium or heavyweight cookware Heavy and medium weight pans heat evenly Because lightweight pans hea...

Page 27: ...preheat to the set temperature before placing food in the oven Try adjusting the recipes recommended temperature or baking time If you feel the oven is too hot or cool see Adjusting the Oven Temperature section in this Use and Care Guide A cooling fan may automatically turn on and off to cool internal parts It is normal and the fan may continue to run after the range has been turned OFF but may al...

Page 28: ... that you need to do it yourself For Sears professional installation of home appliances and items like garage door openers and water heaters 1 800 4 MY HOME 1 800 469 4663 Call anytime day or night U S A and Canada www sears com www sears ca Our Home For repair of carry in items like vacuums lawn equipment and electronics call anytime for the location of your nearest Sears Parts Repair Service Cen...

Reviews: