background image

15

Oven Controls

Important Things to Know Before Setting any Basic Oven 

Cooking Function

Important: This appliance has been factory pre-set to start any 
Bake or Conv Bake function with the oven set temperature auto-
matically set for 350°F. However if desired, the oven set temper-
ature may be adjusted at any time during the cooking process. 
You may also choose to add a cook time or delay start with any 
of the functions listed above.

Choosing and Setting an Oven

Both the upper and lower ovens may be set to cook at the same 
time using different functions. For example, you may want to use 
the Warm & Hold function in the lower oven while broiling in the 
upper oven at the same time. Follow the instructions in this guide 
to set the desired cooking functions.

The display will indicate which oven is currently available to be 
set by displaying UPPER or LOWER on the control.

Important: Convection features are available only in the lower 
oven, and the broil feature is available only in the upper oven.

Temperature Visual Display

Your appliance is equipped with a temperature visual display. 
When a cooking mode is set, the actual temperature will be 
shown in the display and will rise as the unit preheats. When the 
unit has reached its target temperature, a chime will sound to 
remind you to place the food in the oven. This feature will be 
active with some cooking modes: bake and convection bake.

Important note: The lowest temperature that can be displayed is 
100°F.

Setting The Clock

When the appliance is powered up for the first time or when the 
electric supply to the appliance has been interrupted, the 
display will flash 12:00. Before any function of the oven can be 
set, STOP must be pressed. This will set the clock at 12:00. The 
time of day must first be set before operating the oven.

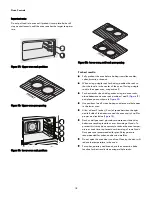
To set clock to 1:30:

1.

Press CLOCK. CLO will appear in the display.

2. Press 1 3 0 using the numeric keys to set the time of day to 

1:30.

3. Press either of the two START keys, and the time of day will 

appear in the display.

Important note: 

The clock cannot be changed when a Cook Time, Self Clean, 
Delay Start, or cooking feature is active.

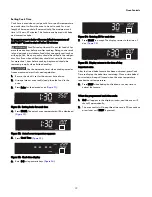
Setting 12 hour or 24 hour display mode

The clock display mode allows you to select 12 hour or 24 hour 
modes. The factory pre-set clock display mode is 12 hours.

 To set 12 hour or 24 hour display mode:

1.

Press and hold CLOCK for 6 seconds until 12 Hr or 24 Hr 
appears in the display.

2. Press either of the two Self Clean keys to toggle between 12 

Hr day or 24 Hr day display modes.

3. Press either of the two START keys to accept choice.

Important: Reset the correct time as described in 

“Setting The 

Clock” 

on 

page 15

. Note that if the 24 hour time of day mode 

was chosen, the clock would now display a time from 0:00 
through 23:59.

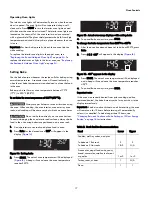
Setting Timer

The timer serves as an extra timer in the kitchen that will beep 
when the set time has run out. It does not start or stop cooking. 
This feature can be used during any of the other oven control 
functions, except during a Self Clean. Refer to 

Table 2

 on 

page 14

 for time amount settings. The timer may be set from a 

minimum time of 1 minute to a maximum of 11 hours and 59 
minutes.

Important note: 

When the timer is set for more than 1 hour, it will display 
hours and minutes until 1 hour remains. When less than 1 
hour remains, the display counts down in minutes and 
seconds. With less than 1 minute remaining, only seconds 
will display.

If the timer is active during a cooking process, the timer will 
show in the display.

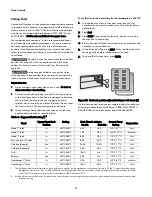
To set timer for 5 minutes:

1.

Press Timer ON/OFF.

2. Enter 5 using numeric key. Press either of the two START 

keys and the time will begin to count down in the display.

Important note: If START is not pressed, the timer will return to 
the time of day after 30 seconds.

3. When set time ends, END and TIMER will show in the 

display, and the control will sound with three beeps every 7 
second until Timer ON/OFF is pressed.

To cancel the timer when active, press Timer ON/OFF 
again.

Summary of Contents for 7814

Page 1: ... number número de color Use Care Guide Manual de Uso y Cuidado English Español Model Modèle 790 7804 7814 P N 808575101 Rev B Sears Brands Management Corporation Hoffman Estates IL 60179 U S A www kenmore com Sears Canada Inc Toronto Ontario Canada M5B 2C3 www sears ca ...

Page 2: ... of this appliance resulting from installation not performed by Sears authorized service agents including installation that was not in accord with electrical gas or plumbing codes 8 Damage to or failure of this appliance including discoloration or surface rust if it is not correctly operated and maintained according to all supplied instructions 9 Damage to or failure of this appliance including di...

Page 3: ... warmer drawer or lower oven This includes paper plastic and cloth items such as cookbooks plastic ware and towels as well as flammable liquids Do not store explosives such as aerosol cans on or near the oven Never cover any slots holes or passages in the oven bottom or cover an entire oven rack with materials such as aluminum foil Doing so blocks air flow through the oven and may cause carbon mon...

Page 4: ...y result in burns from steam Do not let potholders touch hot cooking areas Do not use towels or other bulky cloths Do not store items of interest to children in the cabinets above a range or on the backguard of the range Children climbing on the range to reach items could be seriously injured Important Important Safety Notice The California Safe Drinking Water and Toxic Enforcement Act requires th...

Page 5: ...an range by removing the leveling legs panels wire covers anti tip brackets screws or any other part of the range Remove the oven door from any unused range if it is to be stored or discarded For electric ignition models only Do not attempt to operate the range during a power failure If the power fails always turn off the range If the range is not turned off and the power resumes the range will be...

Page 6: ...ilating hood turn the fan on Use proper pan size This appliance is equipped with one or more surface units of different sizes Select utensils having flat bottoms large enough to cover the burner The use of undersized utensils will expose a portion of the flame to direct contact and may result in ignition of clothing Proper relationship of utensil to burner will also improve efficiency Utensil hand...

Page 7: ...eal Care should be taken not to rub damage or move the gasket Some birds are extremely sensitive to the fumes given off during the self clean cycle of any oven Move birds to another well ventilated room DO NOT TOUCH SURFACE HEATING UNITS OR SURFACE COOKING BURNERS AREAS NEAR THESE SURFACE HEATING UNITS OR INTERIOR SURFACE OF THE OVEN Both surface burners and oven heating elements may be hot even t...

Page 8: ...e only available outlet it is the personal responsi bility of the consumer to have it replaced with a properly grounded 3 prong wall receptacle installed by a qualified electri cian See the installation instructions packaged with this range for complete installation and grounding instructions PRODUCT RECORD In this space below record the date of purchase model and serial number of your product You...

Page 9: ... cap from side to side to be sure it is centered and firmly seated Figure 5 When the burner cap lip makes contact inside the center of the burner head you will be able to hear the burner cap click Please note that the burner cap should NOT move off the center of the burner head when sliding from side to side Check and be sure that all oval style some models burner caps are correctly in place on ov...

Page 10: ...ith flat bottoms suitable for use on your cooktop are available in most cookware or hardware stores Round bottomed woks with a support ring that does not extend beyond the burner unit may also be used The metal ring was designed to support the wok safely when it is filled with large amounts of liquids soup making or fat frying Wire trivets Do not use wire trivets Cookware bottoms must be in direct...

Page 11: ...est heat seating when first bringing the water to a boil Once boiling is achieved reduce heat to lowest possible setting to maintain that boil Use tested recipes and follow instructions carefully Check with your local Cooperative Agricultural Extension Service or a manufacturer of glass jars for the latest canning infor mation It is best to can small amounts and light loads Do not leave water bath...

Page 12: ...knobs located directly above the oven door 1 Place cooking utensil on center of surface burner grate Be sure the cooking utensil sets stable on the burner grate 2 Push the desired surface control knob in and turn counter clockwise out of the OFF position Figure 11 3 Release the surface control knob and rotate to the LITE position Visually check that the burner has lit 4 Once the burner has a flame...

Page 13: ...ome very hot which can cause burns To Arrange Always arrange the oven racks when the oven is cool prior to operating the oven To Remove Pull the oven rack straight forward until it reaches the stop position Lift up front of oven rack slightly and slide out To Replace Place the oven rack on the rack guides on both sides of oven walls Tilt the front of oven rack upward slightly and slide the oven ra...

Page 14: ...sing Add 1 Minute will start timer when timer is idle 11 0 thru 9 Numeric Keys Use to enter temperatures and cooking times and use to enter time of day when setting clock 12 CLOCK Use with numeric keys to set the time of day 13 LIGHT Use to turn oven lights ON and OFF whenever the oven doors are closed 14 Conv Bake Use to obtain the best culinary results when baking with multiple pans and racks Av...

Page 15: ...ing the numeric keys to set the time of day to 1 30 3 Press either of the two START keys and the time of day will appear in the display Important note The clock cannot be changed when a Cook Time Self Clean Delay Start or cooking feature is active Setting 12 hour or 24 hour display mode The clock display mode allows you to select 12 hour or 24 hour modes The factory pre set clock display mode is 1...

Page 16: ...e Silent mode allows the oven control to operate without audible tones The control may be programmed for silent operation and later reset to operate with all the normal audible tones To set for silent or audible mode 1 Press and hold Delay Start for 6 seconds 2 After 6 seconds bEEP On will appear in the display Press either of the two Self Clean keys to toggle between bEEP On or bEEP OFF 3 Press e...

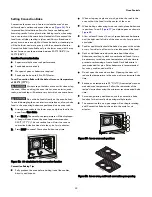
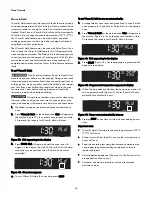
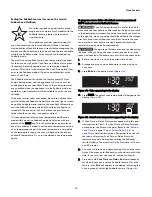
Page 17: ... the oven interior and surfaces always bake food in the oven using bakeware positioned on an oven rack 1 Arrange interior oven racks and place food in oven 2 Press Bake for the desired oven 350 will appear in the display Figure 14 3 Press START The actual oven temperature will be displayed Figure 15 A beep will sound once the oven temperature reaches 350 F 4 To cancel Bake at any time press STOP T...

Page 18: ...ower oven Allow at least 2 inches 5 cm of space between the right and left side of the bakeware and the oven cavity s wall for proper air circulation Figure 18 Dark or dull pans and glass absorb more heat than shiny bakeware resulting in dark or over browning of foods To prevent this it may be necessary to reduce the oven temper ature or cook time to prevent over browning of some foods Dark pans a...

Page 19: ...s and vegetables 1 Be sure the clock is set for the correct time of day 2 Arrange interior oven rack s and place the food in the oven 3 Press Bake for the desired oven Figure 21 4 Press START The actual oven temperature will be displayed Figure 22 5 Press Cook Time Figure 23 6 Enter 3 0 using numeric keys Figure 24 7 Press START to accept The display returns to the time of day Figure 25 Important ...

Page 20: ...od poisoning or sickness Foods that can easily spoil such as milk eggs fish meat or poultry should be chilled in the refriger ator first Even when chilled they should not stand in the oven for more than 1 hour before cooking begins and should be removed promptly when finished cooking 1 Be sure the clock is set for the correct time of day 2 Arrange interior oven rack s and place the food in the ove...

Page 21: ...ly selected temperature 12 Press STOP when baking has completed or at any time to cancel Delay Start When the set bake time runs out 1 End will appear in the display window and the oven will shut off automatically Figure 34 2 The oven control will beep and End will remain in the display until STOP is pressed Figure 34 End appearing in the display ...

Page 22: ...ng food 2 Press Broil 3 Press START Place the food in the oven and be sure to close the oven door when broiling 4 Broil on one side until food is browned turn and broil other side until done to your satisfaction 5 When finished broiling press STOP Always pull the rack out to the stop position before turning or removing food 6 To cancel Broil at any time press STOP If a broiler pan and insert are n...

Page 23: ... will start as soon as convection bake has been into the cycle for six minutes 3 Press STOP to cancel Convection Bake at any time Convection Baking Tips Fully preheat the oven before baking items like cookies biscuits and breads When using any single oven rack position the rack in the oven so that the food is in the center of the oven When baking cakes using two oven racks place bakeware in positi...

Page 24: ...d food in oven 2 Press Warm Hold for the desired oven HLd will appear in the display Figure 39 If no other keys are touched within 25 seconds the request for Warm Hold will clear 3 Press START HLd will remain on and the oven icon will appear in the display Figure 40 Warm Hold will auto matically turn on and then turn off after 3 hours unless cancelled 4 To turn Warm Hold off at any time press STOP...

Page 25: ...ure is set outside of the temperature range the oven will default to the nearest available temperature Try to set the desired oven temperature again To program oven to Bake with default oven temperature of 350 F and activate the Sabbath feature Food Poisoning Hazard Do not let food sit for more than one hour before or after cooking Doing so can result in food poisoning or sickness Foods that can e...

Page 26: ... Should you experience a power failure or interruption the oven will shut off When power is restored the oven will not turn back on automatically The oven will remember that it is set for the Sabbath and the oven display will show the message SF for Sabbath failure The food may be safely removed from the oven while still in the Sabbath feature however the oven cannot be turned back on until after ...

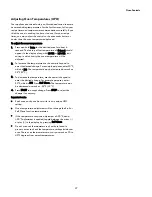
Page 27: ...enter the desired change For example purposes enter 30 F which is 3 0 The temperature may be increased as much as 35 F 19 C 3 To decrease the temperature use the numeric keypad to enter the desired change For example purposes enter 30 F which is 3 0 Press Self Clean The temperature may be decreased as much as 35 F 19 C 4 Press START to accept change Press STOP to reject the change if necessary Imp...

Page 28: ... utensils and any aluminum foil Aluminum foil will not withstand high temperatures from a self clean cycle and will melt Do not use oven cleaners or oven protective coatings in or around any part of the oven interior Clean any soil from the oven frame the door liner outside the oven door gasket and the small area at the front center of the oven bottom Figure 47 These areas heat suffi ciently to bu...

Page 29: ...or steam to escape The oven interior may appear to have cooled after it has been turned off The oven may still be hot and burns may occur if it is touched before it has cooled Do not force the oven door open when self clean is active This can damage the automatic door locking system Use caution when opening the door after self clean cycle is complete the oven may still be very hot 1 Hot will appea...

Page 30: ...r a Self Clean can only be programmed to start up to 11 hours and 59 minutes after the time showing in the display be sure to set the clock to current time before programming a delay start To set a Delay Start Self Clean to begin 12 or more hours maximum is 23 hours and 59 minutes after the time of setting be sure to first set the control in the 24 Hr display mode If Self Clean was active and then...

Page 31: ... sugar or acid content milk tomatoes sauerkraut fruit juices or pie filling to remain on the surface they may cause a dull spot even after cleaning Oven interior For oven interior remove excessive spillovers from oven cavity bottom before starting Self Clean Clean any soils from oven frame and door liner outside the oven door gasket For very important cleaning precautions be sure to read all the i...

Page 32: ... utensil will be damaged or destroyed Cleaning the Cooktop and Surface Burners To avoid possible burns do not attempt any of the cooktop cleaning instructions provided before turning OFF all of the surface burners and allow them to completely cool Any additions changes or conversions required in order for this appliance to satisfactorily meet the application needs must be made by an authorized qua...

Page 33: ... as shown Should you experience ignition problems it may be that this port hole is partially blocked with soil With the burner head in place use a small wire gauge needle or the end of a paper clip to clear the ignition port Refer to Figure 53 round style shown oval burner on some models not shown Important notes The surface burner heads are secured to the cooktop and must be cleaned in place on t...

Page 34: ...oven door is opened The oven light may be turned on when the door is closed by pressing LIGHT on the control panel Important The lamp is covered with a glass shield The glass shield can be removed to be cleaned manually or to change the oven light To replace the lower oven rectangle halogen light Be sure the range is unplugged and all parts are cool before replacing oven light Wear a leather faced...

Page 35: ... frame Figure 61 To replace oven door 1 Firmly grasp both sides of oven door along the door sides Do not use the oven door handle Figure 60 2 Holding the oven door at the same angle as the removal position seat the hook of the hinge arm over the roller pins located on each side of the oven door frame Figure 61 The hook of the hinge arms must be fully seated onto the roller pins 3 Fully open the ov...

Page 36: ... the oven Use proper rack position for baking needs Set oven temperature 25 F 13 C lower than recommended Cakes not done in center Oven too hot Incorrect pan size Pan not centered in oven Set oven temperature 25 F 13 C lower than recommended Use pan size suggested in recipe Use proper rack position and place pan so there is 5 1 cm to 10 2 cm 2 to 4 of space on all sides of pan Cakes not level Oven...

Page 37: ...as line is hard plumbed Have a flexible CSA International approved metal appliance connector installed Entire appliance does not operate Make sure power cord is plugged properly into outlet Electrical power outage Check house lights to be sure Call your local electric company for service outage information In addition service wiring is not complete Call 1 800 4 MY HOME for assistance See back cove...

Page 38: ...nd then repower appliance and set clock with the correct time of day Try Bake or Broil function again If the fault recurs press STOP to clear and call 1 800 4 MY HOME for assistance See back cover d O is displayed The door was left open and control set for self cleaning cycle Close the door and press STOP Self Clean does not work Oven control not set properly Review the Self Clean instructions in ...

Page 39: ...ce Burners on page 12 Be sure the gas supply to the range is turned on Surface burner flame uneven or only part way around burner cap Burner slots or ports are clogged With the surface burner OFF clean ports with a small gauge wire or needle Also moisture is present after cleaning Lightly fan the flame and allow burner to operate until flame is full Burner caps are not seated properly Check that a...

Page 40: ...40 Before You Call ...

Page 41: ......

Reviews: