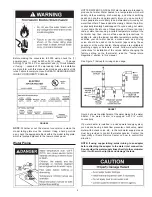
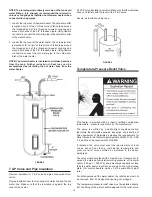
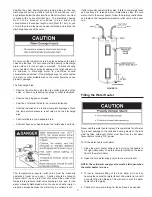
background image

15

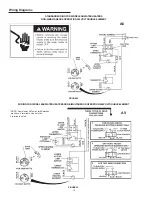
5. Wiring Diagrams (see 

“Wiring Diagrams”

 section) have been

supplied showing the two most common types of
connections between the water heater and the power supply.
You can easily see which type connection you have by
removing the junction box cover on top of the water heater.

Two Wire Connection Diagrams: 

is the most common

requiring you to simply connect red to red, black to
black, and the ground wire to the green ground screw
in the junction box of the water heater.

Three Wire Connection Diagram:

 is used when you

are connecting the water heater to a power supply
that has a “Time Clock” or “Off Peak” meter. To make
these connections refer to block 1 or 2 in this wiring
diagram for the type of system you have.

NOTE:

 If you have purchased a three wire connection water

heater but you are not on a “Time Clock” or “Off Peak” meter
and have a standard two wire connection power supply,
simply follow the connection diagram in block 3 of the three
wire connection diagram.

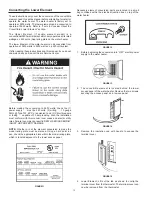
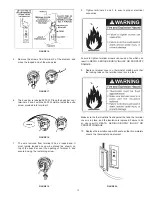
6. Use wire nuts and connect the power supply wiring to the

wires inside the water heater’s junction box.

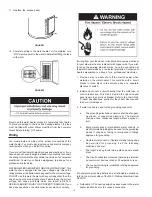
7. The water heater must be electrically “grounded” by the

installer. A green ground screw has been provided on the
water heater’s junction box. Connect ground wire to this
location.

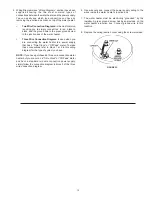
8. Replace the wiring junction cover using the screw provided.

FIGURE 23.

Summary of Contents for 153.326362

Page 1: ... to all residential electric water heaters with capacities of 20 to 120 Gallons Input rating of 12kW or less Safety Instructions Installation Operation Care and Maintenance Troubleshooting Parts List MODEL NO 153 326362 30 Gal 153 326363 30 Gal 153 326462 40 Gal 153 326463 40 Gal 153 326562 55 Gal 153 326563 55 Gal 153 326662 50 Gal Medium 153 326663 50 Gal Medium 153 326762 40 Gal Medium 153 3267...

Page 2: ...oductive harm This appliance can cause low level exposure to some of the substances listed including formaldehyde IMPORTANT DEFINITIONS Sears Service Center The Sears Service Center has the ability equivalent to a licensed tradesman in the fields of plumbing and electrical work including a thorough understanding of the requirements of the National Electrical Code as it relates to the installation ...

Page 3: ...3 GENERALSAFETY ...

Page 4: ...er Element 11 14 Wiring 14 15 Wiring Diagrams 16 SERVICEANDADJUSTMENT 17 22 Temperature Regulation 17 Thermostats 17 Temperature Settings 17 Upper and Lower Thermostat Adjustments 17 18 Anode Rod Inspection 18 Temperature Pressure Relief Valve Operation 18 Draining 18 19 Thermostat Removal Replacement 19 Element Cleaning Replacement 19 22 Drain Valve Washer Replacement 22 Service 22 TROUBLESHOOTIN...

Page 5: ... heater Correct electrical wiring and connections are very important in preventing death from possible electrical shock and fires Examine the location to ensure the water heater complies with the Facts to Consider About the Location section For California installation this water heater must be braced anchored or strapped to avoid falling or moving during an earthquake See instructions for correct ...

Page 6: ...FOOT TAPE HACKSAW TUBING CUTTER PROPANE TORCH ROLL OF EMERY CLOTH 3 4 19 mm WIRE BRUSH 1 2 13 mm WIRE BRUSH ROLL OF LEAD FREE SOFT SOLDER SOLDER FLUX Materials Needed To simplify the installation Sears has available the installation parts shown below You may or may not need all of these materials depending on your type of installation EXPANSION TANKS FOR THERMAL EXPANSION CONDITIONS AVAILABLE IN 2...

Page 7: ...per piping to the water heater the two copper water pipes can be cut with a hacksaw approximately four inches away from where they connect to the water heater This will avoid cutting off the pipes too short Additional cuts can be made later if necessary Disconnect the temperature pressure relief valve drain line When the water heater is drained disconnect the hose from the drain valve Close the dr...

Page 8: ...rigger an alarm or turn off the incoming water to the water heater when leakage is detected Sensors mounted in the drain pan that turn off the water supply to the entire home when water is detected in the drain pan Water supply shut off devices that activate based on the water pressure differential between the cold water and hot water pipes connected to the water heater INSTALLATION IN RESIDENTIAL...

Page 9: ...ocal code or state law requiring a certain temperature water at the hot water tap then you must take special precautions In addition to using the lowest possible temperature setting that satisfies your hot water needs a means such as a mixing valve should be used at the hot water taps used by these people or at the water heater Mixing valves are available at plumbing supply or hardware stores Foll...

Page 10: ...er line Make sure that the insulation is against the top cover of the heater Fit T P valve insulation over valve Make sure that the insulation does not interfere with the lever of the T P valve Secure all insulation using tape FIGURE 9 Temperature Pressure Relief Valve This heater is provided with a properly certified combination temperature pressure relief valve by the manufacturer The valve is c...

Page 11: ...any valve between the relief valve and tank The temperature pressure relief valve must be manually operated at least once a year Caution should be taken to ensure that 1 no one is in front of or around the outlet of the temperature pressure relief valve discharge line and 2 the water manually discharged will not cause any bodily injury or property damage because the water may be extremely hot If a...

Page 12: ...quivalent and 3 Circuit breakers or fusing capable of 30 amp loading Also the installation must conform with this manual local codes and electric utility rules Failure to comply can result in DEATH SERIOUS BODILY INJURY OR PROPERTY DAMAGE NOTE Whether or not the element conversion is made the model rating plate must be marked Using a hard point ink pen check the appropriate block within the model ...

Page 13: ...ecured using the remaining screw FIGURE 19 8 Tighten terminals 2 and 3 to ensure proper electrical connection Failure to tighten terminal screws can cause a fire which can result in DEATH SERIOUS BODILY INJURY OR PROPERTY DAMAGE 9 Replace terminal cover on thermostat making sure that the locking tabs on the terminal cover are in place Make sure the thermostat is flush against the tank the terminal...

Page 14: ...sh to reuse the existing aluminum wire have the connection at the water heater made by a competent electrician Contact your Sears salesperson to arrange for a professional electrician 1 Provide a way to easily shut off the electric power when working on the water heater This could be with a circuit breaker or fuse block in the entrance box or a separate disconnect switch 2 Install and connect a ci...

Page 15: ...er supply that has a Time Clock or Off Peak meter To make these connections refer to block 1 or 2 in this wiring diagram for the type of system you have NOTE If you have purchased a three wire connection water heater but you are not on a Time Clock or Off Peak meter and have a standard two wire connection power supply simply follow the connection diagram in block 3 of the three wire connection dia...

Page 16: ...TERHEATERS NON SIMULTANEOUS OPERATION 240 VOLT DOUBLE ELEMENT WIRING FOR 3 WIRE LEAD WATER HEATERS NON SIMULTANEOUS OPERATION 240 VOLT DOUBLE ELEMENT NOTE Some lower Hi Temp Limit Switches may have 4 terminals Use only the 2 terminals on left FIGURE 24 A6 A9 ...

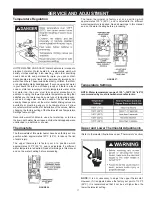
Page 17: ... Temperature Settings table at right Never allow small children to use a hot water tap or to draw their own bath water Never leave a child or handicapped person unattended in a bathtub or shower Thermostats The thermostats of this water heater have been factory set at a position which approximates 120 F 49 C to reduce the risk of scald injury The upper thermostat is factory set at a position which...

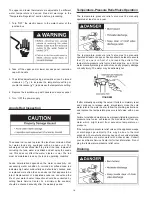
Page 18: ...our water heater Inspection should be conducted by calling Sears Service Center At a minimum the anode s should be checked annually after the warranty period Temperature Pressure Relief Valve Operation The temperature pressure relief valve must be manually operated at least once a year The temperature pressure relief valve must be manually operated at least once a year Caution should be taken to e...

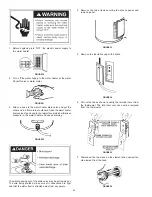
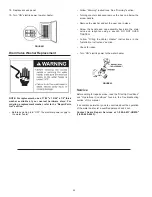
Page 19: ... flow from the hot water faucet before turning ON power Thermostat Removal Replacement 1 Turn OFF the electrical power to the water heater at the junction box 2 Remove the access panel and the insulation cap with handle 3 Lift out the tab as shown below to unclip the terminal cover from the thermostat The terminal cover can now be removed from the thermostat FIGURE 29 4 Disconnect wires from the t...

Page 20: ...e water heater and speed draining FIGURE 32 The water passing out of the drain valve may be extremely hot To avoid being scalded make sure all connections are tight and that the water flow is directed away from any person 4 Remove the two screws securing the access panel and remove panel FIGURE 33 5 Remove the insulation cap with handle FIGURE 34 6 Lift out the tab as shown to unclip the terminal ...

Page 21: ...ter NOTE The cold water supply valve must be left open when the water heater is in use 13 To insure complete filling of the tank allow air to exit by opening the nearest hot water faucet Allow water to run until a constant flow is obtained This will let air out of the water heater and the piping Never use this water heater unless it is completely full of water To prevent damage to the tank and hea...

Page 22: ...he screw handle Remove the washer and put the new one in place Screw the handle and cap assembly back into the drain valve and retighten using a wrench DO NOT OVER TIGHTEN Follow Filling the Water Heater instructions in the Installation Instructions section Check for leaks Turn ON electric power to the water heater FIGURE 42 Service Before calling for repair service read the Start Up Conditions an...

Page 23: ...ansion Tank Specifications Tank Dimensions Pipe Model Capacity in Inches Fitting Number In Gallons Diameter Length On Tank 153 331020 2 8 203 mm 12 3 4 323 mm 3 4 Male 153 331050 5 11 279 mm 14 3 4 375 mm 3 4 Male Expansion Tank Sizing Chart Inlet Water Heater Capacity Gallons Water Pressure 30 40 50 66 82 Expansion 40psi 2 2 2 5 5 Tank 50psi 2 2 2 5 5 Capacity 60psi 2 2 5 5 5 Needed 70psi 2 2 5 5...

Page 24: ... near the faucet at the time it is open RUMBLINGNOISE In some water areas scale or mineral deposits will build up on your heating elements This buildup will cause a rumbling noise Follow Element Cleaning Replacement instructions to clean and replace the elements HIGHTEMPERATURESHUTOFFSYSTEM The water heater has a high limit shut off system with a reset button located on the thermostat Follow the r...

Page 25: ...lation section 7 If you had experienced very hot water and now no hot water the problem may be due to the high temperature shut off system See High Temperature Shut Off System in the Troubleshooting section 8 During very cold weather the incoming water will also be colder and it will require a longer time to become heated 9 The hot water usage may exceed the capacity of the water heater If so wait...

Page 26: ...e tank fitting D The element may be leaking at the tank fitting Turn electrical power OFF remove access panel and insulation cap with handle If leaking around element follow proper draining instructions and remove element Reposition or replace gasket on element Place element into opening and tighten securely Then follow Filling the Water Heater instructions in the Installation Instructions section...

Page 27: ... 17 32 x13 64 x1 8 thick 9001584 9001584 9001584 9001584 9001584 9001584 4 ElementGasket 9000308 9000308 9000308 9000308 9000308 9000308 5 ElementGasket 9000308 9000308 9000308 9000308 9000308 9000308 6 HeatTrapNipple 9003915 9003915 9003719 9003719 9003719 9003719 7 Lower Access Panel 9003900 9003900 9003900 9003900 9003900 9003900 8 Lower Element See NOTE A above 3800 Watts 9000049 9000049 90000...

Page 28: ... 19 20 21 22 23 6 6 Key Model No No Part Description 153 326662 153 326663 153 326762 153 326763 1 Buss Bar Kit 9001591 9001591 9001591 9001591 2 Drain Valve 9001588 9001588 9001588 9001588 3 Drain Valve Washer 17 32 x13 64 x1 8 thick 9001584 9001584 9001584 9001584 4 ElementGasket 9000308 9000308 9000308 9000308 5 ElementGasket 9000308 9000308 9000308 9000308 6 HeatTrapNipple 9003921 9003921 9003...

Page 29: ... order part no 9000396 replacement element See model rating plate If Converted box NOTE B These water heaters are equipped with a Roto SwirlTM dip tube to retard a build up of dissolved solids REPAIR PARTS LIST Key Model No No Part Description 153 326862 153 326863 1 Buss Bar Kit 9001591 9001591 2 Drain Valve 9001588 9001588 3 Drain Valve Washer 17 32 x13 64 x1 8 thick 9001584 9001584 4 ElementGas...

Page 30: ...30 NOTES ...

Page 31: ...31 NOTES ...

Page 32: ... manufactured for years of dependable operation But like all products it may require preventive maintenance or repair from time to time That s when having a Master Protection Agreement can save you money and aggravation Purchase a Master ProtectionAgreement now and protect yourself from unexpected hassle and expense The Master Protection Agreement also helps extend the life of your new product Her...

Reviews: