background image

5

For close-clearance installations between 31.5" (80.01 cm) 
and 37" (93.98 cm), see “Plan Vent System” section for 
venting requirements.

Mobile home installations require special parts (listed following) 
available for purchase from your local Sears store or Sears 
Service Center. For further information, please call 
1-800-4-MY-HOME

®

 (1-800-469-4663).

Mobile Home Installation Kit. Ask for Part Number 346764.

Metal exhaust system hardware.

Optional Pedestal

Are you placing the dryer on a pedestal? You have the option of 
purchasing pedestals of different heights separately for this dryer. 
You may select a 10" (25.4 cm) pedestal or a 15.5" (39.4 cm) 
pedestal with a storage drawer. The pedestal will add to the total 
height of the dryer for a total height of approximately 46"
(116.8 cm) or 51.5" (130.8 cm), respectively.     

For a garage installation, you will need to place the 10" (25.4 cm) 
pedestal at least 9" (22.9 cm) above the floor. You will need to 
place the 15.5" (39.4 cm) pedestal at least 3" (7.6 cm) above the 
floor.    

The pedestals are available in several colors.

To order, call your local Sears store. For further information, 
please call 1-800-4-MY-HOME

®

 (1-800-469-4663).

Location Requirements 

You will need

A location that allows for proper exhaust installation. A gas 
dryer must be exhausted to the outdoors. See “Venting 
Requirements.”

A grounded electrical outlet located within 2 ft (61 cm) of 
either side of the dryer. See “Electrical Requirements.”

A sturdy floor to support the total dryer weight of 
200 lbs (90.7 kg). The combined weight of a companion 
appliance should also be considered.

A level floor with a maximum slope of 1" (2.5 cm) under entire 
dryer. (If slope is greater than 1" [2.5 cm], install Extended 
Dryer Feet Kit, Part No. 279810.) Clothes may not tumble 
properly and automatic sensor cycles may not operate 
correctly if dryer is not level.

For a garage installation, you will need to place the dryer at 
least 18" (46 cm) above the floor. If using a pedestal, you will 
need 18" (46 cm) to the bottom of the dryer.

Do not operate your dryer at temperatures below 45ºF (7ºC). At 
lower temperatures, the dryer might not shut off at the end of an 
automatic cycle. Drying times can be extended.

The dryer must not be installed or stored in an area where it will 
be exposed to water and/or weather.

Check code requirements. Some codes limit, or do not permit, 
installation of the dryer in garages, closets, mobile homes, or 
sleeping quarters. Contact your local building inspector.

NOTE: No other fuel-burning appliance can be installed in the 
same closet as a dryer.

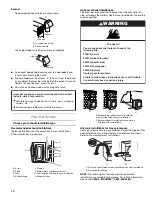
Optional pedestal (15.5" [39.4 cm] model shown)

Pedestal

Height

Color

Part 
Number

10" (25.4 cm)

White

46822

10" (25.4 cm)

Black Diamond

46826

15.5" (39.4 cm)

White

57822

15.5" (39.4 cm)

Black Diamond

57826

15.5" (39.4 cm)

Pacific Blue

57827

15.5" (39.4 cm)

Champagne

57828

15.5" (39.4 cm)

Barolo

58829

      37"
(93.98 cm)

WARNING

Explosion Hazard

Keep flammable materials and vapors, such as
gasoline, away from dryer.

Place dryer at least 18 inches (46 cm) above the floor
for a garage installation.

Failure to do so can result in death, explosion, or fire.

Summary of Contents for 110.9708

Page 1: ...Gas Dryer Use Care Guide Secadora a gas Manual de uso y cuidado Models Modelos 110 9708 9709 color number número de color W10035620 Sears Roebuck and Co Hoffman Estates IL 60179 U S A www sears com ...

Page 2: ...purposes this warranty applies for only 90 days from the date of purchase THIS WARRANTY COVERS ONLY DEFECTS IN MATERIAL AND WORKMANSHIP SEARS WILL NOT PAY FOR 1 Expendable items that can wear out from normal use including but not limited to filters belts light bulbs and bags 2 A service technician to instruct the user in correct product installation operation or maintenance 3 A service technician ...

Page 3: ... very important We have provided many important safety messages in this manual and on your appliance Always read and obey all safety messages This is the safety alert symbol This symbol alerts you to potential hazards that can kill or hurt you and others All safety messages will follow the safety alert symbol and either the word DANGER or WARNING These words mean follow instructions instructions D...

Page 4: ...ion of children is necessary when the dryer is used near children Before the dryer is removed from service or discarded remove the door to the drying compartment Do not reach into the dryer if the drum is moving Do not repair or replace any part of the dryer or attempt any servicing unless specifically recommended in this Use and Care Guide or in published user repair instructions that you underst...

Page 5: ...A sturdy floor to support the total dryer weight of 200 lbs 90 7 kg The combined weight of a companion appliance should also be considered A level floor with a maximum slope of 1 2 5 cm under entire dryer If slope is greater than 1 2 5 cm install Extended Dryer Feet Kit Part No 279810 Clothes may not tumble properly and automatic sensor cycles may not operate correctly if dryer is not level For a ...

Page 6: ...lent ventilation openings are acceptable Companion appliance spacing should also be considered Custom undercounter installation Dryer only Required spacing Closet installation Dryer only Required spacing For side or bottom venting 0 0 cm spacing is allowed Recessed or closet installation Dryer on pedestal Required spacing For side or bottom venting 0 0 cm spacing is allowed Installation spacing fo...

Page 7: ...commended that a separate circuit serving only this dryer be provided 48 in 2 310 cm2 3 7 6 cm 3 7 6 cm 1 2 5 cm 24 in 2 155 cm2 6 15 2 cm 76 193 cm 27 68 6 cm 5 12 7 cm 1 2 5 cm 1 2 5 cm Electrical Shock Hazard Plug into a grounded 3 prong outlet Do not remove ground prong Do not use an adapter Do not use an extension cord Failure to follow these instructions can result in death fire or electrica...

Page 8: ...Z223 1 The location should be easy to reach for opening and closing Gas supply connection requirements Use an elbow and a flare x NPT adapter fitting between the flexible gas connector and the dryer gas pipe as needed to avoid kinking Use only pipe joint compound Do not use TEFLON tape This dryer must be connected to the gas supply line with a listed flexible gas connector that complies with the s...

Page 9: ...d clamps must be used DURASAFE venting products are recommended DURASAFE vent products can be purchased from your dealer For further information please call 1 800 4 MY HOME 1 800 469 4663 or visit our website at www sears com Rigid metal vent For best drying performance rigid metal vents are recommended Rigid metal vent is recommended to avoid crushing and kinking Flexible metal vent Flexible meta...

Page 10: ...structions NOTE The following kits for close clearance alternate installations are available for purchase For further information please call 1 800 4 MY HOME 1 800 469 4663 A Louvered hood style B Box hood style A Dryer B Elbow C Wall D Exhaust hood E Clamps F Rigid metal or flexible metal vent G Vent length necessary to connect elbows H Exhaust outlet 4 10 2 cm 4 10 2 cm B A 4 10 2 cm 2 6 4 cm Im...

Page 11: ...erformance Vent system chart NOTE Side and bottom exhaust installations have a 90º turn inside the dryer To determine maximum exhaust length add one 90º turn to the chart InstallVentSystem 1 Install exhaust hood Use caulking compound to seal exterior wall opening around exhaust hood 2 Connect vent to exhaust hood Vent must fit inside exhaust hood Secure vent to exhaust hood with 4 10 2 cm clamp 3 ...

Page 12: ... connections you must use pipe joint compound resistant to the action of LP gas Do not use TEFLON tape A combination of pipe fittings must be used to connect the dryer to the existing gas line Shown is a recommended connection Your connection may be different according to the supply line type size and location 3 Open the shutoff valve in the supply line The valve is open when the handle is paralle...

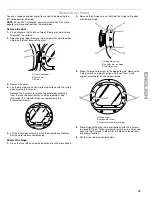
Page 13: ...ve only the 5 indicated screws 5 Lift the inner door assembly off of the outer door assembly Set the outer door assembly aside Reverse the hinge 1 Place the inner door screw head side up on the work space 2 Remove the 4 hinge screws that hold the hinge to the door and remove hinge 3 Move the large hole screw to the opposite side Remove the 2 plug screws and plastic plugs and insert them in the ori...

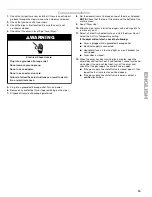
Page 14: ...e 2 Reassemble the inner and outer door assemblies with the 5 screws 3 Remove existing label from the opposite side of the door and discard Find label provided with the Use and Care Guide and apply over original hinge holes 4 Align the door by placing the locating tabs on the hinge with the locating holes on the dryer front panel Insert and tighten the center hinge screw The door will hang in plac...

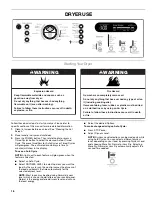
Page 15: ...ed cycle and start the dryer Do not select the Air Only Temperature setting If the dryer will not start check the following Dryer is plugged into a grounded 3 prong outlet Electrical supply is connected Household fuse is intact and tight or circuit breaker has not tripped Dryer door is closed 12 When the dryer has been running for 5 minutes open the dryer door and feel for heat If you feel heat ca...

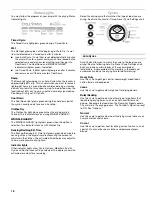
Page 16: ...ss level which is shown in bold letters on your control panel Normal is the energy preferred dryness level and will use the least energy Select the desired Options To make changes during an Auto Cycle Press STOP once Adjust Dryness Level NOTE Dryness Level selections can be made only while using Auto Cycles You can select a different dryness level depending on your load by pressing Dryness Level a...

Page 17: ...once To restart the dryer Close the door Press and hold START until dryer starts NOTE Drying will continue from where the cycle was interrupted if you close the door and press Start within 5 minutes If the cycle is interrupted for more than 5 minutes the dryer will shut off Select new cycle settings before restarting the dryer ControlLocked This feature allows you to lock your settings to avoid un...

Page 18: ...s on with Clothes Dry Sensing Revising Est Time The Sensing Revising Est Time light glows green when moisture sensing strips in the dryer drum are measuring the amount of moisture in the clothes The estimated time display may adjust to show a more accurate drying time Indicator lights Other indicator lights show Cycle Options Modifiers End of Cycle and Control Lock settings selected The display sh...

Page 19: ... be dried using Air Fluff The temperature setting is not adjustable with this cycle Reset cycle to complete drying if needed When using Air Fluff Check that coverings are securely stitched Shake and fluff pillows by hand periodically during the cycle Dry item completely Foam rubber pillows are slow to dry Rack Dry Rotate the dial to Rack Dry to use this cycle with the drying rack to dry clothes or...

Page 20: ... volume is set to Off Drum Light Press Drum Light to turn on the light inside the dryer drum During a cycle if Drum Light is selected the drum light turns on and will remain on until DRUM LIGHT is pressed again the door is open and closed or the door is left open for 5 minutes When the dryer is not running the drum light will turn on when DRUM LIGHT is pressed or the dryer door is opened and it wi...

Page 21: ...LEFREE HeatedDryerRack The dryer rack is shipped in place in your dryer Remove and discard any packing material before use Use the TUMBLE FREE Heated Dryer Rack for items that you do not want to tumble dry such as sweaters When you use the heated dryer rack the heated air inside the dryer flows in a concentrated pattern to allow efficient and uniform drying The dryer rack is recommended for use wi...

Page 22: ...due buildup To wash 1 Roll lint off the screen with your fingers 2 Wet both sides of lint screen with hot water 3 Wet a nylon brush with hot water and liquid detergent Scrub lint screen with the brush to remove residue buildup 4 Rinse screen with hot water 5 Thoroughly dry lint screen with a clean towel Replace screen in dryer CleaningtheDryerInterior To clean dryer drum 1 Make a paste with powder...

Page 23: ... the fuse or reset the circuit breaker If the problem continues call an electrician Was a regular fuse used Use a time delay fuse Is the dryer door firmly closed Was the Start button firmly pressed Large loads may require pressing and holding the Start button for 2 5 seconds No heat Has a household fuse blown or has a circuit breaker tripped The drum may be turning but you may not have heat Replac...

Page 24: ...ckly Separate the load to tumble freely Cycle time too short Is the automatic cycle ending early The load may not be contacting the sensor strips Level the dryer Change the dryness level setting on Automatic Cycles Increasing or decreasing the dryness level will change the amount of drying time in a cycle Do not use a dryer rack with an Automatic Cycle Lint on load Is the lint screen clogged Clean...

Page 25: ... Annual Preventive Maintenance Check at your request no extra charge Fast help by phone phone support from a Sears technician on products requiring in home repair plus convenient repair scheduling Power surge protection against electrical damage due to power fluctuations Rental reimbursement if repair of your covered product takes longer than promised Once you purchase the Agreement a simple phone...

Page 26: ...RA 41 Puesta en marcha de la secadora 41 Detención de la marcha de la secadora 42 Pausa o reanudación de la marcha 42 Control bloqueado 42 Sugerencias de ciclos y secado 42 Luces de estado 43 Ciclos 43 Opciones 45 Modificadores 46 Cambio de ciclos opciones y modificadores 46 Señal de fin de ciclo 47 Estante térmico de la secadora TUMBLE FREE 47 CUIDADO DE LA SECADORA 48 Limpieza del lugar donde es...

Page 27: ...ergentes limpiadores productos químicos o utensilios diferentes de los recomendados en todas las instrucciones provistas con el producto 7 Daños a piezas o sistemas o fallas de los mismos como resultado de modificaciones no autorizadas que se hayan efectuado en este producto EXCLUSIÓN DE GARANTÍAS IMPLÍCITAS LIMITACIÓN DE RECURSOS El único y exclusivo recurso del cliente según los términos de esta...

Page 28: ...n en este manual debe ser observada para minimizar el riesgo de incendio o explosión o para prevenir daños a propiedades heridas o la muerte No almacene o use gasolina u otros líquidos y vapores inflamables cerca de éste u otro aparato electrodoméstico PASOS QUE USTED DEBE SEGUIR SI HUELE A GAS No trate de encender ningún aparato electrodoméstico No toque ningún interruptor eléctrico no use ningún...

Page 29: ...epare o reemplace ninguna pieza de la secadora ni trate de repararla a menos que esto se recomiende especificamente en el Manual del propietario o en instrucciones de reparación publicadas para el usuario que usted comprenda y sólo si cuenta con la experiencia necesaria para llevar a cabo dicha reparación No utilice suavizadores de tejidos o productos para eliminar el estático de prendas a menos q...

Page 30: ...o resistente para soportar la secadora con un peso total de 200 lbs 90 7 kgs Asimismo se debe considerar el peso de otro artefacto que la acompañe Un piso nivelado con un declive máximo de 1 2 5 cm debajo de la secadora completa Si el declive es mayor que 1 2 5 cm instale el juego de extensión de patas de la secadora Pieza No 279810 La ropa quizás no rote adecuadamente y los ciclos del sensor auto...

Page 31: ... con aberturas de ventilación equivalentes También se debe considerar espacio adicional para otro electrodoméstico que le acompañe Instalación personalizada debajo del mostrador Sólo secadora Espacio necesario Instalación en el clóset Sólo secadora Espacio necesario Para la ventilación lateral o por la parte inferior se permite 0 0 cm de espacio Instalación empotrada o en el clóset Secadora sobre ...

Page 32: ...a el uso de un circuito independiente que preste servicio únicamente a esta secadora 48 pulg 2 310 cm2 3 7 6 cm 3 7 6 cm 1 2 5 cm 24 pulg 2 155 cm2 6 15 2 cm 76 193 cm 27 68 6 cm 5 12 7 cm 1 2 5 cm 1 2 5 cm ADVERTENCIA Peligro de Choque Eléctrico Conecte a un contacto de pared de conexión a tierra de 3 terminales No quite la terminal de conexión a tierra No use un adaptador No use un cable eléctri...

Page 33: ... en un lugar donde se pueda alcanzar con facilidad para cerrarla y abrirla Requisitos para la conexión del suministro de gas Use un codo y un accesorio adaptador abocinado NPT de por entre el conector de gas flexible y el tubo de gas de la secadora para evitar que se doblen Use solamente compuesto para juntas de tubería No utilice cinta TEFLON Esta secadora debe conectarse a la línea de suministro...

Page 34: ...ASAFE son recomendables Los productos de ventilación DURASAFE pueden adquirirse en su distribuidor Para obtener más información sírvase llamar al 1 800 4 MY HOME 1 800 469 4663 o visite nuestro sitio en la internet en www sears com Ducto de escape de metal rígido Para un óptimo rendimiento de secado se recomiendan ductos de escape de metal rígido Se recomienda el ducto de escape de metal rígido pa...

Page 35: ...cer convertir su secadora A Estilo de capota con ventilación tipo persiana B Estilo de capota con ventilación tipo caja 4 10 2 cm 4 10 2 cm B A 4 10 2 cm 2 6 4 cm La ventilación inadecuada puede ocasionar la acumulación de humedad y pelusa en la casa lo cual puede dar como resultado Daños de humedad en la carpintería muebles pintura empapelado alfombras etc Problemas en la limpieza de la casa y de...

Page 36: ...el cuadro del sistema de ventilación Los sistemas de ventilación más largos que los especificados Acortarán la vida de la secadora Reducirán el rendimiento dando lugar a tiempos de secado más largos y un aumento en el consumo de energía El cuadro del sistema de ventilación indica los requisitos de ventilación que le ayudarán a alcanzar el mejor rendimiento de secado Cuadro del sistema de ventilaci...

Page 37: ...rimero de lado a lado y luego del frente hacia atrás Si la secadora no está nivelada apuntale la secadora usando un bloque de madera Use una llave de tuercas para regular las patas hacia arriba o hacia abajo y verifique nuevamente si la secadora está nivelada Conexióndelsuministrodegas 1 Quite la tapa roja del tubo de gas 2 Utilizando una llave de tuercas conecte el suministro de gas a la secadora...

Page 38: ...a secadora y volverla a colocar Desmontaje de la puerta 1 Coloque una toalla o un paño suave encima de la secadora o del espacio en donde va a trabajar para proteger la superficie 2 Abra la puerta de la secadora Quite los 5 tornillos que sujetan la bisagra de la puerta en el panel frontal de la secadora 3 Quite la puerta 4 Coloque la puerta de la secadora en una superficie plana y protegida con el...

Page 39: ...e la puerta Para que encaje correctamente el borde del conjunto interno de la puerta queda completamente dentro del borde del ensamblaje externo de la puerta 2 Vuelva a colocar los ensamblajes interior y exterior de la puerta con los 5 tornillos 3 Saque la etiqueta que está del lado opuesto de la puerta y deséchela Busque la etiqueta provista con el Manual de uso y cuidado y aplíquela sobre los or...

Page 40: ...y ponga la secadora en marcha No seleccione el ajuste de temperatura de sólo aire Air Only Si la secadora no funciona revise lo siguiente Que la secadora esté conectada en un contacto de 3 terminales con conexión a tierra Que el suministro eléctrico esté conectado Que el fusible de la casa esté intacto y ajustado o que no se haya disparado el cortacircuitos Que la puerta de la secadora esté cerrad...

Page 41: ...S LEVEL para regular el nivel de sequedad que usted desea para su ropa A medida que avanza el ciclo el control detecta el nivel de sequedad de la carga y regula automáticamente el tiempo según el nivel de sequedad seleccionado NOTA Pueden secarse la mayoría de las cargas usando el nivel de secado Normal que se muestra en negrita en el panel de control El nivel Normal es el que tiene el secado de a...

Page 42: ...ra y borrar los ajustes Seleccione otro ciclo u opción 4 PASO OPCIONAL Si lo desea seleccione Opciones OPTIONS Para obtener más detalles vea Opciones 5 PASO OPCIONAL Si lo desea fije la señal de fin de ciclo Seleccione Alto LOUD o Bajo SOFT presionando el botón de la señal de ciclo Cycle Signal para avisarle cuándo termina el ciclo 6 Presione y sostenga Inicio START durante unos 3 segundos hasta q...

Page 43: ...ando la ropa está aproximadamente 80 seca Esto es útil cuando usted quiere quitar artículos livianos en una carga mixta para evitar que se sequen en exceso o para quitar artículos parcialmente secos que pudiesen necesitar un planchado Para saber cuándo la carga está aproximadamente 80 seca puede usar la opción de la señal de secado húmedo Damp Dry Signal Vea Señal de secado húmedo en Opciones Enfr...

Page 44: ...secar cargas pequeñas o cargas que necesitan un tiempo de secado corto Retoque Touch Up Use este ciclo para alisar las arrugas de ropa que ha estado empacada en una valija o artículos que se han arrugado por haber permanecido mucho tiempo en la secadora Esponjar Air Fluff Gire el cuadrante a Esponjar Air Fluff para usar este ciclo para artículos que requieren secado sin calor tales como artículos ...

Page 45: ...el ciclo de artículos voluminosos ropa de cama Bulky Bedding Cuando suene la señal abra la puerta para detener la secadora vuelva a arreglar la carga dentro de la secadora cierre la puerta y vuelva a poner la secadora en marcha para terminar el ciclo de secado Al volver a arreglar la carga esto ayudará en el proceso de secado Para el ciclo de artículos voluminosos ropa de cama Bulky Bedding la señ...

Page 46: ... antes de que comience la opción o modificador seleccionado 1 Presione STOP una vez 2 Seleccione la nueva opción y o modificador 3 Presione y sostenga START para continuar el ciclo NOTA Si accidentalmente presiona STOP dos veces el programa se despejará y la secadora se apagará Vuelva a iniciar el proceso de selección Cómo cambiar los ajustes prefijados de nivel de sequedad Si todas las cargas de ...

Page 47: ...eborde posterior de la secadora Empuje hacia abajo el frente del marco para asegurarlo sobre el filtro de pelusa 3 Coloque los artículos mojados encima del estante Deje espacio alrededor de los artículos para que circule el aire El estante no se mueve pero el tambor rotará Asegúrese que los artículos no cuelguen por los bordes o entre las rejillas del estante 4 Cierre la puerta 5 Rote la perilla a...

Page 48: ...e el filtro esté obstruido Limpie el filtro de pelusa con un cepillo de nylón cada 6 meses o con más frecuencia si se obstruye debido a la acumulación de residuos Para lavar 1 Quite la pelusa del filtro enrollándola con sus dedos 2 Moje ambos lados del filtro de pelusa con agua caliente 3 Moje un cepillo de nylón con agua caliente y detergente líquido Talle el filtro de pelusa con el cepillo para ...

Page 49: ...e la secadora o desconecte el suministro de energía 2 Abra la puerta de la secadora Localice la cubierta del foco de luz en la pared posterior de la secadora Quite el tornillo ubicado en la esquina inferior derecha de la cubierta Quite la cubierta 3 Gire el foco en sentido contrario a las manecillas del reloj Reemplácelo únicamente con un foco para electrodomésticos de 10 W Vuelva a colocar la cub...

Page 50: ... del suavizante de telas y úsela una sola vez Tiene el ducto de escape el largo correcto Controle el ducto de escape para verificar que no sea demasiado largo o no dé demasiadas vueltas Una ventilación larga aumentará el tiempo de secado Vea las Instrucciones de instalación Es el diámetro del ducto de escape del tamaño correcto Use un material de ventilación de 4 10 2 cm de diámetro Está la secado...

Page 51: ... también ayuda a prolongar la vida de su nuevo producto He aquí lo que se incluye en el Contrato Servicio experto por nuestros 12 000 especialistas en reparación competentes Servicio ilimitado y gratuito para repuestos y mano de obra en todas las reparaciones protegidas por el contrato Garantía sin disgustos reemplazo de su producto protegido si ocurren cuatro o más fallas del producto en el trans...

Page 52: ... 2006 Sears Brands LLC Registered Trademark TM Trademark SM Service Mark of Sears Brands LLC Marca registrada TM Marca de comercio SM Marca de servicio de Sears Brands LLC 9 06 Printed in U S A Impreso en EE UU ...

Reviews: