background image

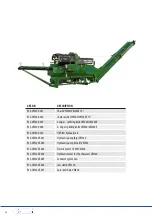
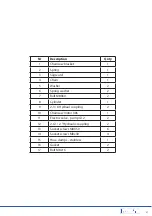
25

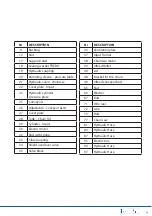
Nr

DESCRIPTION

9

Bushing

12

Nut

17

Support roller

18

Sealing washer TREDO

19

Hydraulic coupling

20

Ramming  device - pressure plate

21

Hydraulic valve - chainsaw

22

Cover plate - Input

23

Hydraulic cylinder 

 pressure plate

25

Conveyors

26

Adjustable  - conveyor belts

27

Cover plate 

28

Tank -  Chain Oil

29

Cylinder - Input

30

Electric motor

32

Rod with spring

33

Claw coupling

34

Shield over lever valve

35

Valve block

Nr

DESCRIPTION

36

Ventilation plate

37

Input Format

38

Chainswa motor

39

Infeed Roller

40

Lid

48

Bracket for the  chain

49

Infeed conveyor belt

65

Nut

66

Washer

67

Bolt

71

Wire reel

72

wire

73

Bolt

77

Chain saw

81

Hydraulic Hose

86

Hydraulic Hose

87

Hydraulic Hose

95

Electric box

96

Hydraulic Hose

97

Hydraulic Hose

Summary of Contents for 13-VM360E

Page 1: ...13 VM360E WOOD PROCESOR PLEASE READ ALL INSTRUCTIONS BEFORE USINGTHE PRODUCT TRANSLATED FROMTHE ORIGINAL...

Page 2: ...folding con veyor adjustable in 3 positions The machine produces between 4 and 5 m3 of wood per hour and can handle logs up to 36 cm automatic lubrication of the chainsaw and separate tank for hydraul...

Page 3: ...mal Welfare Act Persons under 15 years old and people with mental illness may not use these product Warning The machine must not in any circumstances be modified without permission from the manufac tu...

Page 4: ...F before power is connected Never overload the machine Do not move the machine while it is running Never leave the machine unattended when it is running Walking or staying under the conveyor is strict...

Page 5: ...urfaces such as exhaust system and to avoid oil and gasoline on the skin Hearing protection should be used when the engine is running SURROUNDINGS Make sure your working area is clear from people chil...

Page 6: ...stickers from your supplier SYMBOL SPECIFICATION Read the instructions manual before using the machine Warning High voltage Beware of thrown objects Be aware of the equipment s danger zone Warning Ris...

Page 7: ...ting make sure that the working area is cleared Take care and keep bystanders and animals away from the area within 5m in diameter Makesurethemachineisnotwornout havelooseordamagedparts Donotuseifdama...

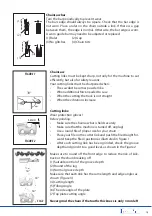
Page 8: ...safety equipments CUTTING AND SPLITTING OF WOOD Walk around and study the machine to familiarize yourself with its features before you start Press the engine start button Wait a few minutes until the...

Page 9: ...E FORWARD RAMMING PLATE RETURN CHAINSAW SPEED FASTER LOWER ALWAYS REMEMBER Work alone concentrate and always use common sense Use working gloves safety glasses and shoes with steel cap Do not wear loo...

Page 10: ...e upper part of the conveyor and gently lay it down on the ground When raising the car rier to the full length crank up to the desired height and angle It is important that the angle of the conveyor b...

Page 11: ...or Preparing the support legs Remove the pin that holds the support leg Lower the support leg Attach the support leg in the tracks of the machine s frame Marked on the image Ensure that the leg is fir...

Page 12: ...protec tive guard and the chainsaw bar Tension the chain by tightening the index bolt then tighten the two bolts holding the protective guard and the chainsaw bar The chain is tensioned correctly whe...

Page 13: ...and lower ing speed of the chainsaw before you start cutting firewood Run the machine a num ber of times without placing any wood to get the right speed of the bar Start with a low speed and increase...

Page 14: ...chain oil Cutting the last piece When cutting the last bit of the log push the handle down to hold the log in place Cut the log by pressing down the chainsaw carefully onto the log Hydraulic filter U...

Page 15: ...ing the bolts and move the plate forward or backward Note Don t move the plate too far in or too far out make sure it does not touch the ramming plate under the machine The plate is pre adjusted upon...

Page 16: ...d grease that leads to increased wearing of the machine After greasing wipe off excess grease from fittings LUBRICATION CHART 2 1 3 4 5 Replacement of blades Pull the handle out of the machine while l...

Page 17: ...keep in mind the risk of tipping MAINTENANCE AND SERVICE Ensure that the unit is stable and cannot tip over during maintenance and service Replace damaged or worn parts immediately to reduce the risk...

Page 18: ...iently Sharpens if requires TROUBLESHOOTING ERROR PROBABLE CAUSE ACTION The piston is not moving forward Low or no pressure in the system The engine rotates the wrong way Check oil pressure and level...

Page 19: ...ection gloves Before grinding Make sure the chainsaw bar is held securely Make sure that the machine is turned off unplug Use a round file of proper size for your chain Place your file on the cutter l...

Page 20: ...0 004 6 edges splitting knifeVM400 VM360E R13 VM400 014 Oil filter hydraulic oil R13 VM360E 001 Hydraulic pump big VM360 R13 VM360E 002 Hydraulic pump small VM360 R13 VM360E 003 Electric motor 7 5kWVM...

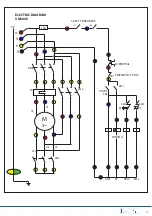
Page 21: ...21 ELECTRIC DIAGRAM VM360E PE L1 L2 L3 L0 SQ1 KM1 KM2 KM2 KM2 KT KT KT SAFETY BREAKERS FR BIMETAL EMERGENCY STOP START SB1 SB2 KM1 KM1 KM3 KM3 KM3 V1 U1 W2 U2 V2 FR SQ2 TIDREL M 3 10A...

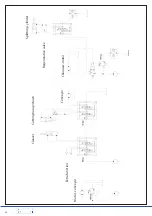
Page 22: ...22 Cleaver Cutting bar up down Conveyor Extra function Motor conveyor Chainsaw motor Regenerative valve Splitting cylinder...

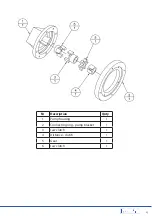
Page 23: ...23 Nr Description Qnty 1 Pump housing 1 2 Connecting ring pump bracket 1 3 Jaw clutch 1 4 Distance clutch 1 5 Gear 1 6 Jaw clutch 1...

Page 24: ...24...

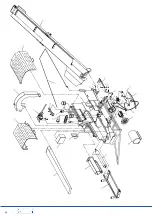
Page 25: ...7 Cover plate 28 Tank Chain Oil 29 Cylinder Input 30 Electric motor 32 Rod with spring 33 Claw coupling 34 Shield over lever valve 35 Valve block Nr DESCRIPTION 36 Ventilation plate 37 Input Format 38...

Page 26: ...26...

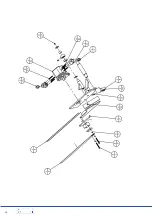
Page 27: ...1 5 Washer 2 6 Spring washer 2 7 Bolt M8X60 2 8 Cylinder 1 9 2 3 8 Hydraul coupling 2 10 Chainsaw motor 306 1 11 Electric valve pump G12 2 12 2 G1 2 Hydraulic coupling 2 13 Socket screws M8X50 6 14 S...

Page 28: ...WARRANTY TERMS AND CONDITIONS Validity of the warranty Kelifri s Warranty is valid 12 months from the date of purchase This warranty replaces Compensation for spare parts after acknowledgment that the...

Reviews: