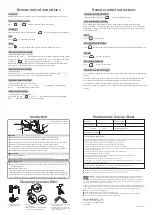

Remote control instructions
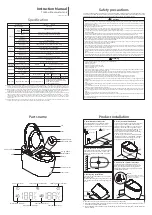
Instruction
Maintenance Service Sheet
Product
Product code
The selling store
Maintenance content
Free maintain regulation:
1. Free maintenance is provided when you use it properly in accordance with instructions and under warranty.
2. Please contact the dealer or the company if the fault occurs under warranty.
3. The following situations is chargeable for maintenance under warranty:
① Faults or damages caused by the improper operation, repair or reinstall.
② Faults or damages caused by forced movement after the product is installed.
③ Faults or damages caused by earthquakes, fires, floods, lightning strikes, corrosive liquids, abnormal voltages
and other natural disasters.
④ Faults or damages caused by other approaches which are not for family-use.
⑤ Fail to provide the maintenance-service sheet.
⑥ There is no detailed records or there are modified records on the maintenance-service sheet.
4. This maintenance-service sheet is valid.
5. This maintenance-service sheet is unrepeatable, please safe keep it.
6. The customer can go to the local repair network or sent the products back to the company for free repair
within two years from the purchase date.
Executive standard: CONFORMS TO UL STD. 1431/UL STD. 1591 ASME A112.4.2-2021
Warranty period: within two years from the purchase date
Province
City
Dealer ( signature ):
Purchase date
KELISS TRADING CO., LTD
ADD:RM4, 16/F, HO KING COMM CTR,
2-16 FAYUEN ST, MONGKOK KOWLOON,
HONG KONG
Made in China
and can radiate radio frequency energy and, if not installed and used in accordance with the instructions, may
cause harmful interference to radio communications.
However, there is no guarantee that interference will not occur in a particular installation. If this equipment does
cause harmful interference to radio or television reception, which can be determined by turning the equipment off
and on, the user is encouraged to try to correct the interference by one or more of the following measures:
■
Reorient or relocate the receiving antenna.
■
Increase the separation between the equipment and receiver.
■
Connect the equipment into an outlet on a circuit different from that to which the receiver is connected.
■
Consult the dealer or an experienced radio/TV technician for help.
NOTE:
This equipment has been tested and found to comply with the limits for a Class B digital
device, pursuant to Part 15 of the FCC Rules. These limits are designed to provide reasonable
protection against harmful interference in a residential installation. This equipment generates uses
■ Due to the constant improvement about our products, we will keep the final interpretation of products change.
■ If the products you bought exist differences from the instruction, please in kind prevail.
Without automatic flip version: Touch the kick sensor(short touch and then leave) to realize
the flushing function.
With automatic flip version:
When the lid and seat are closed, short touch the kick sensor and the lid automatically opens.
When the lid and seat are closed,long touch the kick sensor and the lid and seat automatically open;
When the lid open,seat closed,short touch the kick sensor and the seat automatically opens;
When the lid and seat are open,short touch the kick sensor to realize the flushing function.
Foot kick sensor
●
●
P
ress the knob to flush.
Long press the knob for 5 seconds to start or close the Knob indicator.
Not sitting
●
●
Sitting
B
idet wash:Knob forward, spray bar extend,bidet wash works about 2 minutes.
Rear wash:Knob backward, spray bar extend,rear wash works about 2 minutes.
Nozzle position:Under bidet/rear wash,knob forward or backward to adjust nozzle position.
Stop:Under bidet/rear wash,press the knob to stop current working function.
Drying:Without any function working, long press the knob for 2 seconds to start drying;
Knob forward to make the wind temp higher, knob backward to make the wind temp lower.
Flush:Without any function working,press the knob to flush.
●
●
●
●
●
●
Forward
Press
Backward
Knob function description
No need to reset the stepless knob after use
Remote control instructions
Spray bar swing cleaning
Under rear/bidet wash, press “ ”, nozzle oscillating cleaning
SWING
Seat temperature setting
4 levels adjustable(close option included). When closed, seat temp set as room temp.
Press “seat temp” to adjust from the highest to close option(100°F, 95°F, 89°F, room temp);
After sitting for more than 10 minutes, the seat temp will automatically drop to a low level to
avoid low temp scald.
Combination function keys
Stop + Rear wash: Long press for 5 seconds to activate or deactivate the powerful deodorizing
function.
Stop + Bidet wash: Long press for 5 seconds to activate or deactivate the night light function.
Stop + Massage: Long press for 5 seconds to activate or deactivate the kick flip function .
flush + Rear wash: Long press for 5 seconds to activate or deactivate the Pre-wetting.
Rear wash + Bidet wash: Long press for 5 seconds to activate or deactivate the Automatic nozzle
cleaning .
Energy saving function
Click " " to close all functions including seat temperature and enter energy-saving mode.
Flush
Press “ ” to start flush.
FLUSH
Press“ ” to open/close the lid.
Flip lid
Press “ ” to open/close the seat.
Open/close the seat
Sit down
Open the lid and sit down in sensor area, this toilet will automatically sense human body.
Wind temperature setting
3 levels adjustable:
Under dry, press “+” to increase wind temp,till the highest temp. Same, press “-” to
decrease wind temp (122℉, 109℉, 96℉), till the lowest wind temp.
Spray bar position setting
3 levels adjustable under rear/bidet wash:
Under rear/bidet wash, find “ +/- ”, press “ + ” forward the bar, till the highest.
Press “ - ” backward the bar, till the lowest.
Choose cleaning mode
Press “ ” or “ ”, nozzle self-cleaning, then start cleaning.
REAR
BIDET
Dry
Press “ ” to start warm air drying.
DRY
Stop
Press “ ” to stop all the functions such as rear wash, bidet wash, dry, etc.
STOP
Massage
Under rear/bidet cleaning mode, press the “ ” and enjoy oxygen-enriched massage.
MASSAGE
Water volume setting
3 levels adjustable: such as rear wash
Under rear wash, find “ ”, press “+” to increase water volume, till the biggest.
Press “-” to decrease water volume, till the smallest.
FLOW
Water temperature setting
3 levels adjustable: such as rear wash
Under rear wash, press “+” to increase water temp, each time 4℉ difference till the highest
temp. Same, press “-” to decrease water temp(102℉, 98℉, 95℉), till the lowest water temp.
Long press “ ” , enter the normal temp cleaning, press “+” to cancel.
When inlet water temp higher than 68℉, cleaning mode can work. When inlet water temp
lower than 68℉, it will be adjusted to 68℉ then go for cleaning mode.
TEMP
Cleaning the water filter
② Remove the water-inflow filter from
the inlet hose.
③
T
ake out the filter by using a flat-blade
screwdriver to unscrew the filter .
④ Remove the filter screen and rinse
it with clean water.
⑤ Install the filter screen as it is, be
sure to tighten it, otherwise it will
cause water leakage.
① Unplug the product.
Shutoff water supply.
G1/2


