background image

15

Kelda Showers products are designed for easy maintenance and should give continued superior and safe performance, 

provided:

1. 

Kelda Showers products are installed, commissioned, operated and maintained in accordance with this installation 

guide.

2. 

Periodic attention is given as necessary to maintain the product in good functional order. 

Guidelines for frequency are given below. Maintenance must be carried out in accordance with these instructions, and 

must be conducted by designated, qualified and competent personnel. Children are not to perform maintenance. Kelda 

showers are built with the highest quality components which are designed for a long life, but due care must be taken 

during maintenance to avoid damage.

Daily/Weekly Hygiene

External surfaces of the chrome plated showerhead wiped clean with soft cloth and a mild detergent. Take care not to 

get detergents on to stainless steel.  Stainless steel should be regularly cleaned with warm water and soft cloth, taking 

care to remove any dirt and remnants of shampoo or soap. See "Stainless Steel Care" for more details. 

Quarterly Hygiene*

Shower heads to be dismantled to clean, de-scale and sanitise main shower head components. Please see instructions 

for dismantling and reassembling head for cleaning. Unlike a conventional showerhead a Kelda showerhead is highly 

unlikely to block due to limescale and so service timings can set purely for hygiene. 

*This service point can be adjusted to suit site specific maintenance regime and shower usage levels. 

Bi-Annual Visual & Hygiene

Check internal component condition of the shower head and hoses. Inspect for debris, scale deposition, deformation, 

damage, etc. Maintain or renew if necessary.  Instructions for cleaning and disinfecting air hoses are given in this booklet. 

Shut off water supply, check stop valves then remove and clear filters of debris. These may be located in thermostatic 

mixer if an one is fitted.

If a mixer is fitted into panel then please follow maintenance guide which is specific to that model of mixer.

Stainless Steel Care

Stainless steel requires regular cleaning for to keep its anti-corrosion properties, this can be done just with a soft cloth 

and warm water. Glass cleaner can be used to remove fingerprints (we advise you spot test the use of any cleaner first). 

Chlorine, bleach, detergents, shampoos and soaps can all all strip stainless steel of its anti-corrosion properties and if left 

uncleaned this can result in rust spotting. If you believe any of these substances have been in contact with the stainless 

steel or if the panels need cleaning following a period of neglect, then use a stainless-steel cleaner – these are widely 

available but stop test any cleaner first. 

If cleaning has been missed and rust spotting has occurred, then vigorous cleaning with stainless-steel cleaner can bring 

back original anti-corrosion properties.   
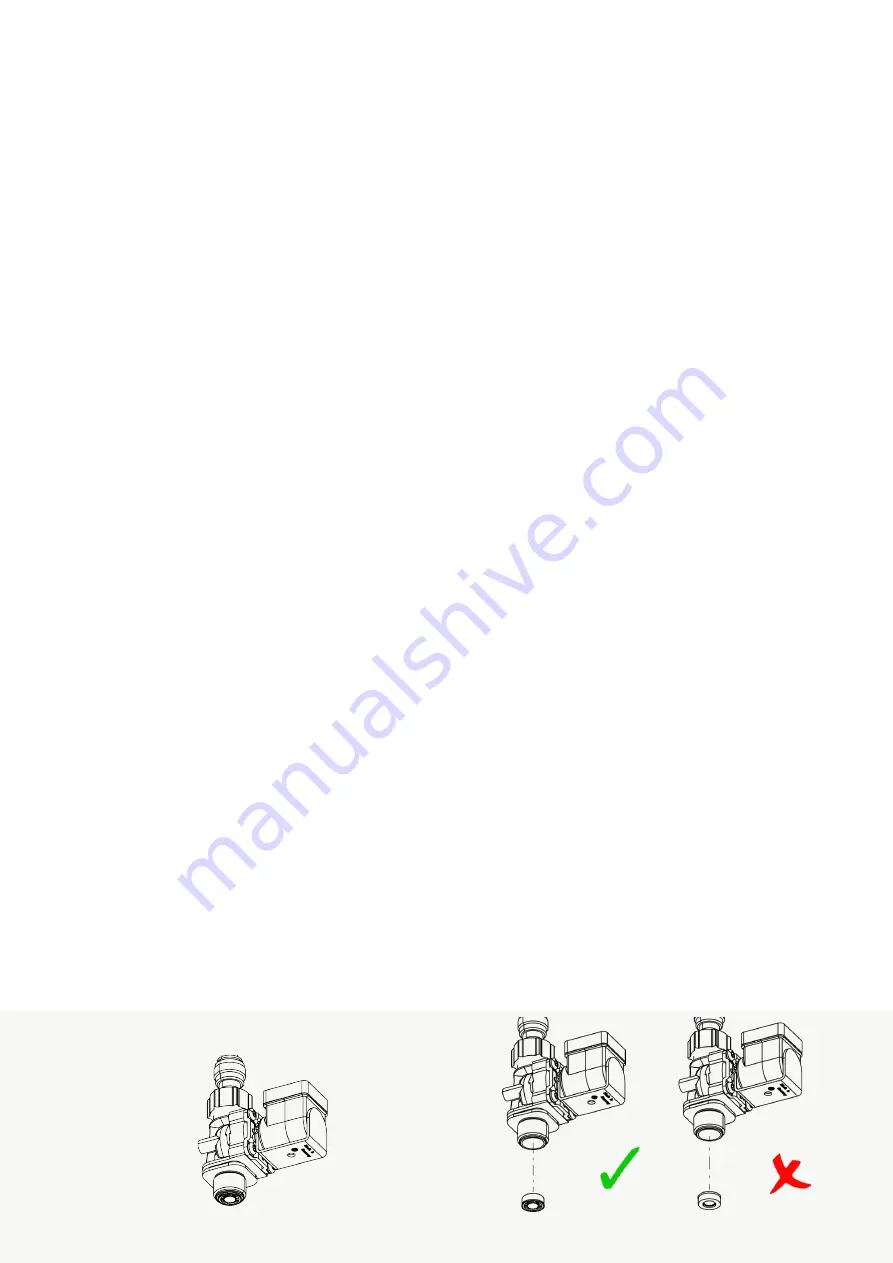
Maintenance

Flow Regulator Installation

Summary of Contents for 93011100

Page 1: ...and operational purposes Installation Manual and User Guide Fixed Head AV Commercial Shower Panel Timed Flow 93011100 Flex Head AV Commercial Shower Panel Timed Flow 93013100 Fixed Head AV Commercial...

Page 2: ...ns from a blended water supply mixer not included and adjustable timed flow is activated by a digital push button Flex Head Stainless Steel Timed Flow TMV2 Thermostatic 93015100 Surface mounted stainl...

Page 3: ...solder pipes or fittings within 300mm of the supplied hoses as heat can transfer along the pipework and damage components 4 DO NOT use excessive force when making connections to the flexible hose sol...

Page 4: ...with 15mm push fit connection Timed Flow TMV2 93014100 93015100 TMV2 Mixer Hot and cold water connection points BSP compression fittings or extend with supplied 800mm flexible hose with 15mm push fit...

Page 5: ...0mA RCBO Blended water feed Bottom Alternative route Low voltage electrical link Rear Push button control and LED indicator Low voltage 24V Electrical link 220 240V Mains electricity supply via the OW...

Page 6: ...mmercial Panel order Panel Specification 222mm 1110mm 218mm 86mm x4 M5 Fixing Points OR x1 Kelda Shower Head x1 OWA 60 24V Power Supply x1 Allen Key 5mm x1 Fixing Kit x6 Screws x6 Rawl plugs x1 Gromme...

Page 7: ...lve 32A 30mA RCBO Hot Cold water feed Bottom Alternative route Low voltage electrical link Rear Digital switch control and LED indicator Low voltage 24V Electrical link 220 240V Mains electricity supp...

Page 8: ...ommercial Panel order 2 Panel Specification x4 M5 Fixing Points x1 OWA 60 24V Power Supply x1 Allen Key 5mm x1 Fixing Kit x6 Screws x6 Rawl plugs x1 Grommet Selection Installation 3 OR x1 Kelda Shower...

Page 9: ...tensions or multiple sockets The power supply cable must never be bent or dangerously compressed 2100mm 2000mm 1950mm 1850mm Installation should be completed to suit the user s requirements Installati...

Page 10: ...or pinched when front panel is fitted Secure front panel with M5 Hex screws using supplied Allen key For TMV2 panel fit control handle with Allen key provided 3 4 Run the low electrical power cable fr...

Page 11: ...s in the country of installation Only the power supply and cables provided by Kelda Showers can be used Damaged power supplies and cables should be scrapped other power supplies or cables cannot be us...

Page 12: ...tory 2 To change the fan speed settings press FAN button once There are 6 speed settings 1 6 3 To display current fan speed set press and hold FAN button for 2 seconds The number of LED flashes corres...

Page 13: ...eed button to run the fan independently of full shower operation Time Delay Feature The factory setting is set at 30 seconds 3 LED Flashes Press TMR button once the number of LED flashes next to the b...

Page 14: ...upply Conduct hard reset by switching off electrical supply and waiting 10 seconds before turning on Debris in fan Clear any debris from fan and follow Fan Test Function p 12 If fan runs then check fl...

Page 15: ...mescale and so service timings can set purely for hygiene This service point can be adjusted to suit site specific maintenance regime and shower usage levels Bi Annual Visual Hygiene Check internal co...

Page 16: ...te 2 and atomisation engine 3 are held until screw removed 3 Slowly lower fascia plate and atomisation engine 4 Carefully detach the rubber hose from the water chamber 4 ensuring not to remove the hos...

Page 17: ...solution and flush through continue this until hoses are clean Once hoses are clean flush hoses through with fresh water Shake out any excess water and wipe dry Replace air supply hose by gently inse...

Page 18: ...ser engine E3 Fixed Fascia plate E3 Fixed Screw cap 03 80047 E3 Flex Re fresh replacement pack Water chamber E3 Flex Atomiser engine E3 Flex Fascia plate E3 Flex Screw cap 04 32008 TMV2 Single Outlet...

Page 19: ...ption Parts List 06 82004000 P23 Kelda Hub P23 Kelda Hub Base P23 Kelda Hub Lid P23 Kelda Hub Lid Clips P23 PCBA RVE45 Fan Blower Air Adapters 07 35017 19mm 800mm Air hose 19mm 800mm Flexible Air Hose...

Page 20: ...chase providing that they are in good order and the packaging is unopened Note returned spares will be subject to a 15 restocking charge and authorisation must be obtained from Kelda Showers before re...

Page 21: ...Trading Estate Chandler s Ford Eastleigh SO53 4DR UK Tel 44 0 2381 290640 Web www keldashowers com DISPOSAL Do not dispose of with household waste Please recycle where facilities exist Check with your...

Reviews: