


Model 6514 Quick Results Guide
17
Configuring limit tests
Press SHIFT then CONF-LIM, then select LIMIT 1 or LIMIT 2. Use CONTROL to
enable the test, then enter your HILIM and LOLIM values (-9.999999T to +9.999999T).
(Place the cursor on the + or - keys to change polarity or the desired range symbol to
change range.)
Once limit tests are configured, use the LIMIT key to start and stop the limit test. Results
are displayed as summarized in Table 11.
Remote limits programming
SCPI commands
Basic SCPI commands for basic limit testing are listed in Table 12. See Section 10 of the
Model 6514 Instruction Manual for additional limit test commands
.
Programming example
The programming example in Table 12 tests limits on a voltage. Limit 1 values are ±1, and
Limit 2 values are ±0.1.
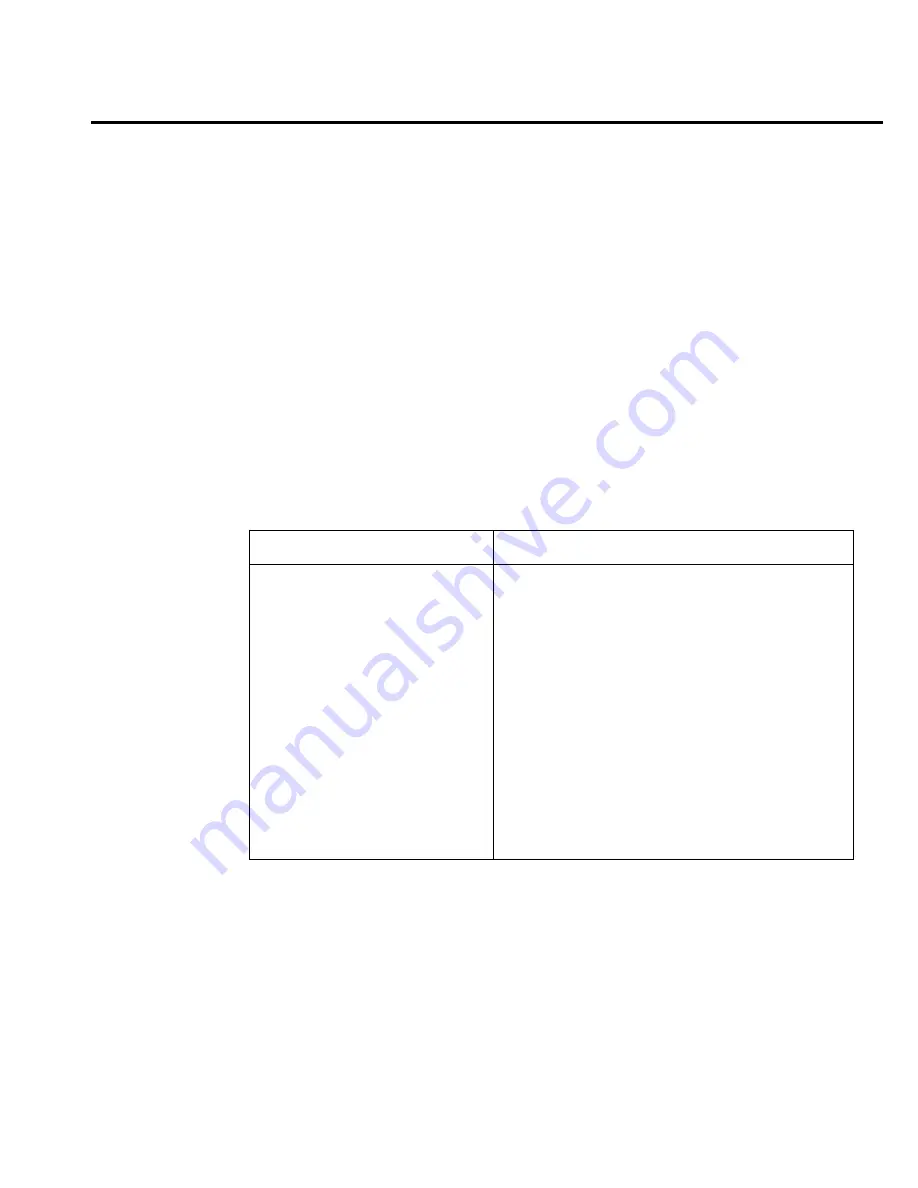
Table 12
SCPI commands: basic limit testing
Command
Description
:CALCulate2:LIMit:STATe <b>
Enable/disable Limit 1 test: <b> = ON or OFF.
:CALCulate2:LIMit:LOWer <n>
Set lower limit for Limit 1: <n> = limit:
-9.99999e20 to 9.99999e20.
:CALCulate2:LIMit:UPPer <n>
Set upper limit for Limit 1: <n> = limit;
-9.99999e20 to 9.99999e20.
:CALCulate2:LIMit:FAIL?
Query Limit 1 test result (0 = pass, 1 = fail).
:CALCulate2:LIMit2:STATe <b>
Enable/disable Limit 2 test: <b> = ON or OFF.
:CALCulate2:LIMit2:LOWer <n> Set lower limit for Limit 2: <n> = limit:
-9.99999e20 to 9.99999e20.
:CALCulate2:LIMit2:UPPer <n>
Set upper limit for Limit 2: <n> = limit:
-9.99999e20 to 9.99999e20.
:CALCulate2:LIMit2:FAIL?
Query Limit 2 test result (0 = pass, 1 = fail).