background image

WARNING

Turn on the direction signal lamps in time when 

changing the driveway or turning a direction 

and turn off the lamps.

9  -  10            

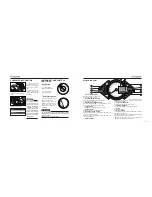
Turn the switch to "      " position, the high beam of 

headlamp turn on and the indicator lamp on the 

meter would also turn on; turn the switch to "     " 

position, the low beam of headlamp turn on.

Direction indicator lamp switch

Turn the switch to "    " position, the left direction 

signal lamp flashes; turn the switch to "     " position, 

the right direction signal lamp flashes. And the indi-

cator lamps would turn on accordingly.

Dimmer switch


Press down on the button, to activate the horn.

Horn button

When passing other vehicles, press this button so 

the high beams of the headlamp would flash to 

alarm the vehicles in front of you.

Passing switch 

(IF EQUIPPED)


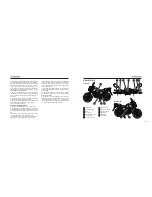
HANDLEBAR

3. Dimmer switch “    /     ”

2. Passing switch

1. Choke switch

4. Direction indicator lamp switch

 “    /    ”

5. Horn switch “     ”

2. Light switch “     /        ”

1. Engine stop switch“    

/     

” 

3. Electric starter button “   ”

2

1

3

1

2
3

4

5

LEFT HANDLE

RIGHT HANDLE

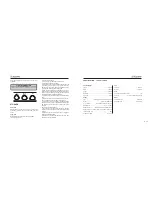
1.  

Speedometer

Speedometer shows the 

running speed, hours/kilometers.

2.  

Odometer

Odometer records the total mileage driven.

neutral  number lamps are off and the neutral indicator 

lamp 

 is on.

3.  

Reset Knob

The mileages on trip meter can be reset by turning the 

knob.

4.


Trip Meter

Trip meter can be reset, which records the mileages 

driven in a specific period.

5.  

Turning Indicator

The indication lamps would flash with the turning 

signals.

6.  

Fuel Level Indicator

1

8

10

9

2

3
4

6

5

7

It indicates the fuel level in the fuel tank.

7.  

Gear Indicator Lamp

Numbers on the meter indicate the gear position of the 

vehicle.  

8.


Tachometer

Tachometer indicates the revolution per minute of 

engine.

9.  

Neutral Indicator Lamp

When the transmission is in the neutral , the indicator 

lamp would be on.

10.  

High Beam Indicator Lamp

When the high beam lamp of the headlamp turns on, 

the high beam indicator lamp would be on.

Summary of Contents for 2015 RKS 125-26

Page 1: ...as purchased the accessories fitted or the national market specification No claims will be asserted as a result of such discrepancies Dimensions weights fuel consumption and performance data are quot...

Page 2: ...rides So remember to put safety first Our company continually seeks advance in product design and quality Therefore while this manual contains the most current product information available at the ti...

Page 3: ...your vehi cle where there is no traffic until you have become thoroughly familiar with the vehicle and all of its con trols Many accidents have been caused by error of the vehicle operator A typical e...

Page 4: ...r face Slow down as you approach a corner or turn Once you have completed a turn accelerate slowly Be careful when passing parked cars A driver might not see you and open a door in your path Railroad...

Page 5: ...e mileage the vehi cle covers in a period of time Odometer TOTAL it records the total mileage the vehi cle has covered in km 7 Adjust button Short press the button to switch between km h and mph Long...

Page 6: ...ndicator lamp switch 5 Horn switch 2 Light switch 1 Engine stop switch 3 Electric starter button 2 1 3 1 2 3 4 5 LEFT HANDLE RIGHT HANDLE 1 Speedometer Speedometer shows the running speed hours kilome...

Page 7: ...f position When fuel switch is on the position of fuel can t flow to carburetor from fuel tank Please keep the fuel switch on Off position when you do not drive the vehicle On position When fuel switc...

Page 8: ...d brake fluid to specified level Check hydraulic system for leakage Drum brake If equipped Check operation Check brake shoes for wear Replace if necessary Throttle grip Make sure that operation is smo...

Page 9: ...un the engine in high speed when you do not drive the vehicle or it will become over heating and damage its inner parts NOTICE 15 16 ITEM CHECKS Wheels and tires Check for damage Check tire condition...

Page 10: ...eplace Valves Check adjust valve clearance Air filter element Inspect cleaning replace Carburetor Check adjust idle speed Disc brake Check operation fluid level and vehicle for fluid leakage Inspect r...

Page 11: ...plug gasket and its mating surface and then wipe off any grime from the spark plug threads CHECKING THE SPARK PLUG The engine oil level should be checked before each ride In addition the oil must be...

Page 12: ...ler cap wipe the dipstick clean insert it back into the oil filler hole without screwing it in and then remove it again to check the oil level 4 If the engine oil is below the minimum level mark add s...

Page 13: ...m of rear wheels to adjust the free play of rear brake Set down the rear brake pedal after adjusting until there is effective brake feeling The extension line is within the range The extension line is...

Page 14: ...of a higher amperage rating than recommended to avoid causing extensive damage to the electrical system and possibly a fire or problems 12V 35W 35W 12V 2W 12V 3A 12V 10W 12V 5W 12V LED Turn light Hea...

Page 15: ...225kpa 2 25kgf cm2 X O X 2 Lubricate drive chain 3 Drain fuel in fuel tank and carburetor out Install the fuel tank cover again 4 Detach the spark plug and add one teaspoon of 15 20cm3 clean engine oi...

Reviews: