background image


19" LCD Open frame SAW TM

the Dust T-proof type

User Guide (Rev2.0) 


- 7 - 

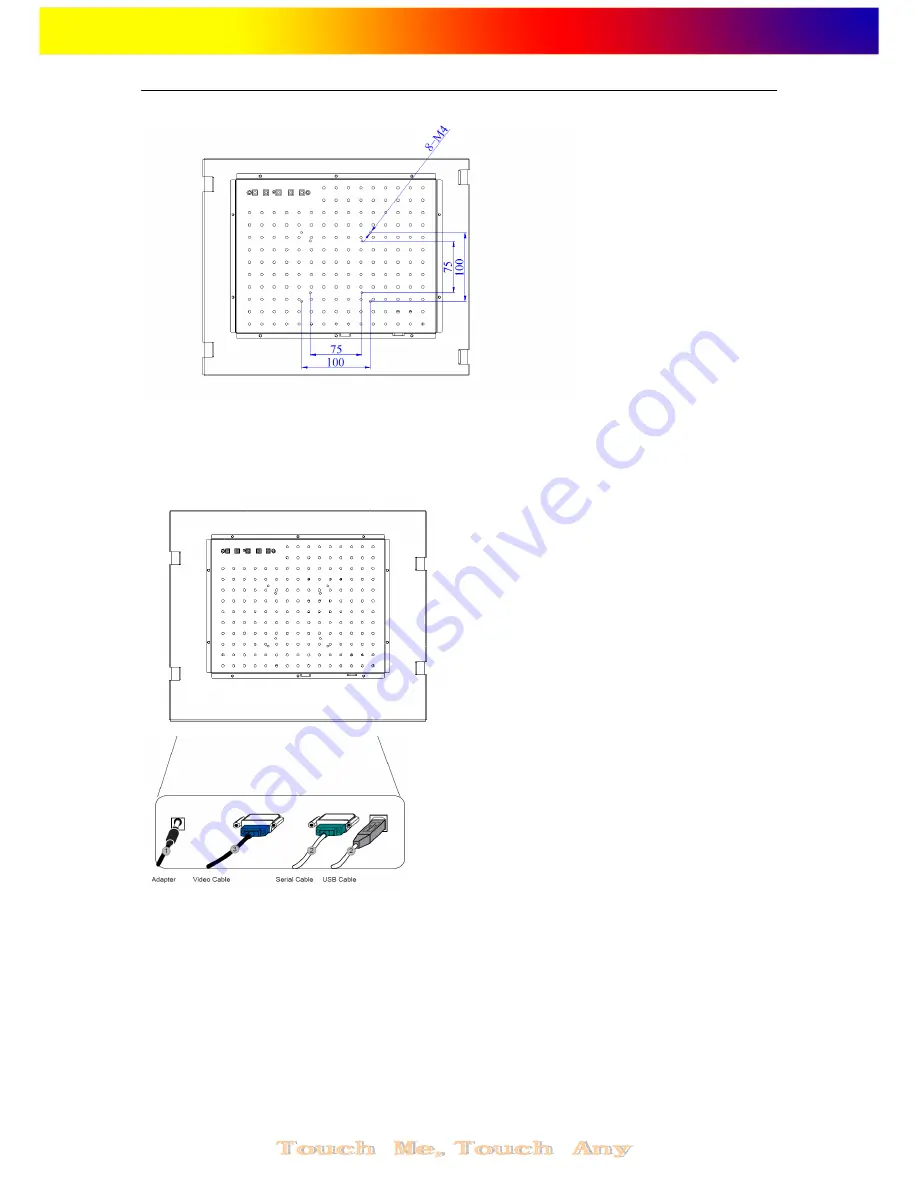
NOTE:Do not penitrate the M4 screw into the monitor more than 5mm. 


2.5 Interface Connection 

Note: Before connecting the cables to your touchmonitor and PC, be sure that the 
computer and touchmonitor are turned off. 


1.    Connect one end of either the 

serial (RS232) cabl

e or the 

USB cable

(but not both) to the 

rear side of the computer and the other end to the LCD monitor. Tighten by turning the two 
thumb screws clockwise to ensure proper grounding ( USB cable does not have thumb 
screws). 
2. Connect one end of the 

video cable 

to the rear side of computer and the other to the LCD 

monitor. Tighten by turning the two thumb screws clockwise to ensure proper grounding. 
3. Connect one end of the 

power adapter 

to the monitor and the other end to the connector of 

the power cord.   
4. Press the 

power button 

on the rear panel to turn the monitor power on. 

Summary of Contents for KOT-0190US-SA6BP

Page 1: ...frame SAW TM the Dust T proof type User Guide Rev2 0 1 19 LCD Open frame SAW Touch Monitor the Dust proof Type User Guide Rev2 0 Model KOT 0190US SA6BP Shenzhen K JAD Technology Co Ltd www keetouch c...

Page 2: ...ion and Setup 2 1 Unpacking Your Touchmonitor 4 2 2 Product Overview 5 2 3 Attaching the L bracket 5 2 4 VESA Mounting Interface 6 2 5 Interface Connection 7 2 6 Installing the Driver Software and Cal...

Page 3: ...out the Product Your LCD openframe touchmonitor is 19 SXGA TFT color display with the following features Long lasting product cycle enclosure controlled by Keetouch specifications Future generation pa...

Page 4: ...ow to install your LCD touchmonitor and how to install the driver software 2 1 Unpacking Your Touchmonitor Check that the following 9 items are present and in good condition One Touchmonitor Two L bra...

Page 5: ...To attach the L brackets 1 Lay the monitor face down 2 Place the long end of the L bracket against the side of touchmonitor Line up the two holes of the L bracket with the two holes of the touchmonit...

Page 6: ...Your touchmonitor conforms to the VESA Flat Panel Monitor Physical Mounting Interface FPMPMITM Standard which defines a physical mounting interface for flat panel monitors and corresponding standards...

Page 7: ...not both to the rear side of the computer and the other end to the LCD monitor Tighten by turning the two thumb screws clockwise to ensure proper grounding USB cable does not have thumb screws 2 Conn...

Page 8: ...com Your Keetouch touchmonitor is Plug and Play compliant Information on the video capabilities of your touchmonitor is sent to your video display adapter when Windows starts If Windows detects your t...

Page 9: ...nterface click the Install button to start installing the driver as following Installation successfully as following 2 6 2 Calibration Click at the right side in the down corner of the Desk Top then c...

Page 10: ...pen frame SAW TM the Dust T proof type User Guide Rev2 0 10 Windows will pop out the calibration interface then click with finger one by one as follow After clicking the on by one the calibration is c...

Page 11: ...ss Typ With SAW Glass Sensor 275cd m2 Response Time Typ 5ms Horizontal left right 80 80 Viewing Angle Typ at CR 10 Vertical up down 80 80 Contrast Ratio Typ 800 1 Video Input Analog RGB Signal Input H...

Page 12: ...Auto adjust Phase Clock H V Location Languages Function Reset Touch screen Type 19 SAW 6MM thickness of touch screen sensor Touch System Interface USB and RS232 Certificates ETL FCC CE RoHS Mechanical...

Page 13: ...standard L brackets are included Appendix B B Typical Application Gaming Casino Systems Outdoor and indoor Kiosks Entertainment Transport and Ticketing Hospitality Banking Customizsed Solutions How t...

Reviews: