16
4.4 Wiring Installation Procedure
1.
Before attaching the large battery cables to the MKSM posts, slide included protective
boots onto the cables. The first cable shall be connected to the positive
(+)
terminal of
the MKSM, and then connected to the positive
(+)
terminal of the battery, or starter.
2.
Slide included protective boot onto the negative
(–)
cable. This second cable shall be
connected to the negative
(–)
clamp, or terminal of the battery, engine, or chassis
ground and then connected to the negative
(–)
terminal of the MKSM module.
3.
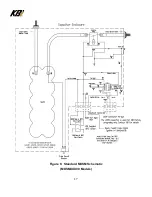
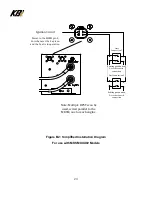
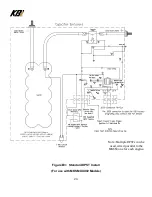
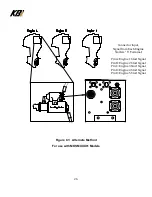
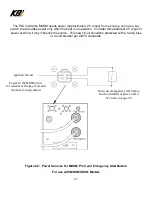
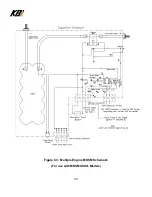
As based on Figure 5, and Figure 6 create and wire the harnesses to the Deutsch
connector. The MKSM Deutsch connector has been provided with a mating connector
that has pigtail wire leads tagged and identified in order to facilitate installation.
4.
For the PLC input, pin four (4) of the wire interface connector, find a 5-amp power
source from the vehicle, or vessel “key-on” ignition source that is live positive
(+)
only,
when the ignition switch is on, and is capable of delivering up to 5 amps. This can often
be sourced at the engine. Install a 5-amp fuse in this circuit within 7-inches of the
power source. Use care not to disturb or compromise the engine’s own wiring harness,
or connections.
NOTE:
The PLC inside the MKSM needs power (approximately 2.5 amps) from a
source, such as a key switch, that provides power only when the vehicle or boat is in
operation. Consider this additional 2.5 amps of power and how it may influence the
source. This new circuit should be protected with a 5-amp fuse or circuit breaker per
ABYC standards in marine applications.
5.
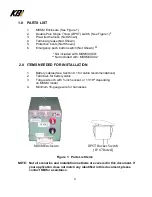
Wire the DPST switch by replacing the existing vehicle, vessel, or equipment push
button engine starting switch with the KBI supplied DPST switch. Then find and wire the
appropriate PLC input (pin 4) as based and depicted on Figure 5, and Figure 6. Do not
connect any wiring to the J1939 Connector.
The J1939 CAN-Bus is used for KBI
Factory programming only. Contact KBI for details.
6.
Apply provided protective grease on MKSM positive
(+)
and negative
(–)
terminals.
7.
Attach provided protective boots to terminals on MKSM module.
8.
To monitor the MKSM state of charge, order and install the KBI Voltmeter wire-harness,
and connector accessory kit, KBI part number 302809. See page 33. The meter
used may be digital, or analogue; however, it
must
be activated only with a momentary
ON switch or button. Permanently wiring a voltmeter to the MKSM will accelerate the
depletion of its charge.
9.
Wiring is complete and the unit is now ready to operate.
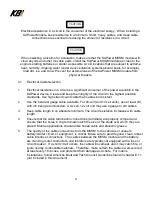
After the installation and wiring are complete, and whenever the DPST switch is pressed, the
MKSM positive (+) and negative (–) terminals will be live. Do not short-circuit the terminals.
WARNING

