These are our mechanics
Robert and Stefan.
They will help you
to assemble your KayserBed!
Assembly Instructions
for your new
Timmy
- care cot
Nice to meet you!
Hello!
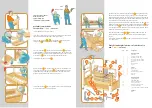
The assembly must be on a level surface.
If your bed is equipped with a set of castors then please screw them first into
the holes drilled under the side frames (drawing left above).
Please lay the architraves 4 + 5 on the ground in order to push in the
transverse nuts 10 . Now screw in the threaded bars 11 .
Set up one side frame 1 . At first, install the first architrave 5 by putting it
with the threaded bars through the lower drilled holes of the side frame. The
wooden pegs must fit properly into the drilled holes. Then bolt the architrave
with a brass cap 12 . Now, the construction stands steady already!
Install the second lower architrave 5 .
The second side frame 1 has to be pushed onto the 6 remaining threaded
bars of the architraves and securely tightened.
The bed is now ready so that the sleeping platform 14 can be inserted. At first,
take the control units out of the packaging. Then you need a second person to
help with the sleeping platform. To avoid pinching your fingers, hold it from the
inside. The sleeping platform needs to be led carefully between the side frames
and is laid down onto the wooden strips of the architraves.
(If your cot is electronically adjustable, then please make sure that the cables are
underneath in order to avoid them being trapped. Install the switch box 16 with
the screws provided 18 on the left or right exterior of a side frame (out of reach
of the patient). For further information concerning the sleeping platform, please
read the enclosed operating instructions.)
Now the apertures 6 have to be put into the grooves of the installed archi-
traves, then insert the upper architraves 4 with the threaded bars into the
upper drilled holes of the side frame. The batten needs to be inside at the
bottom. Screw the architraves with two brass caps each.
Now the 4 lowerable cot sides 2 + 3 should be inserted from above. By
pulling the bolting device inward, the cot sides can be lowered to different
heights.
Place the four ornament heads 7 onto the corner posts and your new Timmy-
cot is ready to use.
Parts list and explosion views of your de votre
new
Timmy
- care cot
Pos.
Qty.
Designation
Wooden surround
1
2
side frame
2
2
lowerable cot side, short
3
2
lowerable cot side, long
4
2
connecting architrave 150mm
5
2
connecting architrave 90mm
6
2
aperture
7
4
ornament head
8
4
castors
Fittings
9
4
plug-in pegs
10
12
transverse nuts
11
12
threaded bars M8x140mm
12
12
brass caps
13
1
allen key
Sleeping platform
14
1
sleeping platform
with slatted frame
15
1
manual control switch*
16
1
security switch box*
17
1
mounting for power cable*
18
2
screws for switch box*
*(only with electronic sleeping platform)
Optional
19
1
lifter


