background image

Assembly

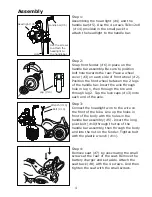
Step 1:

Assembling the head light (#4) and the 

handle bar(#5). Use the 4 screws TA3x12x8 

 (#14) provided in the small pack to

attach the headlight to the handle bar.

Step 2:

Snap front fender (#6) in place on the 

handle bar assembly. Be sure to position 

bolt hole towards the rear. Place a wheel 

cover (#3) on each side of front wheel (#2). 

Position the front wheel between the 2 legs 

of the handle bar. Insert the axle through 

hole in leg 1, then through the tire and 

through leg 2. Tap the lock caps (#13) onto 

each end of the axle.

Step 3:

Connect the headlight wire to the wire on 

the front of the bike. Line up the holes in 

front of the body with the holes in the 

handle bar assembly (#5). Insert the long 

pivot bolt (#10)through the top of the 

handle bar assembly, then through the body 

and into the nut on the fender. Tighten bolt 

with the plastic wrench (#11).

Step 4:

Remove seat (#7) by unscrewing the small 

screws at the rear of the seat. Remove the 

battery charger and set aside. Attach the 

seat back (#8) with the 4 screws. And then 

tighten the seat with the small screws.

Hole

Handle bar(#5)

Head light (#4)

Use the screws 

to attach the 

headlight to 

the handlebar

cap (#13)

Wrench (#10)

Bolt (#10)

4

Summary of Contents for KL-20039

Page 1: ...or Little Motorcycle 1 KL 20039 WARNING Adult assembly required Please read this manual carefully before assembly and use This manual contains important information which will help you assemble the unit and give your safety instructions ...

Page 2: ... and 1 auto reset fuse on the motor Should the motor become overloaded the Bike will shut down the fuse will reset automatically after approximately 30 seconds The Bike will function as normal 12 Recommended age group Ages 3 5 years old 13 Maximum weight 55lbs 25kgs Bike weight 11 44lbs 5 20kgs 14 Power source Rechargeable sealed lead acid battery Battery charge time 8 12 hours for full charge 15 ...

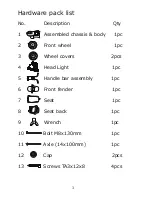
Page 3: ...sembled chassis body 1pc 2 Front wheel 1pc 3 Wheel covers 2pcs 4 Head Light 1pc 5 Handle bar assembly 1pc 6 Front fender 1pc 7 Seat 1pc 8 Seat back 1pc 9 Wrench 1pc 10 Bolt M8x130mm 1pc 11 Axle 14x100mm 1pc 12 Cap 2pcs 13 Screws TA3x12x8 4pcs 3 ...

Page 4: ...ck caps 13 onto each end of the axle Step 3 Connect the headlight wire to the wire on the front of the bike Line up the holes in front of the body with the holes in the handle bar assembly 5 Insert the long pivot bolt 10 through the top of the handle bar assembly then through the body and into the nut on the fender Tighten bolt with the plastic wrench 11 Step 4 Remove seat 7 by unscrewing the smal...

Page 5: ...bike moves slowly Recharge the battery for 8 12 hours 3 The battery can not be fully charged The adaptor or the battery may be faulty or double check the wires If you have any missing or damaged parts or need assembly assistance please contact our service center directly Do not return this product to the retailer they do not stock replacement parts Support Website http support bigtoysusa com Suppo...

Reviews: