2.
Software Update
(ES520)
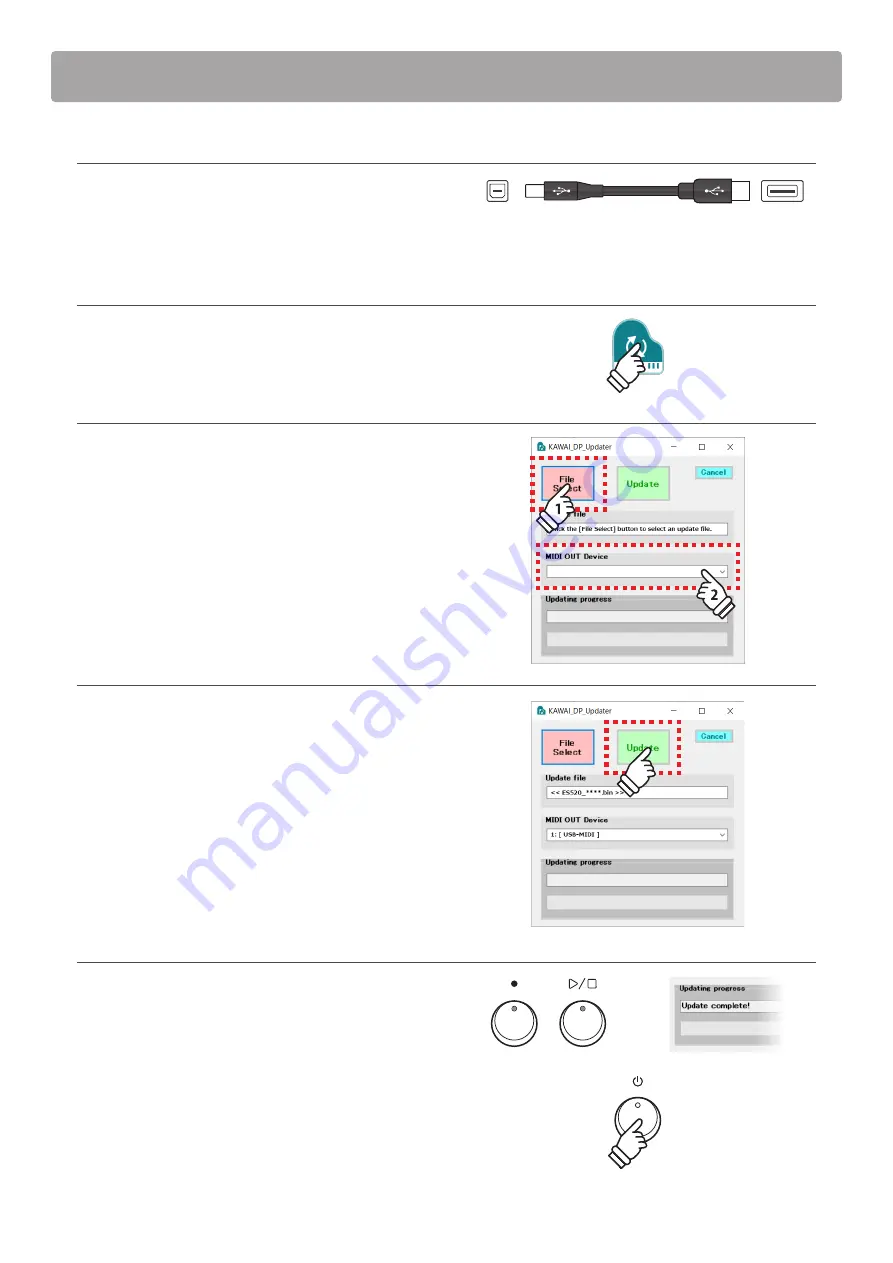
2. Connect the piano to the computer
Connect the piano to the computer using a USB type “B” to USB
type “A” cable.
* Please refer to page 91 of the main ES520 owner’s manual for more
information.
3. Launch the Kawai DP Updater tool
Launch the Kawai DP Updater tool on the Windows or macOS
computer.
4. Select the update file and MIDI Out device
From the Kawai DP Updater tool window:
Click the [File Select] button, then select the
ES520****.dat
update file.
* The file should be stored in the temporary folder on the desktop.
Click the MIDI Out Device list and select the USB-MIDI device.
* Note that the position of the USB-MIDI device within the list may vary
if other MIDI devices are also connected to the computer.
5. Start the update process
From the Kawai DP Updater tool window:
Click the [Update] button to start the software update process.
* The software update will take approximately 5 minutes to complete.
The update progress will be shown in the bottom of the window.
* During the update, do not use or attempt to launch other applications,
and ensure that the Kawai DP Updater tool remains the front-most
window.
* During the update, the LED indicators for different buttons will
continue to flash, however do not turn off the piano.
6. Finish the update
After approximately 5 minutes, the LED indicators for the [REC]
and [PLAY/STOP] buttons will turn on, and an [Update complete!]
message will be shown in the Kawai DP Updater tool window.
Disconnect the USB cable, then press the [POWER] button twice
(pausing 1 second between presses) to turn the instrument off.
Perform the software version check (explained on the first page
of these instructions) to confirm that the update was successful.
When the instrument is turned on, the updated software will be
used automatically.
* If this stage of the update is unsuccessful, please restart from step 1.
“B” type
(Piano)
“A” type
(Computer)
Kawai DP Updater
× 2
× 2


