Kawai Concert Performer CP3 Owner'S Manual Download Page 43

Page

43

4

Recording a Song

„

As discussed in the above section, MIDI Rec enables the CP to record incoming MIDI data from an external MIDI 

instrument connected to the MIDI jacks. You can set more than one track to MIDI REC, enabling the CP to record on 

several tracks simultaneously over MIDI. Each MIDI Rec track will record on the incoming MIDI channel that corresponds 

to its track number. Track 1 records MIDI channel 1 and so on.

‘

 Loop Settings

The Loop function lets you specify certain bars or your entire song to repeat over and over. Loop is a global function 

and all tracks will be looped equally. You cannot have different loop settings for each track.

¡

 To set the Loop:

…

 Step 1

Touch Loop Settings on the Advanced Recorder menu.

…

 Step 2

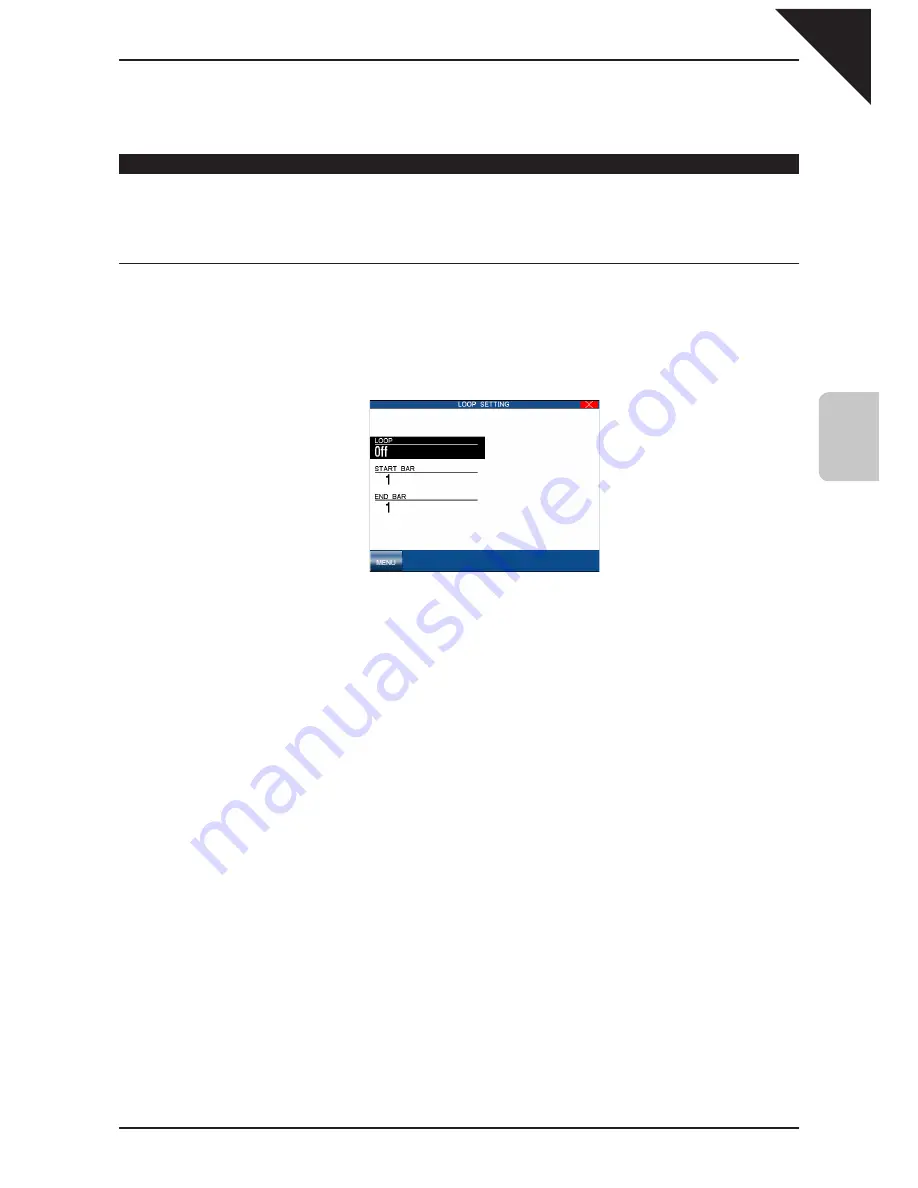
Touch the screen to select the different loop settings, then use the Dial to change the values.

LOOP  :  Turns the Loop ON/OFF.

START BAR  :  Specifies the starting bar.

END BAR  :  Specifies the ending bar.

MENU  :  Takes you back to the Advanced Recorder menu.

…

 Step 3

Touch LOOP to turn the Loop ON/OFF.

…

 Step 4

Touch START BAR to specify the bar where you want the Loop to start.

…

 Step 5

Touch END BAR to specify the bar where you want the Loop to end.

…

 Step 6

Touch the MENU button to return to the Advanced Recorder menu when you are finished.

„

You can turn looping on and off in the Mixer menu. However, you still have to set the Start and End Bar from the Loop 

Settings menu.

„

You can set up looping for recording in the Real-time REC menu as well. In the Real-time REC menu, when you turn on 

the looping, the Start Bar and End Bar information will be automatically copied from the Loop Settings menu.

Summary of Contents for Concert Performer CP3

Page 1: ...ames Functions 2 Listening to the Piano 3 Playing the Piano Basic Controls 4 Recording a Song 5 Using a Style 6 Music Menu 7 Settings Menu 8 Virtual Technician 9 Using USB Memory 10 Appendices Owner s...

Page 2: ...All descriptions and speci cations in this manual are subject to change without notice...

Page 3: ...iment Styles provide the enjoyment of playing rich fully orchestrated music in hundreds of musical genres Thanks to the Song Stylist feature you will never have to worry about nding the best sounds an...

Page 4: ...on 59 Favorites Button 59 2 Auto Accompaniment System 60 3 1 2 Play 62 4 Registration 63 5 Song Stylist 66 6 Keyboard Harmony 69 7 Creating Your Own Styles 70 8 Conductor 71 Easy Edit 71 Style Effect...

Page 5: ...Data from USB Memory 121 Erasing Data from USB Memory 123 Formatting a USB Memory Device 124 Play MIDI Song 125 Controlling Song Playback 126 Playing MP3 WAV Audio 128 Recording MP3 WAV Audio 130 Reco...

Page 6: ...se instructions 3 Heed all warnings 4 Follow all instructions 5 Do not use this apparatus near water 6 Clean only with dry cloth 7 Do not block any ventilation openings Install in accordance with the...

Page 7: ...cause permanent hearing loss Do not operate for a long period of time at a high volume level or at a level that is uncomfortable If you experience any hearing loss or ringing in the ear you should co...

Page 8: ...r sources of electrical noises Care should be taken so that objects do not fall and liquids are not spilled into the enclosure through openings The product shall not be exposed to dripping or splashin...

Page 9: ...or relocate the receiving antenna Increase the separation between the equipment and receiver Connect the equipment into an outlet on a different electrical circuit from the receiver Consult the deale...

Page 10: ...page 63 These buttons are used to recall one of the eight panel settings available in the currently selected Registration group h TAP TEMPO page 28 This button is used to tap in the desired tempo for...

Page 11: ...T page 16 Selects which of the three parts LEFT SPLIT RIGHT1 RIGHT2 are active and ready to be played with the sounds assigned to them y REVERB page 22 This button turns on off the Reverb Press and ho...

Page 12: ...lf pedaling Front Terminals M Headphone Jacks These jacks are used to connect up to two headphones to the CP piano Rear Terminals K J L K J L M M N Line Out Jacks These jacks are used to provide stere...

Page 13: ...buttons have an LED Indicator small light on them This Indicator will be turned ON when a function is in use so that you can quickly see if that function is active LCD Touch Screen The LCD Touch Scree...

Page 14: ...o adjust this waiting period or to prevent the MAIN screen from returning automatically please refer to the Display Control instructions on page 108 of this owner s manual Dial The Dial is used to cha...

Page 15: ...ten to a Guided Tour Sound Style Demo Step 1 Press the DEMO button A Sound or Style demonstration will be selected at random and begin to play The name of the Sound Style demonstration will be shown i...

Page 16: ...arts are active at the same time Activating the LEFT SPLIT Part automatically splits the keyboard so that the sound assigned to the LEFT SPLIT Part is only heard when you play below a speci ed key spl...

Page 17: ...LIT Part The LEFT SPLIT button LED will light Step 2 Press and hold the LEFT SPLIT button then press the desired key on the keyboard that you want to serve as the split point The key you press will be...

Page 18: ...ds to be stored and recalled simply and conveniently To select a Sound Step 1 In the main play screen touch the Part to which you wish to assign a new sound The selected Part will become highlighted S...

Page 19: ...OUND SELECT Chose the sound for the selected Favorite position Step 2 Touch one of the Favorite sound names That entry will become selected Step 3 Touch the SOUND SELECT button The Favorites screen wi...

Page 20: ...TTONS Selects the part to adjust HARMONY Show the Harmony screen Step 2 Touch the buttons at the bottom of the screen to select the Part to be adjusted Step 3 Touch the slider that you wish to adjust...

Page 21: ...screen touch the STYLE MIXER button The Style Mixer screen will be shown BACK Return to the main Mixer screen PART BUTTONS Selects the Section to adjust Step 2 Touch the buttons at the bottom of the...

Page 22: ...y effect is used on the Church Organ to recreate the sense of being in a large church and a Rotary speaker effect is used on the Drawbar organ to give it an authentic vintage feel If you wish you can...

Page 23: ...ral Simulates the ambiance of a large cathedral The LED Indicator on the REVERB button will be lit whenever Reverb is turned on for the any Part except ACC regardless of each part s Effect Priority Se...

Page 24: ...types when in the Chorus Settings menu There is a fth chorus type which is assigned as an Effect from the Effect Settings menu In this way you can actually have two chorus effects active if so desired...

Page 25: ...er tone Rotary1 Rotary6 Simulates the sound of a rotary speaker commonly used with vintage electronic organs There are three different levels of overdrive with and without a Chorus effect The soft ped...

Page 26: ...o Likewise the only time an active LEFT Part s settings will be applied is if the other 2 Parts are inactive Unless you change them the Effect settings will only change in response to a change in the...

Page 27: ...u a number telling you how many half steps up or down you have transposed the piano 5 for example represents a transposition that is 5 half steps lower Step 2 To cancel the Transpose setting press bot...

Page 28: ...e the Dial to change the TEMPO or BEAT value You can also adjust the tempo by tapping on the TAP TEMPO button Simply tap on the button with your nger three or more times at the desired tempo and the C...

Page 29: ...any function or editing screen except for Concert Magic and immediately return to the Main Screen When you are using Concert Magic pressing the Piano Only button will change the Concert Magic song s...

Page 30: ...n Decrement Switches from one Registration to another 8 to 1 To set the pedals Step 1 Press and hold the KBD SETTINGS button The KBD Settings screen will be displayed Step 2 Touch LEFT PEDAL OVERRIDE...

Page 31: ...ch KBD SETTINGS BUTTON and use the Dial to assign a function Step 3 Press the KBD SETTINGS button to exit Step 4 Press the KBD SETTINGS button The LED will light and the function assigned to the butto...

Page 32: ...freely change the split point to any key on the keyboard Layer When the LEFT SPLIT Part is activated the LEFT SPLIT Part will function as a layer with the two right hand Parts In this manner you can...

Page 33: ...n read both Type 1 and 0 SMF les Please read the following sections carefully to learn more about the capabilities of the Easy and Advanced recorder 1 Easy Recording The Easy Recorder will record all...

Page 34: ...ps You can also change sounds tempo and make other changes to the panel settings before you continue recording To Re record or make other changes to a previously recorded section of a song please read...

Page 35: ...oose When you rst record a song all Parts and the Style will be automatically set to REC but only the active Parts and the Style will be recorded When you are nished recording the status for any activ...

Page 36: ...ed for entering a name of the song Step 3 Touch the screen to enter a name for the song Step 4 Touch the EXEC button to store the song Erasing the song Whenever a Part is selected for recording the ne...

Page 37: ...the pedal you assigned the Easy Loop Loop top will be selected and the Loop will be displayed Step 4 Depress the pedal again Loop end will be selected and the bars between Loop top and Loop end will...

Page 38: ...CHORD Show hide the name of the chord CHORD CH Select the channel to be used for chord recognition BACK Takes you to the previous screen MORE Takes you to the next screen Transpose Allows the key sig...

Page 39: ...orus for each of the 16 tracks Real Time Rec Prepares the track for real time recording Punch In Out Re record speci c measures within your song Step Recording Record by entering data note by note Tra...

Page 40: ...data in its place OVERDUB mixes the new data with the previous data so that both are heard together Repeatedly touching REC MODE switches between the REPLACE and OVERDUB MENU Cancels the real time rec...

Page 41: ...oomed version of the selected area will be shown allowing adjustments to be made more easily BACK Returns you to the Advanced Recorder menu Step 5 At this point you can start recording or go to anothe...

Page 42: ...ng playback will select Play or Mute Touching the STATUS button after entering Real time record but before recording begins will select Play MIDI Rec or Mute Rec can only be selected from the Real tim...

Page 43: ...he Advanced Recorder menu Step 2 Touch the screen to select the different loop settings then use the Dial to change the values LOOP Turns the Loop ON OFF START BAR Speci es the starting bar END BAR Sp...

Page 44: ...Touch STYLE PASTE while you are in the Advanced Recorder menu The LCD screen will prompt you for con rmation NO Cancels the Style Paste YES Proceeds with Style Paste Step 2 If you would like to procee...

Page 45: ...TO PEDAL switches between the Auto and Pedal MENU Takes you to the Advanced Recorder menu MIXER Takes you to the Mixer Settings menu REHEARSAL Plays the song for rehearsal LOOP Turns Loop on off If yo...

Page 46: ...nd use the Dial to adjust values REC TRACK Selects the recording track REC SOUND Selects which sound is assigned to the track START BAR Selects which measure you d like to start recording at B M Chang...

Page 47: ...Ebutton WhenyouareusingtheREPLACE mode for recording every time you press DELETE the list of your entered notes on the screen scrolls back one event and that event is erased immediately Therefore if y...

Page 48: ...ch space represents 24 clock pulses Therefore the number of displayed spaces per partition represents the duration of the beat For example if you choose the 4 4 time signature in the Step Recording se...

Page 49: ...tial tempo of the song TRANSPOSE Adjusts transposition MENU Takes you to the Advanced Recorder menu DELETE Deletes the song Bar Editing Bar Edit contains many useful editing functions You can edit you...

Page 50: ...will use to shift the notes you want to quantize For example setting a quarter note resolution will shift all of the quantized notes to the nearest quarter beat Setting an eighth note resolution will...

Page 51: ...be placed FROM TRACK Selects the track to be copied Use the Dial to select the track numbers 1 16 Tempo or Chord START BAR Selects the bar where the data that you are copying starts Use the Dial to ch...

Page 52: ...nu will be displayed You can insert empty bars into a track between bars that have data or at the rst blank bar at the end of the track TO TRACK Selects the track where the empty bars are going to be...

Page 53: ...where you want to copy data Choose 1 16 BACK Returns you to the Advanced Recorder menu UNDO Undoes the merge This option is not always available EXEC Proceed with the merge Gate Time Modify Gate time...

Page 54: ...t the CP Advanced recorder divides each beat in a bar into 96 clock beats also expressed as a quarter note Therefore there are 48 clocks per eighth note and 24 clocks per sixteenth note and so on This...

Page 55: ...sing the TRACK buttons Note that the Style Chord and Tempo track can be edited as well DOUBLE ARROWS Moves the cursor forward and backward through the bars SINGLE ARROWS Moves the cursor forward and b...

Page 56: ...backward through the bars SINGLE ARROWS Moves the cursor forward and backward through the selected beat clock event etc DELETE Removes the selected event INSERT Creates a new event REPLACE Modi es th...

Page 57: ...you edit or create your own custom Styles These features are explained in the section of this manual Creating Your Own Styles page 70 1 Selecting and Playing a Style To select a Style Step 1 Press th...

Page 58: ...le will not start until you play a note or chord on the keyboard Step 7 To adjust the tempo of the Style use the Dial to change the Tempo The tempo will be displayed in the top left corner of the LCD...

Page 59: ...horter Intro Ending Fill In and Variation Each Style is made of four Variation patterns and four Fill in patterns Fill ins are short patterns that temporarily embellish the Style Fill ins can add exci...

Page 60: ...m will recognize the chord type This mode is similar to Fingered however Full Keyboard recognizes chord types from three or more notes played anywhere across the 88 keys not just below the split point...

Page 61: ...ng the chords one is selected by the front panel and the other is pre programmed for the Style This is because the sounds used by the Auto accompaniment Style are independent of the Left and Right Par...

Page 62: ...ke to play Step 2 Press the 1 2 PLAY button The 1 2 Play indicator will become lit and the words 1 2 Play are displayed in the Main Screen The SYNC button is activated as well Step 3 Activate one of t...

Page 63: ...each registration group is designed to take full advantage of certain types of sounds available in the instrument Switching from one Registration Group to another instantly changes the Registration bu...

Page 64: ...hat you d like to save them Step 2 Press the REGISTRATION GROUPS button Step 2 Touch the SAVE button then touch one of the ve Registration Groups listed in which to save your setup Touch the PAGE butt...

Page 65: ...roup that you wish to rename Step 3 Touch the NAME button The display will show a virtual keyboard Step 4 Touch the screen to enter a new name for the Registration Group BACK Takes you to the previous...

Page 66: ...gin The Song Stylist contains no prerecorded music only the setup to play the chosen song You must play the actual music yourself To use the Song Stylist Step 1 Press the SONG STYLIST button The Name...

Page 67: ...settings for that song Step 6 You may start and play the song in your usual manner You can operate the CP normally and make any changes to the Song Stylist setup that you wish STYLE Highlights the St...

Page 68: ...sical genres for the SONG STYLIST Step 2 Touch the SEARCH BY NAME buttons Touch the screen to take you to the rst letter of the name of the desired song Step 3 Touch the PAGE buttons to search for the...

Page 69: ...t note played in the right hand and doubles it an octave down Octave Duet Adds an Octave note and a Duet note Vocal 1 Adds a single note above the top note of the right hand based on the chord Vocal 2...

Page 70: ...tyle entirely from scratch These are the Conductor and the Style Maker The Conductor allows you to edit the Style data and personalize it to your taste The Style Maker allows you to create Styles of y...

Page 71: ...within the style This means you can mix and match the different phrases for each section to create your own unique arrangements Once you are satis ed with your edits you can save your Easy Style edits...

Page 72: ...ginal factory settings after you have pressed the SAVE button use reset Conductor on the Soft Reset screen See the section titled Soft Reset on page 106 Note Easy Edit doesn t allow you to edit the In...

Page 73: ...inning of the Style Maker process The different Sections can be of varying bar lengths as long as they stay within the limit Having them all the same length may make the Style easier to use in a song...

Page 74: ...ttings MORE Takes you to the next menu for more options PART Selects which Section s you are working with Pressing twice deactivates the Section so that it will not be incorporated into the new Style...

Page 75: ...will be analyzed differently than chords in a Chordal Phrase The Bass section is automatically set to Scalic since it will rarely if ever play chords The terms Open and Close apply to Chordal Phrases...

Page 76: ...ettings you wish to change BACK Takes you to the previous menu PLAY Plays the style PART Selects the Section Step 2 Touch the buttons at the bottom of the screen to select the Section Step 3 Use the D...

Page 77: ...ch the ENTER button to proceed to the next screen The LCD screen will display the rst Phrase Combination screen Step 4 Touch the screen to select which of the four Fill ins and Variations you would li...

Page 78: ...location to be saved NAME Names the style PRESET TEMPO Sets the default tempo for the style BACK Takes you to the previous menu SAVE Saves the style to User Style Step 11 Touch the SAVE TO button the...

Page 79: ...Settings Each of the CP instrument Sounds has preset Chorus and Effect settings that are applied automatically whenever that sound is selected You can change these settings to suit your tastes and sa...

Page 80: ...nd Attack determines how quickly a sound reaches its maximum volume after you press a key Positive values produce a slower attack that is more gradual and smooth while negative values produce a faster...

Page 81: ...SAVE button The Sound Edit Save screen will be displayed SAVE TO USER SOUND Selects the location where the sound will be saved NAME Names the Sound BACK Takes you to the previous menu SAVE Saves the...

Page 82: ...s you play a CM song a handy Note Navigator display helps you keep track of where you are in the music as well as suggesting how the rhythm of the song should be tapped out on the keys Many of the CM...

Page 83: ...he song Step 3 If you want to go to another song category touch SEARCH BY CATEGORY You can also search for a speci c title by using SEARCH BY NAME which will list all 176 song titles in alphabetical o...

Page 84: ...k of where you now are When you get to the bottom of the screen the top lines change to show the next lines of music as if you had turned the page When you get to the end of the song you will see a do...

Page 85: ...is made of two parts a melody part and accompaniment part Many of the songs have different instrument sounds assigned each part to make the music more interesting You can select different sounds for e...

Page 86: ...y SONG LIST Returns to the song list Step 5 Touch the PLAY button to start playing the songs Step 6 To exit Concert Magic press the EXIT button again Concert Magic Song Arrangements Concert Magic song...

Page 87: ...ment as simple as possible Concert Magic pauses the song after every note as it waits for you to tap the next key If there are complex rhythm patterns that have many notes per beat the song may become...

Page 88: ...es de M canisme Opus 849 Czerny 100 Hundert bungsst cke Opus 139 Beyer Vorschule im Klavierspiel Opus 101 J S Bach Inventionen Sonatinen Album 1 Scales Arpeggios Cadences Chords To select a book song...

Page 89: ...layback position can also be changed by touching the BAR BEAT eld then using the Dial Step 3 Touch the icon to pause playback of the selected lesson song Step 4 Touch the icon again to resume song pla...

Page 90: ...left hand value will decrease the volume of the student s part while increasing the right hand value will decrease the volume of the teacher s part Adjusting the playback tempo It may also be desirabl...

Page 91: ...are selected the CP can also evaluate one s practice analysing note accuracy timing evenness and note volume consistency before displaying results for each category Using this function players can ob...

Page 92: ...selected song will start to play Save My Song This function will store the recorded song to the CP s internal memory allowing it to be used for My Music lists Step 1 From the My Songs menu select the...

Page 93: ...you to adjust the CP s pitch You may need to adjust the tuning when playing with other instruments The master pitch is displayed in Hertz The range of adjustment is from 427 0 to 453 0 Hz The factory...

Page 94: ...Concert Magic songs will be played with Preset Plays all the Concert Magic songs with the Preset Sounds assigned to each song Piano Plays all the Concert Magic songs with the Concert Grand piano Pres...

Page 95: ...witches from one Registration to another You may choose the order 1 to 8 or 8 to 1 Style Variation Switches from one Style Variation to another You may choose the order 1 to 4 or 4 to 1 Intro Ending P...

Page 96: ...mper Selects the Right pedal Damper Center Selects the Center pedal Sostenuto Left Selects the Left pedal Soft MENU Takes you to the Settings menu Step 2 Touch the screen to select the setting and use...

Page 97: ...button is pressed Fill ins will only be played if a FILL button is pressed Auto A Fill in will be played each time a VARIATION button is pressed The Fill in that is played will be the one that accompa...

Page 98: ...be used In other words changing the Sounds will not change the Effect types and other settings for the Effects This allows you to set each Effect section REVERB CHORUS and EFFECTS to your own taste an...

Page 99: ...d page within a category You can also use the Dial to scroll through all of the categories one by one Manual Select The sound does not change automatically when you press a Sound Selection button or s...

Page 100: ...automatically when you press a Sound Selection button or select a new sound page within a category The style only changes when you select the desired style from the current style page by touching the...

Page 101: ...ets the MIDI receive channel for chord data being sent to the CP The Accompaniment System can be controlled remotely on this MIDI channel by an external MIDI controller You can select MIDI channels 1...

Page 102: ...will be transmitted ACC On Off Determines whether or not the data from the Auto Accompaniment System will be transmitted KEYBOARD Selects whether note data is transmitted PROGRAM BANK Selects whether...

Page 103: ...l for the Chord Left part Choose 1 16 PAGE Selects the other MIDI Settings pages MIDI Sound Settings On page ve of the MIDI Settings you can determine which sound will be played by the CP when it rece...

Page 104: ...the current panel settings automatically as the default settings when the CP is turned on Select Restore Factory Settings to return the CP to the factory default settings The original factory setting...

Page 105: ...ation is selected ACC On Off Determines if the memorized ACC mode ACC on off or Bass on off value will be used On or ignored Off when a registration is selected Left Pedal On Off Determines if the mem...

Page 106: ...ly the ones you want to Reset at the touch of a button To perform a Soft Reset Step 1 Touch the SOFT RESET icon The Soft Reset screen will be displayed Step 2 Touch the screen to choose the type of da...

Page 107: ...urrently installed on the CP To show the software version Step 1 Touch the Software Version icon Step 2 The software version will appear in the LCD screen MENU Takes you to the Settings menu The versi...

Page 108: ...djustable time function is effective with the following menus x Sound Select menu x Style Select menu x Keyboard Settings menu called up by holding down the KBD SETTINGS button x Effect Chorus Setting...

Page 109: ...enu of the CP piano features settings that simulate these re nements digitally allowing performers to shape various aspects of the instrument s character to suit their personal preferences To use the...

Page 110: ...You can create two of your own custom touch curves LIGHT and HEAVY do not represent the physical weight of the keys These are settings that affect the sensitivity of the keys which determines the vol...

Page 111: ...ve Current Settings from the Power Up Settings screen See Power Up Settings on page 115 2 Voicing Voicing is a technique used by piano technicians to mold the character of a piano s sound The Voicing...

Page 112: ...s pressed and released it is often possible to hear the sound of the damper head touching and releasing the strings The Damper Noise setting allowing the volume of this sound to be adjusted You can se...

Page 113: ...epth MENU Takes you to the Virtual Technician menu 6 Temperament The CP offers not only equal temperament the modern standard but also immediate access to temperaments popular during the Renaissance a...

Page 114: ...kofconsonance s experienced with certain fths for the Pure temperament It produces chords that are more beautiful than those with the equal temperament Werckmeister III Kirnberger III Temperament Thes...

Page 115: ...to piano sounds only If Piano Normal Piano Wide is selected the tuning for any other active sounds layered with a piano sound will be stretched to match the piano If no piano sound is active the tunin...

Page 116: ...a User 88 Key Volume Step 1 On the 88 Key Volume screen touch the EDIT button The User 88 Key Volume screen will be displayed Step 2 Touch the KEY eld and use the Dial or press a key to select the not...

Page 117: ...laying an acoustic grand piano the position of the instrument s topboard lid affects both the volume and openness of the tone produced A fully open topboard allows sound waves to re ect off the polish...

Page 118: ...MinimumTouch setting allows the minimum key velocity required to produce a sound to be adjusted By default this setting attempts to recreate the extremely ne touch sensitivity of a concert grand piano...

Page 119: ...This important function stores your custom data to disk so that you can retrieve it at a later time You can save the following data Song Song data currently in the Recorder You can save it as the CP s...

Page 120: ...SMF Standard MIDI File format or CP Stylist format Example Saving a Style USER STYLE Selects which le you would like to save or if all les are to be saved as a single all le NAME Names the data le BAC...

Page 121: ...8 Key Volume One User 88 Key Volume setting can be loaded from USB All Settings Loads the All Settings le from USB Favorite Sound Sounds that can be stored in the Favorites sound category button Favor...

Page 122: ...ect the data to load Step 6 Touch the the EXEC button to proceed The screen will display the destination where the data will be loaded Step 7 When loading an individual data le touch NAME then use Dia...

Page 123: ...tep 2 Connect a USB memory device Step 3 Touch the screen to select the type of data to erase Step 4 When you erase User Style User Sound or Registration data select whether you wish to erase individu...

Page 124: ...TouchYES then touch EXEC to proceed The screen will prompt you for con rmation Step 4 TouchYES again to start formatting or TOUCH NO to cancel formatting and go back to the previous menu NO Cancels f...

Page 125: ...long as they have DOS le names ending with MID There are two types of Standard MIDI File formats Format 0 and 1 The CP can read the song data of both formats however it will only display the lyrics of...

Page 126: ...play Transpose and Octave Shift are available when a song is playing Octave Shift affects only the notes you play live on the keyboard not the music playing from the song le Transpose can be applied s...

Page 127: ...TEMPO Adjusts the tempo of the song Song Transpose Raise or lower the pitch of the song without affecting the keyboard Full Screen Show the song lyrics in full screen mode PLAY SCREEN Returns to the...

Page 128: ...menu will be shown in the LCD display Step 2 Select Play Audio A list of playable MP3 audio les stored on the USB memory device will be shown in the LCD display Step 3 Touch the screen to select the...

Page 129: ...B button again to set the end of the section to be repeated The AB section will repeat continuously until the REPEAT AB button is touched for a third time thus deactivating the function and resuming n...

Page 130: ...MP3 WAV audio le SELECT FORMAT The audio format to be used for the new recording MP3 or WAV BACK Return to the main USB menu EXEC Accept the name and format and continue to AUDIO RECORD screen Step 3...

Page 131: ...mpaniment and recorder at the same time Recording with additional sound sources It is also possible to record MP3 WAV audio les while the CP is playing back a song from MIDI or another MP3 WAV audio l...

Page 132: ...be shown in the LCD display Touch WAV to list WAV audio les stored on the connected USB memory device Select the desired MP3 WAV audio le to be played and added to the recording Step 4 Touch the z but...

Page 133: ...n jacks The sound of your stereo playing a tape CD or even radio will be heard through the CP s speaker system and mixed in with any sounds from the CP itself enabling you to play along with your favo...

Page 134: ...models of these interface devices Once you have your computer connected to your Concert Performer you can think of it as a powerful extension of the CP s own music processing abilities There are hundr...

Page 135: ...is connected to the computer Mac OS 9 USB MIDI is not supported Please use the standard MIDI IN OUT connectors USB MIDI Information Disconnecting the USB MIDI cable suddenly or turning the instrument...

Page 136: ...ing a single short screw I for each side After ensuring that the correct Side Panels are used for the left and right side and that the pedal cable is not caught between the assembled parts securely fa...

Page 137: ...the oor and supports the pedals rmly pedals rmly pedals rmly 5 Insert the pedal connection cord that comes from Pedal Board C into the piano s pedal jack and fasten with cord clamps Connect the power...

Page 138: ...t Medium Piano Swing Medium Swing 2 Country Piano Texas Swing Medium Swing Slow Swing 2 Road Trip Boot Scootin Fast Big Band Night Club Mod Country Ballad Redneck Rock Fast Big Band 2 Slow Big Band Co...

Page 139: ...day 4 4 Toons Gospel Shuf e Holiday Two Beat Kids March Fast Gospel Holiday Shuf e Kids 6 8 March Slow Gospel Holiday Rock Kids 2 Beat Southern Gospel Holiday Waltz Kids 2 Beat Shuf Holiday Waltz 2 Ki...

Page 140: ...Thing Cruisin Down River Crusin Cry Cry Me A River Crying In Chapel D Daddy Dance To The Music Dancin In Street Daniel Daydream Days Of Wine Roses Deck The Halls Deep Purple Deja Vu Desa nado Despera...

Page 141: ...On Let s Stay Togethr Light My Fire Lilli Marlene Little Green Apple Loco Motion The Lollipop London Bridge Long Winding Road Look of Love Losing My Religion Lost In Your Eyes Love Boat The Love First...

Page 142: ...here Must Be Way There ll Be Sad There s No Bizness These Dreams They Call The Wind Things Things We Did Last Think Third Man Theme This Masquerade This Ole Man Those Were Th Days Three Coins In A Thr...

Page 143: ...Ocean MP Song Title Type Lyrics In The Good Old Summertime EB For He s A Jolly Good Fellow MP Bill Bailey Won t You Please Come Home EB Give My Regards To Broadway SK Clementine MP Fascination SK Hom...

Page 144: ...e SK Can Can SK Emperor Waltz SK March Militaire by Chopin SK Grand March from Aida by Verdi SK Gymnopedie by Sati SK Gypsy Chorus from Carmen by Bizet SK Largo from Symphony No 9 by Dvor k SK Prelude...

Page 145: ...for Bach 37 Alouette 38 My Kite 39 All Star Game 40 Ode to Joy 41 A Page or Tow 42 Snowy Day 43 Bike Ride 44 Old Joe Clark 45 Hopscotch 46 Rise and Shine 47 The Wheels on the Bus 48 Eine Kleine Mozar...

Page 146: ...ockin Tune 38 Indian Song 39 Raindrops 40 It s Halloween 41 Horse Sense Basic Piano Library Lesson Book Level 1B 1 Step Right Up 2 The Carousel 3 Hail to Thee America 4 Brother John 5 Good Sounds 6 Th...

Page 147: ...4 The Cuckoo 25 Harp Song 26 Beautiful Brown Eyes 27 Alpine Melody 28 Thumbs on C 29 Waltz Time 30 Good Morning To You 31 Happy Birthday To You 32 Standing In The Need Of Prayer 33 The Gift To Be Simp...

Page 148: ...hlau 5 Sonatine Op 55 2 F Kuhlau 6 Sonatine Op 55 3 F Kuhlau 7 Sonatine Op 36 1 M Clementi 8 Sonatine Op 36 2 M Clementi 9 Sonatine Op 36 3 M Clementi 10 Sonatine Op 36 4 M Clementi 11 Sonatine Op 36...

Page 149: ...h an asterisk indicate easy ngerings that can be recognized in One Finger mode C Maj C7 C 7 C6 C sus4 C b5 C aug C6 9 C add9 C9 C11 C13 C7 b5 C7 5 C7 sus4 C7 b9 Cm Cm7 Cm6 Cm6 9 Cm 5 Cm7 b13 Cm7 11 b1...

Page 150: ...5 5 8 Diapason 20 95 6 Chiffy Tibia 20 95 17 Stopped Pipe 20 95 21 Church Organ 2 20 121 1 Reeds 20 95 10 Small Ensemble 20 95 8 8 Diapason 2 18 95 7 Principle Pipe 20 95 22 Puff Organ 21 121 1 Church...

Page 151: ...Hit 56 121 3 Bass Hit Plus 56 121 1 6th Hit 56 121 2 OTHERS PAD Itopia 92 121 1 Warm Pad 90 121 0 Brightness 101 121 0 Atmosphere 100 121 0 New Age 89 121 0 Sine Pad 90 121 1 Halo 95 121 0 Halo 2 95 9...

Page 152: ...m o T d i M 1 d t S 5 4 A A i n a p m i T 2 m o T d i M h s u r B 2 m o T d i M e c n a D A 46 Std1 HHO Std2 HHO Std1 HHO Std1 HHO Std2 HHO Analog HHO Dance HHO Std2 HHO Brush HHO Timpani A 1 m o T d...

Page 153: ...Kit Stereo Pop Kit Stereo Ballad Kit C1 C 24 C 25 D 26 D 27 E 28 F 29 F 30 G 31 G 32 A 33 A 34 B 35 Ambi BD2 Funk BD2 Pop BD2 Bala BD2 C2 C C2 36 Ambi BD1 Funk BD1 Pop BD1 Bala BD1 C 37 Ambi Rim Ambi...

Page 154: ...oise Half Pedal Point Soft Pedal Depth Temperament 9 types 1 User Temperament Stretch Tuning including 88 Key User Stretch 88 Key Volume Hammer Delay Top Board Position Decay Time Minimum Touch Other...

Page 155: ...O O Sustain Level 71 X O Resonance 72 O O Release Time 73 O O Attack Time 74 O O Cutoff 75 O O Decay Time 76 X O Vibrato Speed 77 O O Vibrato Depth 78 X O Vibrato Delay 84 O O Portamento Control 91 O...

Page 156: ...User Notes...

Page 157: ......

Page 158: ......

Page 159: ......

Page 160: ...CP3 Owner s Manual KPSZ 0699 OW1082E J1406 Printed in Indonesia Copyright 2014 Kawai Musical Instruments Mfg Co Ltd All Rights Reserved 818083 R100...

Reviews: