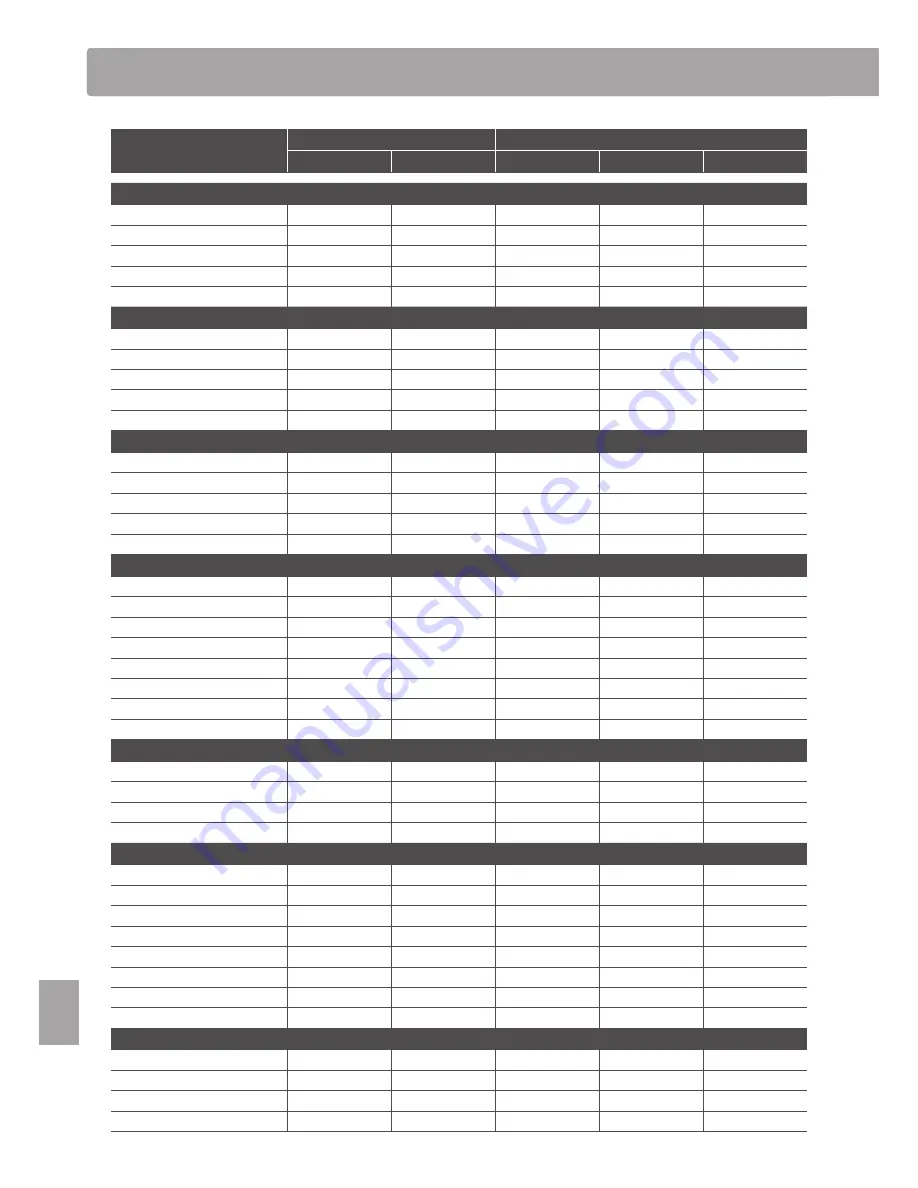
background image

136

A

pp

en

di

x

Program Change Number List

Sound Name

Multi-timbral mode = off/on1

Multi-timbral mode = on2

Bank LSB

Program Number

Bank MSB

Bank LSB

Program Number

PIANO1

SK ConcertGrand

0

1

121

0

1

EX ConcertGrand

0

2

95

27

1

Studio Grand

0

3

121

1

1

Mellow Grand

0

4

121

2

1

Mellow Grand 2

0

5

95

29

1

PIANO2

Upright Piano

0

6

95

25

1

Standard Grand

0

7

95

16

1

Studio Grand 2

0

8

95

28

1

Upright Piano 2

0

9

95

26

1

Modern Piano

0

10

121

0

2

E. PIANO

Classic E.Piano

0

11

121

0

5

60's E.P.

0

12

121

3

5

Modern E.P.

0

13

121

0

6

Classic E.P. 2

0

14

95

3

5

Modern E.P. 2

0

15

95

6

6

ORGAN

Jazz Organ

0

16

121

0

18

Blues Organ

0

17

121

0

17

Ballad Organ

0

18

95

5

17

Gospel Organ

0

19

95

3

17

Church Organ

0

20

121

0

20

Mellow Flutes

0

21

95

48

20

Medium Ensemble

0

22

95

42

20

Loud Ensemble

0

23

95

43

20

HARPSI & MALLETS

Harpsichord

0

24

121

0

7

Vibraphone

0

25

121

0

12

Clavi

0

26

121

0

8

Marimba

0

27

121

0

13

STRINGS & CHOIR

Slow Strings

0

28

95

1

45

String Pad

0

29

95

8

49

Warm Strings

0

30

95

1

49

String Ensemble

0

31

121

0

49

Choir

0

32

121

0

53

Choir 2

0

33

95

53

54

New Age

0

34

121

0

89

Atmosphere

0

35

121

0

100

BASS

Wood Bass

0

36

121

0

33

Electric Bass

0

37

121

0

34

Fretless Bass

0

38

121

0

36

W. Bass & Ride

0

39

95

1

33

Summary of Contents for CN37

Page 1: ...Introduction Playing the Piano Music Menu Recorder Settings Appendix CN37 Owner s Manual...

Page 2: ...owing the CN37 digital piano to be enjoyed almost immediately after being connected while the Music Menu section page 36 includes information regarding the built in demonstration songs Piano Music pie...

Page 3: ...2 Keep these instructions 3 Heed all warnings 4 Follow all instructions 5 Do not use this apparatus near water 6 Clean only with dry cloth 7 Do not block any ventilation openings Install in accordanc...

Page 4: ...t de positionner le c ble d alimentation secteur de sorte qu il puisse tre d branch rapidement en cas d urgence le courant lectrique tant toujours pr sent tant que la prise est branch e m me si le bou...

Page 5: ...odify the product Doing so may result in product breakdown electric shock or short circuit When using the headphones do not listen for long periods of time at high volume levels Doing so may result in...

Page 6: ...uch as TVs and radios Failure to do so may over heat the product resulting in fire Ensure that the ventilation is not impeded by covering the ventilation openings with items such as newspaper table cl...

Page 7: ...xpressly approved by the party responsible for compliance could void the user s authority to operate the equipment NOTE This equipment has been tested and found to comply with the limits for a Class B...

Page 8: ...cording a lesson song practice 42 6 Finger Exercises 43 Concert Magic 44 1 Performing a Concert Magic song 44 2 Concert Magic demo mode 45 3 Concert Magic settings 46 4 Concert Magic song arrangement...

Page 9: ...03 16 Temperament Key 104 17 Key Volume 105 User Key Volume 106 18 Half Pedal Adjust 107 19 Soft Pedal Depth 108 Phones Settings 109 1 SHS Mode 110 2 Phones Type 111 3 Phones Volume 112 USB MIDI USB t...

Page 10: ...d drawbar and church organs to strings human choirs and even atmospheric synth style pads inviting musicians to add greater variety to their performances Furthermore the Dual playing mode also allows...

Page 11: ...ess and hold then press X Combine two sounds h o l d h o l d Text appearance Normal instruction and explanation text is written in regular type at 9 pt size Notes about functions are marked with an as...

Page 12: ...12 Introduction Part Names and Functions...

Page 13: ...ayback of recorder songs and MP3 WAV audio files j REC button This button is used to record performances to internal memory or a USB memory device as MP3 WAV audio files k SOUND buttons These buttons...

Page 14: ...erside of the instrument as snow below 2 Connecting the power adaptor to an outlet Connect the AC power adaptor to an AC outlet The instrument will turn on and the words SK ConcertGrand will be shown...

Page 15: ...the keyboard on the left hand side to connect stereo headphones to the CN37 digital piano 1 4 and 1 8 connectors are provided for convenience Two pairs of headphones can be connected and used simultan...

Page 16: ...essed will not be sustained Pedal support bolt A pedal support bolt is attached at the base of the pedal board to aid stability when the pedals are pushed Turn the bolt anti clockwise until it makes c...

Page 17: ...is category has been selected and the name of the sound will be shown in the LCD display Changing the sound Several sounds are assigned to each category button Press the selected category button repea...

Page 18: ...le through the different sound variations To select a different variation for the main sound Press and hold the layered SOUND button then press the main SOUND button repeatedly to cycle through the di...

Page 19: ...Dual Mode settings After entering the Dual Mode settings menu Press the or buttons to move the selection cursor over the desired setting Press the or buttons to adjust the selected setting To reset th...

Page 20: ...for the upper section Press the desired SOUND button Preferred Split Mode upper lower section sound combinations can be stored to a Registration memory for convenient recall Please refer to page 33 fo...

Page 21: ...r the lower section sound Off Split Point Specify the point along the keyboard that divides the upper and lower sections C4 Entering the Split Mode settings menu While the Split Mode screen is shown i...

Page 22: ...2a Changing the right left section sounds Method 1 To select a different sound for the right section Press the desired SOUND button Preferred Four Hands Mode right left section sound combinations can...

Page 23: ...y the point along the keyboard that divides the right and left sections F4 Entering the Four Hands Mode settings menu While the Four Hands Mode screen is shown in the LCD display Press the FUNCTION bu...

Page 24: ...e of a concert hall or theater Live Hall Simulates the ambiance of a live hall or stage Cathedral Simulates the ambiance of a large cathedral 1 Turning Reverb on off Press the REVERB button to turn re...

Page 25: ...ss the and buttons simultaneously Exiting the Reverb settings menu Press the FUNCTION button EXIT to exit the Reverb settings menu Reverb settings are independent for each sound variation Any changes...

Page 26: ...tes the sound output from left to right across the stereo field using a sine wave Classic Auto Pan Similar in principle to Auto Pan but intended for vintage electric piano sounds Phaser Applies a cycl...

Page 27: ...g the Effects settings menu Press and hold the EFFECTS button The Effects settings menu will be shown in the LCD display Adjusting Effects settings After entering the Effects settings menu Press the o...

Page 28: ...FUNCTION button VT The Virtual Technician menu will be shown in the LCD display and Smart Mode will be selected automatically Press the FUNCTION button EDIT The list of Smart Mode presets will be show...

Page 29: ...and a variety of other acoustic characteristics This mode is recommended for musicians that enjoy fine tuning individual details of the piano sound in order to suit their personal preferences For mor...

Page 30: ...beats per minute BPM and beat of the bar will also be shown in the LCD display Beat Tempo Press the METRONOME button again to stop the metronome The LED indicator for the METRONOME button will turn of...

Page 31: ...efer to page 147 of this owner s manual Exiting the Metronome settings menu Press the FUNCTION button EXIT to exit the Metronome settings menu Any changes made to the metronome tempo beat or volume se...

Page 32: ...ges made to the Auto Power Off setting will be stored to User Memory automatically For a complete listing of the settings that can be stored to Registration memories please refer to pages 148 149 1Sel...

Page 33: ...cycle through the alphanumeric characters and the or buttons to move the cursor 4 Storing the Registration to memory Press the FUNCTION button STORE to confirm the store operation or the FUNCTION but...

Page 34: ...ected registration memory will be opened in normal playing mode allowing additional changes and adjustments to be made Saving the current Registration memory to USB Press the or buttons to select the...

Page 35: ...ultaneously The Panel Lock screen will be shown in the LCD display and the instrument will stop responding to panel button presses 2 Deactivating the Panel Lock While the Panel Lock is activated Press...

Page 36: ...ash and the SK Concert Grand demo song will start to play Selecting a demo song While Demo mode is selected Press a SOUND button to select a sound category The first demo song of the sound category wi...

Page 37: ...ill start to play Selecting a piano music piece While Piano Music mode is selected Press the or buttons to cycle through the different piano music pieces The title and composer of the selected piece w...

Page 38: ...us 101 J S Bach Inventionen Sonatinen Album 1 Lesson books sold separately please refer to the separate Internal Song Lists booklet for more information 1Selecting a lesson book song 1 Entering lesson...

Page 39: ...to rewind or cue the playback position without selecting Bar by pressing the REVERB or EFFECTS buttons To reset the playback position to the first bar of the song press the REVERB and EFFECTS buttons...

Page 40: ...eft right hand part volume Press the or buttons to move the selection cursor over the Balance setting then press the or buttons to adjust the volume of the left right hand part volume Increasing the v...

Page 41: ...e FUNCTION button will start to flash indicating that the start point A of the loop has been set Point A set 3 Specifying the end point B of the loop Press the FUNCTION button A B again to specify the...

Page 42: ...d playback will stop 3 Playing back the recorded lesson song Press the PLAY STOP button again The LED indicator for the PLAY STOP button will turn on and a one bar count in will be heard before the re...

Page 43: ...er exercise Press the PLAY STOP button The LED indicators for the REC and PLAY STOP buttons will turn off and the finger exercise recording and playback will stop The recorded practice will be evaluat...

Page 44: ...number and name of the selected Concert Magic song will be shown in the LCD display 2 Selecting a Concert Magic song While Concert Magic mode is in use Press and hold the FUNCTION button EDIT then pre...

Page 45: ...ic mode 2Concert Magic demo mode This function allows all of the Concert Magic songs to be played back randomly or in designated categories Random playback Enter Concert Magic mode and select the desi...

Page 46: ...cert Magic settings menu While Concert Magic mode is in use Press the FUNCTION button EDIT The Concert Magic settings menu will be shown in the LCD display Adjusting Concert Magic settings After enter...

Page 47: ...X X X X Melody Play These songs are also relatively easy to play especially if they are familiar to the player To perform them tap out the rhythm of the melody on any key of the keyboard Singing along...

Page 48: ...e song memory or part Press the or buttons to change the selected song memory or part to be recorded If a part has already been recorded a symbol will be shown Part has been recorded When recording pa...

Page 49: ...please refer to page 30 Changing panel settings while recording In some cases it may be desirable to make changes to the selected sound or style while recording a song The tables below list the vario...

Page 50: ...bol will be shown Part has been recorded 3 Starting stopping song playback Press the PLAY STOP button The LED indicator for the PLAY STOP buttons will turn on and the selected song parts will start to...

Page 51: ...o Audio Convert a recorder song to an MP3 WAV audio file see page 53 Entering the Internal Recorder menu While the Internal Recorder play screen is shown in the LCD display Press the FUNCTION button E...

Page 52: ...memory or part Press the or buttons to change the selected song memory 1 10 or part 1 2 or 1 2 to be erased If a part has already been recorded a symbol will be shown 3 Erasing the selected song part...

Page 53: ...to be converted If a part has already been recorded a symbol will be shown Press the FUNCTION button NEXT to continue 3 Selecting the audio file format Press the or buttons to select the desired file...

Page 54: ...T 1 Entering USB recorder mode Connect a USB memory device to the USB port Press the REC button The LED indicator for the REC button will start to flash and the USB Recorder format screen will be show...

Page 55: ...the FUNCTION button OK to confirm the save operation or the FUNCTION button BACK to cancel The recorded audio file will be saved with the specified name After a few seconds the USB Recorder play scre...

Page 56: ...nnect a USB memory device to the USB port Press the PLAY STOP button The LED indicator for the the PLAY STOP button will turn on and the Song Browser screen will be shown in the LCD display Song Brows...

Page 57: ...points of the A B loop Pressing the A B button for a third time will turn off the loop USB Recorder Edit menu The USB Recorder Edit menu allows the playback mode Single 1 Repeat All Repeat Random to b...

Page 58: ...lecting the part track to be recorded Press the button to select the Part setting then press the or buttons to select the part track to be recorded The Part setting can be set to 1 16 or MIDI An aster...

Page 59: ...UNCTION button OK to confirm the save operation or the FUNCTION button BACK to cancel TherecordedMIDIsongfilewillbesavedwiththespecifiedname To play back the recorded MIDI song file please refer to th...

Page 60: ...n on and the Song Browser screen will be shown in the LCD display Song Browser screen The Song Browser screen provides a listing of relevant files and folders stored on the connected USB device The ic...

Page 61: ...I file The playback volume can be adjusted within the range of 1 100 Press the FUNCTION button A B twice to set the start and end points of the A B loop Pressing the A B button for a third time will t...

Page 62: ...ngs Play Mode setting Description Single The selected audio MIDI file will be played once 1 Repeat The selected audio MIDI file will be repeated All Repeat All audio MIDI files in the current folder w...

Page 63: ...er audio file format WAV or MP3 It is also possible to adjust the recording gain at this stage For more information about the instrument s audio recorder gain setting please refer to page 54 It is als...

Page 64: ...e desired USB recorder audio file format WAV or MP3 It is also possible to record a new audio file directly to the USB device i e not overdub the previously selected audio file by changing the Mode se...

Page 65: ...ol will be shown beside the part number to indicate that the part has been recording and contains song data 3 Starting the recording Press the PLAY STOP button or a key on the keyboard The LED indicat...

Page 66: ...pose Song Transpose Tone Control Speaker Volume Line Out Volume Tuning Damper Hold Split Four Hands Bluetooth MIDI LCD Contrast Startup Setting Factory Reset Auto Power Off 5 USB Functions Load Song L...

Page 67: ...de function Off 10 Bluetooth MIDI Enable disable the instrument s Bluetooth MIDI function On 11 LCD Contrast Adjust the contrast of the instrument s LCD display 5 12 Startup Setting Store current pane...

Page 68: ...ose setting The keyboard pitch can be raised or lowered by up to 12 semi tones To reset the Key Transpose setting to the default value press the and buttons simultaneously Any changes made to the Key...

Page 69: ...Transpose value Press the or buttons to increase or decrease the value of the Song Transpose setting The song pitch can be raised or lowered by up to 12 semi tones To reset the Song Transpose setting...

Page 70: ...ne Control setting After entering the Basic Settings menu page 67 Press the or buttons to select the Tone Control setting 2 Changing the Tone Control type Press the or buttons to cycle through the dif...

Page 71: ...one Control setting After selecting the Tone Control setting page 70 Press the or buttons to select the User Tone Control type then press the FUNCTION button EDIT The User Tone Control screen will be...

Page 72: ...utput sound at a reduced volume level 1 Selecting the Speaker Volume setting After entering the Basic Settings menu page 67 Press the or buttons to select the Speaker Volume setting 2 Changing the Spe...

Page 73: ...me value Press the or buttons to increase or decrease the value of the Line Out Volume setting The Line Out Volume setting can be adjusted within the range of 0 no sound to 10 full volume To reset the...

Page 74: ...value of the Tuning setting The Tuning value can be adjusted within the range of 427 0 453 0 Hz To reset the Tuning setting to the default value press the and buttons simultaneously Any changes made t...

Page 75: ...c Settings menu page 67 Press the or buttons to select the Damper Hold setting 2 Changing the Damper Hold setting Press the or buttons to turn the Damper Hold setting on or off To reset the Damper Hol...

Page 76: ...ettings menu page 67 Press the or buttons to select the Split setting 2 Changing the Split setting Press the or buttons to turn the Split setting on or off To reset the Split setting to the default se...

Page 77: ...nu page 67 Press the or buttons to select the Four Hands setting 2 Changing the Four Hands setting Press the or buttons to turn the Four Hands setting on or off To reset the Four Hands setting to the...

Page 78: ...th MIDI settings cannot be stored to Registration or Startup Setting memory 3 Exiting the Bluetooth MIDI setting Press the FUNCTION button BACK to exit the Bluetooth MIDI setting and return to the Fun...

Page 79: ...or decrease the value of the LCD Contrast setting The LCD Contrast value can be adjusted within the range of 1 10 To reset the LCD Contrast setting to the default value press the and buttons simultan...

Page 80: ...eadphone Settings Changes made to the Auto Power Off setting will be stored to the Startup Setting memory automatically For a complete listing of the settings that can be stored to Startup Setting mem...

Page 81: ...al memory 1 Selecting the Factory Reset function After entering the Basic Settings menu page 67 Press the or buttons to select the Factory Reset setting 2 Restoring factory settings Press the REC butt...

Page 82: ...instrument will turn off automatically after 60 minutes of inactivity 120 min The instrument will turn off automatically after 120 minutes of inactivity The default Auto Power Off setting varies depe...

Page 83: ...Hammer Delay Adjust the delay of the hammer striking strings when playing pianissimo Off 11 Topboard Simulation Adjust the position of the grand piano topboard Open 3 12 Decay Time Adjust the decay t...

Page 84: ...ll briefly be shown in the LCD display About Stored Virtual Technician settings As mentioned above the Virtual Technician settings are adjusted and stored independently for each sound This allows diff...

Page 85: ...to select a lighter touch curve This Virtual Technician setting will affect all sounds Touch Curve types Touch Curve Description Light Requires less striking force to achieve a forte note For players...

Page 86: ...and return to the Function Menus screen User Touch Curve Creating a User Touch Curve After selecting the Touch Curve setting Press the or buttons to select the User 1 or User 2 touch curve then press...

Page 87: ...he normal tonal character of an acoustic piano throughout the entire dynamic range Mellow 1 A softer more mellow tonal character throughout the entire dynamic range Mellow 2 An even soften tonal chara...

Page 88: ...he desired note to be adjusted To select a note directly press and hold the FUNCTION button KEY then press the desired key Press the or buttons to adjust the User Voicing value for the selected note T...

Page 89: ...nu page 83 Press the or buttons to select the Damper Resonance setting 2 Adjusting the Damper Resonance volume Press the or buttons to increase or decrease the volume of the Damper Resonance setting T...

Page 90: ...page 83 Press the or buttons to select the Damper Noise setting 2 Adjusting the Damper Noise volume Press the or buttons to increase or decrease the volume of the Damper Noise setting The Damper Nois...

Page 91: ...trating String Resonance F G C B F G C G C E G C D E G C C A A E h o l d 1 Selecting the String Resonance setting After entering the Virtual Technician menu page 83 Press the or buttons to select the...

Page 92: ...Undamped String Resonance setting After entering the Virtual Technician menu page 83 Press the or buttons to select the Undamped String Resonance setting 2 Adjusting the Undamped String Resonance vol...

Page 93: ...the Cabinet Resonance setting After entering the Virtual Technician menu page 83 Press the or buttons to select the Cabinet Resonance setting 2 Adjusting the Cabinet Resonance volume Press the or but...

Page 94: ...setting After entering the Virtual Technician menu page 83 Press the or buttons to select the Key off Effect setting 2 Adjusting the Key off Effect volume Press the or buttons to increase or decrease...

Page 95: ...ord sounds 1 Selecting the Fall back Noise setting After entering the Virtual Technician menu page 83 Press the or buttons to select the Fall back Noise setting 2 Adjusting the Fall back Noise volume...

Page 96: ...y 1 Selecting the Hammer Delay setting After entering the Virtual Technician menu page 83 Press the or buttons to select the Hammer Delay setting 2 Adjusting the Hammer Delay value Press the or button...

Page 97: ...open topboard with reduced sound projection Open 1 Simulates the character of a partially open topboard with limited sound projection Closed Simulates the character of a closed topboard with minimum s...

Page 98: ...cay Time setting 2 Adjusting the Decay Time volume Press the or buttons to increase or decrease the value of the Decay Time setting The Decay Time value can be adjusted within the range of 1 10 with l...

Page 99: ...g 2 Adjusting the Minimum Touch value Press the or buttons to increase or decrease the value of the Minimum Touch setting The Minimum Touch value can be adjusted within the range of 1 20 with larger v...

Page 100: ...lied Wide Wide stretch tuning is applied User 1 4 A custom tuning method allowing the pitch of each key to be individual tuned 1 Selecting the Stretch Tuning setting After entering the Virtual Technic...

Page 101: ...e Press the or buttons to select the desired note to be adjusted To select a note directly press and hold the FUNCTION button KEY then press the desired key Press the or buttons to adjust the User Tun...

Page 102: ...or and minor whole tone to eliminate dissonance for thirds was devised to eliminate the lack of consonances experienced with certain fifths for the Mersenne pure temperament It produces chords that ar...

Page 103: ...he or buttons to adjust the User Temperament value for the selected note The User Temperament value can be adjusted within the range of 50 50 A value of 20 indicates a pitch increase of 20 cents To re...

Page 104: ...etting 2 Adjusting the Temperament Key After selecting a temperament other than Equal temperament types page 102 Press the or buttons to change the Temperament Key The Temperament Key can be set withi...

Page 105: ...board towards the bass region High Low Damping Gradually reduces the volume of the keyboard in both the treble and bass regions Center Damping Gradually reduces the volume of the keyboard in the centr...

Page 106: ...select the desired note to be adjusted To select a note directly press and hold the FUNCTION button KEY then press the desired key Press the or buttons to adjust the User Key Volume value for the sel...

Page 107: ...ting 2 Adjusting the Half Pedal Adjust value Press the or buttons to increase or decrease the value of the Half Pedal Adjust setting The Half Pedal Adjust value can be adjusted within the range of 1 1...

Page 108: ...fter entering the Virtual Technician menu page 83 Press the or buttons to select the Soft Pedal Depth setting 2 Adjusting the Soft Pedal Depth value Press the or buttons to increase or decrease the va...

Page 109: ...ration i e Step 1 for each setting explanation below Entering the Phones Settings menu While the normal playing mode screen is shown in the LCD display Press the FUNCTION button MENU The Function menu...

Page 110: ...row spatial positioning Normal default Naturally balanced spatial positioning that is neither forward nor wide Wide Wide very open spatial positioning 1 Selecting the SHS Mode setting After entering t...

Page 111: ...es the sound for canal type headphones 1 Selecting the Phones Type setting After entering the Phones Settings menu page 109 Press the or buttons to select the Phones Type setting 2 Changing the Phones...

Page 112: ...gh The instrument s headphone connectors will output sound at an increased volume level 1 Selecting the Phones Volume setting After entering the Phones Settings menu page 109 Press the or buttons to s...

Page 113: ...tandard built in Mac OS X USB MIDI driver will be installed automatically when the instrument is connected to the computer Mac OS 9 USB MIDI is not supported Please use the standard MIDI IN OUT connec...

Page 114: ...SMF MIDI file 7 Save Registration All Save a file containing all registration memories from the instrument to a USB memory device 8 Save Registration Single Save a single registration memory from the...

Page 115: ...ta a symbol will be shown Press the FUNCTION button ENTER The file selection screen will be shown in the LCD display listing CN37 song files stored on the USB memory device 3 Selecting the song to be...

Page 116: ...screen will be shown in the LCD display listing CN37 registration files stored on the USB memory device 2 Selecting the registration file to be loaded Press the or buttons to move the selection cursor...

Page 117: ...istration to be loaded into Press the FUNCTION button ENTER The file selection screen will be shown in the LCD display listing CN37 song files stored on the USB memory device 3 Selecting the registrat...

Page 118: ...the Load Startup Setting function Press the FUNCTION button ENTER The file selection screen will be shown in the LCD display listing CN37 startup settings files stored on the USB memory device 2 Selec...

Page 119: ...ontains song data a symbol will be shown Press the FUNCTION button ENTER The filename input screen will be shown in the LCD display 3 Naming the song Press the or buttons to cycle through the alphanum...

Page 120: ...or buttons to select the internal song memory to be saved If a song memory contains song data a symbol will be shown Press the FUNCTION button ENTER The filename input screen will be shown in the LCD...

Page 121: ...ions file Press the or buttons to cycle through the alphanumeric characters and the or buttons to move the cursor Press the FUNCTION button SAVE to save the registration file or the FUNCTION button BA...

Page 122: ...shown in the LCD display 3 Naming the registration file Press the or buttons to cycle through the alphanumeric characters and the or buttons to move the cursor Press the FUNCTION button SAVE to save...

Page 123: ...tons to cycle through the alphanumeric characters and the or buttons to move the cursor Press the FUNCTION button SAVE to save the startup settings file or the FUNCTION button BACK to cancel A confirm...

Page 124: ...ton RENAME to select the file to be renamed The filename input screen will be shown in the LCD display 3 Renaming the selected file Press the or buttons to cycle through the alphanumeric characters an...

Page 125: ...ill be shown in the LCD display listing files stored on the USB memory device 2 Selecting the file to be deleted Press the or buttons to move the selection cursor then press the FUNCTION button OK to...

Page 126: ...function After entering the USB Menu page 114 Press the or buttons to select the Format USB function Press the FUNCTION button ENTER A confirmation message will be shown in the LCD display prompting...

Page 127: ...37 digital piano ensure that all parts below are included A Phillips head screwdriver not included will also be required in order to assemble the instrument For Satin White finished instruments black...

Page 128: ...fasten the pedal board to the left and right side panels B B B B D D D D gap C B D pedal cable B D temporary mounting screw 2 Attaching the back board Allow the assembled pedal board and side panels t...

Page 129: ...ews attached in step 2 When lifting the main body onto the stand be careful not to catch trap hands and fingers A C 4 Fastening the main body to the stand View the front of the instrument to ensure th...

Page 130: ...their appearance To avoid damaging the plugs or bending the pins connect the plugs with the correct orientation and do not apply excessive force when connecting 6 Attaching the headphone hook optiona...

Page 131: ...tc Connect the instrument to a computer or tablet to send or receive MIDI data Connect the audio from other devices to the instrument s speakers USB type B USB type A Before connecting the CN37 digita...

Page 132: ...the USB to Host port Please refer to page 1 of the CN37 MIDI Settings Manual for more information about MIDI When the CN37 digital piano is connected to a smart device using Bluetooth MIDI the MIDI I...

Page 133: ...e sounds or noises are heard when playing with piano sounds The CN37 digital piano attempts to reproduce the rich variety of tones created by an acoustic grand piano as accurately as possible This inc...

Page 134: ...78 The instrument cannot connect to the smart device app via Bluetooth Check that the instrument s Bluetooth MIDI function is turned On p 78 Ensure that the mobile device s Bluetooth function is turn...

Page 135: ...i Modern E P 2 Original Kawai ORGAN Jazz Organ Original Kawai Blues Organ Original Kawai Church Organ Chorale Prelude Wachet auf ruft uns die Stimme Bach HARPSI MALLETS Harpsichord French Suite No 6 B...

Page 136: ...13 121 0 6 Classic E P 2 0 14 95 3 5 Modern E P 2 0 15 95 6 6 ORGAN Jazz Organ 0 16 121 0 18 Blues Organ 0 17 121 0 17 Ballad Organ 0 18 95 5 17 Gospel Organ 0 19 95 3 17 Church Organ 0 20 121 0 20 M...

Page 137: ...e Honky Tonk 0 54 121 1 4 OTHERS E Piano Dolce E P 0 55 95 2 5 Crystal E P 0 56 95 1 6 Tremolo E P 0 57 95 1 5 Classic E P 3 0 58 121 1 5 Classic E P 4 0 59 121 2 5 New Age E P 0 60 95 2 6 Modern E P...

Page 138: ...pason 0 94 95 45 20 Soft Strings 0 95 95 41 20 Bright Ensemble 0 96 95 47 20 Full Organ 0 97 95 44 20 Reed Ensemble 0 98 95 46 20 Diapason 0 99 95 7 20 Full Ensemble 0 100 95 1 21 Diapason Oct 0 101 9...

Page 139: ...2 29 Muted Electric 1 7 121 0 29 Cutting Guitar 1 8 121 1 29 Country Lead 1 9 121 3 29 OverdriveGuitar 1 10 121 0 30 Dynmic Ov drive 1 11 121 1 30 Distortion 1 12 121 0 31 Dist Feedback 1 13 121 1 31...

Page 140: ...ic Harp 1 50 121 1 47 Timpani 1 51 121 0 48 OTHERS Choir Hit Choir 3 1 52 121 1 53 Voice Oohs 1 53 121 0 54 Humming 1 54 121 1 54 DoReMi 1 55 95 51 54 DoReMi b 1 56 95 52 54 Synth Vocal 1 57 121 0 55...

Page 141: ...one Sax 1 91 121 0 68 Oboe 1 92 121 0 69 English Horn 1 93 121 0 70 Bassoon 1 94 121 0 71 Clarinet 1 95 121 0 72 OTHERS Pipe Flute Strings 1 96 95 8 74 Piccolo 1 97 121 0 73 Jazz Flute 1 98 95 1 74 Bi...

Page 142: ...Pad 2 5 121 0 92 Bowed Pad 2 6 121 0 93 Metallic Pad 2 7 121 0 94 Halo Pad 2 8 121 0 95 Sweep Pad 2 9 121 0 96 Multi Sweep 2 10 95 1 96 OTHERS Synth SFX Rain Pad 2 11 121 0 97 Soundtrack 2 12 121 0 9...

Page 143: ...trCuttingNoise 2 46 121 1 121 CuttingNoise 2 2 47 95 1 121 Ac Bass Slap 2 48 121 2 121 OTHERS SFX Breath Noise 2 49 121 0 122 Flute Key Click 2 50 121 1 122 Seashore 2 51 121 0 123 Rain 2 52 121 1 123...

Page 144: ...121 0 127 Laughing 2 79 121 1 127 Screaming 2 80 121 2 127 Punch 2 81 121 3 127 Heartbeat 2 82 121 4 127 Foot Step 2 83 121 5 127 Gunshot 2 84 121 0 128 Machine Gun 2 85 121 1 128 Laser Gun 2 86 121...

Page 145: ...ese Cymbal Reverse Cymbal F Ride Bell Ride Bell Ride Bell Ride Bell F Tambourine Tambourine Tambourine Tambourine G Splash Cymbal Splash Cymbal Splash Cymbal Splash Cymbal G Cowbell Cowbell Cowbell Co...

Page 146: ...urine Punch G Splash Cymbal Splash Cymbal Splash Cymbal Splash Cymbal Heart Beat G Analog Cowbell Cowbell Cowbell Cowbell Footsteps 1 A Crash Cymbal 2 Crash Cymbal 2 Crash Cymbal 2 Concert Cymbal 2 Fo...

Page 147: ...2 43 Funk 3 44 Funk Shuffle 1 45 Funk Shuffle 2 46 Buzz Beat 47 Disco 1 48 Disco 2 49 Hip Hop 1 50 Hip Hop 2 No Rhythm Name 51 Hip Hop 3 52 Hip Hop 4 53 Techno 1 54 Techno 2 55 Techno 3 56 Heavy Tech...

Page 148: ...tooth MIDI Off On On 11 LCD Contrast 1 10 5 12 Startup Setting n a 13 Factory Reset n a 14 Auto Power Off Off 15 min 60 min 120 min 2 Virtual Technician 1 Touch Curve Light Light Normal Heavy Heavy Of...

Page 149: ...Pedal Off On Off Split Point A0 C 8 C4 Four Hands Mode Sound Combination n a n a Balance 1 9 9 1 9 9 Right Octave Shift 3 0 2 Left Octave Shift 0 3 2 Split Point A0 C 8 F4 Reverb Type Room Lounge Sma...

Page 150: ...track Record MP3 WAV SMF 16 track Others Load Song Load Registration All Load Registration Single Load Startup Setting Save Internal Song Save SMF Song Save Registration All Save Registration Single S...

Page 151: ...section 151 Appendix User Notes...

Page 152: ...CN37 Owner s Manual KPSZ 0841 OW1101E J1608 Printed in Indonesia Copyright 2016 Kawai Musical Instruments Mfg Co Ltd All Rights Reserved 818482 R100...

Reviews: