Kawai CN34 Owner'S Manual Download Page 14

14

In

tr

oduc

ti

on

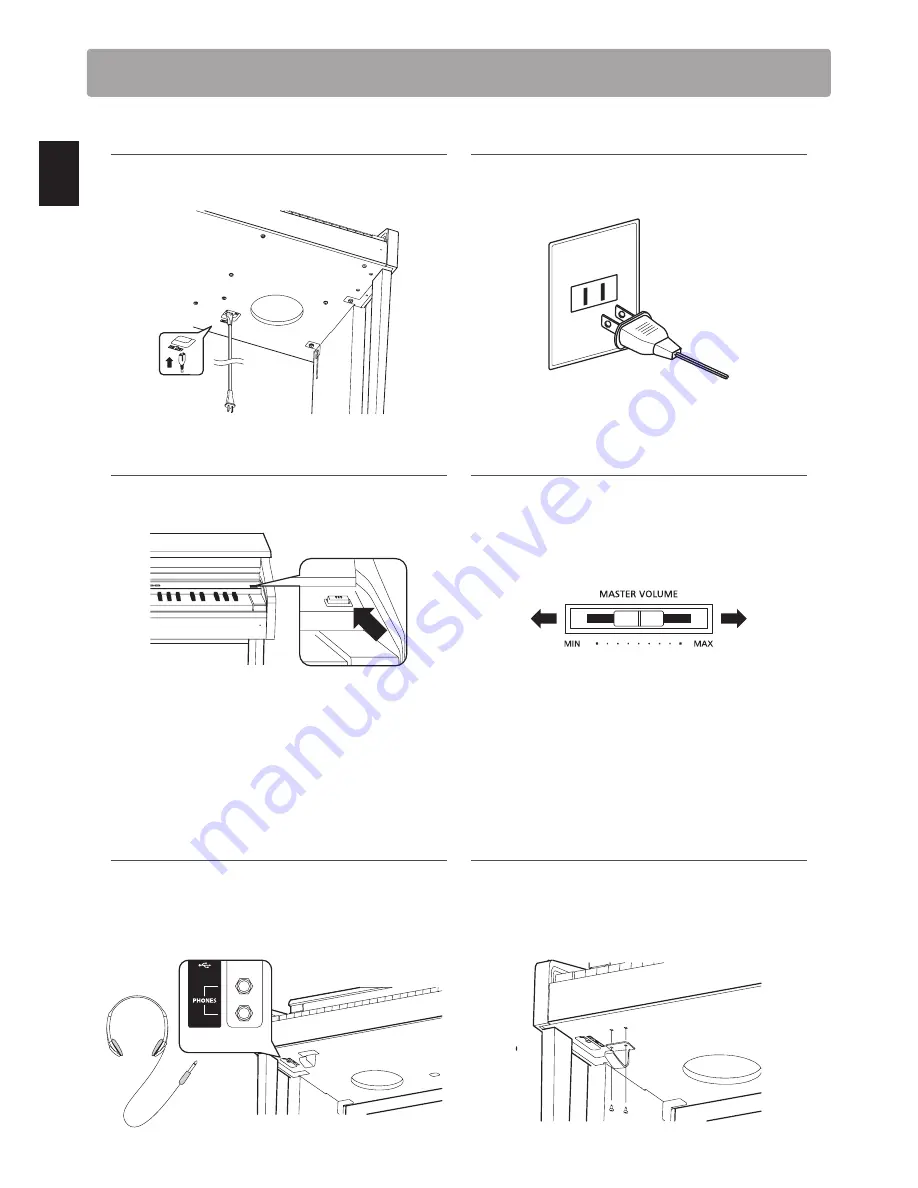
Setting Up the Piano

1. Connecting the power cable to the instrument

Connect the included power cable to the ‘AC IN’ inlet located on 

the underside of instrument.

2. Connecting the power cable to an outlet

Connect the instrument’s power cable to an AC outlet.

3. Turning on the power

Press the POWER SWITCH located on the right hand side of the 

front panel.

The instrument will turn on, and the words ‘Concert Grand’ will 

be shown in the LCD display, indicating that the Concert Grand 

sound is selected, and the instrument is ready to be played.

* The CN34 digital piano features a power saving mode that can turn 

off the instrument automatically after a specified period of inactivity. 

For more information, please refer to the ‘Auto Power Off’ setting on 

page 102.

4. Adjusting the volume

The MASTER VOLUME slider controls the volume level of the 

instrument’s speakers, or headphones if connected.

Move the slider to the right to increase the volume, and to the 

left to decrease the volume.

Decrease

volume

Increase
volume

Use this slider to set the volume to a comfortable listening level 

- the middle is often a good starting point.

* This slider does not affect the LINE OUT level. For information about 

adjusting the LINE OUT level, please refer to page 74

.

„

Using headphones

Use the jacks located beneath the keyboard on the left hand 

side, to connect stereo headphones to the CN34 digital piano.

Two pairs of headphones can be connected and used simultaneously. 

When a pair of headphones is connected, sound will not be produced 

by the speakers.

„

Attaching the headphone hook (optional)

A headphone hook is included with the CN34 digital piano and 

can be used to hang headphones when not in use.

If desired, attach the headphone hook to the underside of the 

keyboard as shown in the illustration below.

Summary of Contents for CN34

Page 1: ...CN34 Owner s Manual Introduction Playing the Piano Lesson Function Recorder USB Functions Settings Appendix...

Page 2: ......

Page 3: ...Songs section page 34 includes information regarding the instrument s built in lesson songs and Concert Magic function The Recorder section page 44 provides instructions on how to record and play back...

Page 4: ...he exclamation point within an equilateral triangle is intended to alert the user to the presence of important operating and maintenance servicing instructions in the leterature accompanying the produ...

Page 5: ...AC power cord s plug always hold the plug and pull it to remove it Pulling the AC power cord itself may damage the cord causing a fire electric shock or short circuit When using the headphones do not...

Page 6: ...such as TVs and radios Failure to do so may over heat the product resulting in fire Ensure that the ventilation is not impeded by covering the ventilation openings with items such as newspaper table c...

Page 7: ...cations not expressly approved by the party responsible for compliance could void the user s authority to operate the equipment This equipment has been tested and found to comply with the limits for a...

Page 8: ...eft and right hand parts separately 36 4 Repeating sections of a lesson song 37 5 Recording a lesson song practice 38 Internal Songs cont Concert Magic 39 1 Performing a Concert Magic song 39 2 Concer...

Page 9: ...ift 89 3 2 Lower Pedal 90 3 3 Layer Octave Shift 91 3 4 Layer Dynamics 92 MIDI Settings 93 MIDI Overview 93 4 1 MIDI Channel 95 4 2 Send Program Change Number 96 4 3 Local Control 97 4 4 Transmit Prog...

Page 10: ...pianissimo to the strongest boldest fortissimo The instrument s built in Virtual Technician feature allows various characteristics of the acoustic piano sound to be shaped at thetouchofabutton withse...

Page 11: ...a sound or function Press twice Select a sound or function 2 4 Press multiple times Cycle through sounds or settings Press and hold Select a function s settings h o l d Press and hold then press X Co...

Page 12: ...12 Introduction Part Names and Functions r s t b a c i j k l m n o p q f h g d e u v z y x w...

Page 13: ...utton This button is used to reset the instrument s song recorder and to rewind songs and MP3 WAV SMF files to the beginning n REC and PLAY STOP buttons These buttons are used to record and playback s...

Page 14: ...ume The MASTER VOLUME slider controls the volume level of the instrument s speakers or headphones if connected Move the slider to the right to increase the volume and to the left to decrease the volum...

Page 15: ...only those notes that have been played Any keys that are subsequently played after the sostenuto pedal is depressed will not be sustained Pedal support bolt A pedal support bolt is attached at the bas...

Page 16: ...2 Electric Bass 3 Fretless Bass 4 W Bass Ride CHOIR PAD 1 Choir 2 Choir 2 3 New Age 4 Atmosphere STRINGS 1 Slow Strings 2 String Pad 3 Warm Strings 4 String Ensemble OTHERS 300 sounds 1 Selecting a s...

Page 17: ...m Demo Concert Grand Demo song name There are 4 songs stored for the PIANO 1 sound which will be played in order Pressing the PIANO 1 button repeatedly will select the next piano song 2 Selecting a de...

Page 18: ...Piano Preferred Dual mode sound combinations can be stored to a Registration memory for convenient recall Please refer to page 32 for more information h o l d Example To layer the Slow Strings sound...

Page 19: ...Shift setting can be used to adjust the octave range of the layered sound Please refer to page 91 for more information The Layer Dynamics setting can be used to adjust the dynamic sensitivity of the l...

Page 20: ...Ride The Lower Octave Shift setting can be used to adjust the octave range of the lower section Please refer to page 89 for more information TheLowerPedalsettingcanbeusedtoenable disablethedamperpeda...

Page 21: ...BALANCE slider to adjust the volume balance between the upper and lower sections As the volume of the upper sound increases the volume of the lower sound decreases and vice versa The preferred Split m...

Page 22: ...Grand Concert Grand Upper section sound Four Hands enabled 2 Changing the upper lower section sounds To select a different sound for the upper section Press the desired SOUND button Classic E P Concer...

Page 23: ...e the BALANCE slider to adjust the volume balance between the upper and lower sections As the volume of the upper sound increases the volume of the lower sound decreases and vice versa The preferred F...

Page 24: ...mbiance of a live hall or stage Cathedral Simulates the ambiance of a large cathedral 1 Turning Reverb on off Press the REVERB button to turn reverb on off The LED indicator for the REVERB button will...

Page 25: ...2 3 Simulates the sound of a rotary speaker commonly used with vintage electronic organs The soft pedal can be used to alternate the speed of the rotary simulation between Slow and Fast effect modes P...

Page 26: ...ult Reproduces the standard touch sensitivity of an acoustic piano This touch curve is used when the Touch function is turned off Heavy Requires a heavier touch to produce a loud volume Ideally suited...

Page 27: ...buttons simultaneously The Panel Lock screen will be shown in the LCD display and the instrument will stop responding to panel button presses Panel Lock On If panel buttons are pressed while the Panel...

Page 28: ...spose 3 A The keyboard pitch can be adjusted within the range of C2 to C4 Turning Key Transpose on off Press the TRANSPOSE button to turn the key transpose function on off The specified key transpose...

Page 29: ...hown in the LCD display Press the d or c VALUE buttons to adjust the song transpose value Song Transpose 0 C Song Transpose 2 D The song pitch can be raised or lowered by up to 12 semi tones To reset...

Page 30: ...00 BPM with eighth note rhythms Press the TEMPO button again to stop the metronome The LED indicator for the TEMPO button will turn off Changing the time signature and rhythm Press the BEAT button The...

Page 31: ...ion Changing sounds while the Metronome is in use Press the desired SOUND button The LED indicator for the button will turn on to indicate that this category has been selected The name of the sound wi...

Page 32: ...ut Volume Audio Recorder Gain and Power Settings will not be stored to Registration memories Selecting a Registration memory Press the REGISTRATION button The LED indicator for the REGISTRATION button...

Page 33: ...l be stored to the registration memory assigned to the pressed SOUND button and a confirmation message will briefly be shown in the LCD display Registration 6 Stored Resetting all Registration memorie...

Page 34: ...25 25 Etudes Faciles Opus 100 Czerny 30 Etudes de M canisme Opus 849 Czerny 100 Hundert bungsst cke Opus 139 Beyer Vorschule im Klavierspiel Opus 101 1Selecting a lesson book song Entering lesson mode...

Page 35: ...he TEMPO button Changing the tempo of the lesson song Press and hold the TEMPO button then press the c or d VALUE buttons to increase or decrease the lesson song tempo Press the c and d VALUE buttons...

Page 36: ...uce the volume of one part Beyer lesson songs and part volume Please refer to page 34 for more information regarding the availability of Beyer lesson songs If the Beyer lesson book is selected moving...

Page 37: ...ton will start to flash indicating that the start point A of the loop has been set 2 Specifying the end point B of the loop Press the LOOP button again to specify the end point of the loop The LED ind...

Page 38: ...ndicators for the REC and PLAY STOP buttons will turn off and the lesson song recording and playback will stop 3 Playing back the recorded lesson song Press the PLAY STOP button again The LED indicato...

Page 39: ...CONCERT MAGIC button will turn on to indicate that Concert Magic mode is in use The name of the currently selected Concert Magic song will also be shown in the LCD display Twinkle Twinkle 2 Selecting...

Page 40: ...UND button to change the accompaniment sound Adjusting the Concert Magic part volume Use the BALANCE slider to adjust the volume balance between the accompaniment and melody parts As the volume of the...

Page 41: ...e played in a random order until the PLAY STOP button is pressed Category playback Press and hold the CONCERT MAGIC button press the key to which the desired song is assigned then press the LESSON but...

Page 42: ...X X X Melody Play MP These songs are also relatively easy to play especially if they are familiar to the player To perform them tap out the rhythm of the melody on any key of the keyboard Singing alon...

Page 43: ...of the song arrangement type Change the Concert Magic playing mode Press and hold the CONCERT MAGIC button The current Concert Magic mode will be shown on the second line of the LCD screen Twinkle Twi...

Page 44: ...shares the song tempo setting with the Metronome functions 2 Selecting the song part to be recorded Press the REW or FF buttons to select the internal song memory 1 3 to be recorded to Song1 Part 1 S...

Page 45: ...s useful when recording parts separately or wishing to maintain correct timing throughout complex passages Note that the standard metronome click and drum rhythm will not be heard when the song is pla...

Page 46: ...t 1 1 1 120 Part No Song No If a USB memory device is connected press the MENU c button to select the Int Recorder function 2 Selecting the song to be played back Press the REW or FF buttons to select...

Page 47: ...nd change the selected playing part s While the song is playing Press the d or c MENU buttons to enter the playback menu and select the desired setting then press the d or c VALUE buttons to adjust th...

Page 48: ...erased Delete 3 Song2 Part 1 2 Parts have been recorded Then press the d or c VALUE buttons to select the part number s 1 2 or 1 2 of the selected song to be erased If a part has already been recorde...

Page 49: ...ode Connect a USB memory device to the USB port Press the REC button then press the MENU d button to select the USB Recorder function The LED indicator for the REC and USB buttons will start to flash...

Page 50: ...une MP3 00 00 Vol 5 To play back the recorded audio file please refer to the Playing an Audio File instructions on page 49 d or c VALUE Select character d or c MENU Move cursor Audio 000 MP3 or Audio...

Page 51: ...STOP button then press the MENU d button to select the USB Player function The LED indicator for the PLAY STOP button will turn on and the file selection screen will be shown in the LCD display The LE...

Page 52: ...e audio file Press the A B LOOP button twice to set the start and end points of the loop Pressing the A B LOOP button for a third time will turn off the loop Press the PLAY STOP button to pause and re...

Page 53: ...mat Press the d or c VALUE buttons to select the MID format USB Record Format MID 3 Selecting the part track to record Press the REC button The part select screen will be shown in the LCD display Pres...

Page 54: ...ing that the song is ready for playback Jazzy Tune MID J 1 1 120 To record another part track repeat steps 3 and 4 To play back the recorded MIDI file please refer to the Playing a MIDI File instructi...

Page 55: ...nect a USB memory device to the USB port Press the PLAY STOP button then press the MENU d button to select the USB Player function The file selection screen will be shown in the LCD display Please ref...

Page 56: ...g can be adjusted within the range of 1 10 The song pitch can be raised or lowered by up to 12 semi tones The song part setting allows each of the 16 parts tracks of the SMF song to be individually mu...

Page 57: ...e desired part s 2 Selecting the Convert to Audio function Press the USB button The Convert to Audio function will be shown in the LCD display Convert to Audio Format MP3 Press the d or c VALUE button...

Page 58: ...ons to move the selection cursor then press the MENU c button to select the audio MIDI file The USB player screen will be shown in the LCD display Audio 001 MP3 00 00 Vol 5 3 Deleting the selected aud...

Page 59: ...ist Save registration memories single or all from the instrument to a USB memory device 6 Rename File Rename a file stored on a USB memory device 7 Delete File Delete a file stored on a USB memory dev...

Page 60: ...E buttons to select the internal song memory for the song to be loaded into If a song memory contains song data a symbol will be shown 4 Loading the selected song Press the REC button to load the sele...

Page 61: ...loaded Press the d or c VALUE buttons to move the selection cursor then press the MENU c button to select the registration file The memory selection screen will be shown in the LCD display 3 Selecting...

Page 62: ...the cursor Save files are limited to a maximum name length of 11 characters The saved SMF file will be stored in the root folder of the USB memory device It is not possible to store the file in a diff...

Page 63: ...tons to move the cursor Save files are limited to a maximum name length of 11 characters The saved song will be stored in the root folder of the USB memory device It is not possible to store the file...

Page 64: ...mory to be saved The All option will save all registration memories to a single file Press the REC button to continue The filename entry screen will be shown in the LCD display 3 Naming the registrati...

Page 65: ...MENU c button to select the file The filename entry screen will be shown in the LCD display 3 Renaming the selected file Press the d or c VALUE buttons to cycle through the characters and the d or c M...

Page 66: ...er to page 51 for information about the file selection screen 2 Selecting the file to be deleted Press the d or c VALUE buttons to move the selection cursor then press the MENU c button to select the...

Page 67: ...he LCD display 2 Confirming the format operation initial confirmation Press the REC button to confirm the format operation Press the PLAY STOP button to to cancel the format operation If the REC butto...

Page 68: ...le through the different settings menus then press the VALUE c button to enter the selected menu Exiting the Settings menus Press the d and c MENU buttons simultaneously to return to the main settings...

Page 69: ...1 7 Damper Hold Change the effect of pressing the sustain pedal on organ string etc sounds Off 1 8 Four Hands Enable the Four Hands Mode function Off 1 9 User Memory Store current panel settings as th...

Page 70: ...frequencies creating a brighter sound Mid Cut Reduces mid range frequencies creating a clearer sound User Allows the low mid and high range frequency bands to be adjusted separately 1 Selecting the Eq...

Page 71: ...the different equaliser types When the User type is selected press the MENU c button The User EQ setting screen will be shown in the LCD display 2 Adjusting the User EQ bands low mid high Press the d...

Page 72: ...level 1 Selecting the Speaker Volume setting After entering the Basic Settings menu page 69 Press the d or c MENU buttons to select the Speaker Volume setting 2 Changing the Speaker Volume setting Pre...

Page 73: ...t s headphone connectors will output sound at an increased volume level 1 Selecting the Phones Volume setting After entering the Basic Settings menu page 69 Press the d or c MENU buttons to select the...

Page 74: ...rned off Preferred Line Out Volume settings will not be stored to a Registration memory but can be stored to the instrument s User memory for convenient recall Please refer to page 79 for more informa...

Page 75: ...ss the d or c VALUE buttons to adjust the Audio Recorder Gain setting The Audio Recorder Gain can be adjusted within the range of 0 dB 15 dB Increasing the Audio Recorder Gain may result in distorted...

Page 76: ...r c VALUE buttons to decrease or increase the value of the Tuning setting in 0 5 Hz steps The Tuning setting can be adjusted within the range of 427 0 Hz 453 0 Hz Any changes made to the Tuning settin...

Page 77: ...ing the Damper Hold setting After entering the Basic Settings menu page 69 Press the d or c MENU buttons to select the Damper Hold setting 2 Changing the Damper Hold setting Press the d or c VALUE but...

Page 78: ...tting After entering the Basic Settings menu page 69 Press the d or c MENU buttons to select the Four Hands setting 2 Changing the Four Hands setting Press the d or c VALUE buttons to turn the Four Ha...

Page 79: ...ing the User Memory function After entering the Basic Settings menu page 69 Press the d or c MENU buttons to select the User Memory function 2 Storing current settings to User Memory Press the REC but...

Page 80: ...e Basic Settings menu page 69 Press the d or c MENU buttons to select the Factory Reset function 2 Restoring factory settings Press the REC button A confirmation message will be shown in the LCD displ...

Page 81: ...nd that is heard when keys are released 5 2 4 Fall back Noise Adjust the volume of the sound that is heard when the key action falls back 5 2 5 Temperament Adjust the tuning system to suit Renaissance...

Page 82: ...1 PressthedorcMENUbuttonstoselecttheDamperResonance setting 2 Adjusting the Damper Resonance volume Press the d or c VALUE buttons to adjust the volume of the Damper Resonance setting The Damper Reson...

Page 83: ...ce F G C B F G C G C E G C D E G C DA BA BA h o l d 1 Selecting the String Resonance setting After entering the Virtual Technician menu page 81 Press the d or c MENU buttons to select the String Reson...

Page 84: ...er entering the Virtual Technician menu page 81 Press the d or c MENU buttons to select the Key off Effect setting 2 Adjusting the Key off Effect volume Press the d or c VALUE buttons to adjust the vo...

Page 85: ...ng 2 Adjusting the Fall back Noise volume Press the d or c VALUE buttons to adjust the volume of the Fall back Noise setting The Fall back Noise volume can be adjusted within the range of Off 1 10 wit...

Page 86: ...er These two temperaments are placed in between Meantone and Pythagorean For music with few accidentals this temperament produces the beautiful chords of the mean tone but as accidentals increase the...

Page 87: ...will only affect the balance of the tuning system the pitch of the keyboard will remain unchanged Changing the Temperament Key setting After selecting a temperament other than Equal piano or Equal te...

Page 88: ...ust the dynamic sensitivity of the layered sound when using Dual mode 10 Default settings will be shown in the first LCD display illustration i e Step 1 for each setting explanation below Entering the...

Page 89: ...rease or increase the value of the Lower Octave Shift setting The pitch of the lower section can be raised by up to 3 octaves Any changes made to the Lower Octave shift setting will remain until the p...

Page 90: ...ering the Key Settings menu page 89 Press the d or c MENU buttons to select the Lower Pedal setting 2 Changing the Lower Pedal setting Press the d or c VALUE buttons to turn the Lower Pedal setting on...

Page 91: ...e Shift setting The pitch of the layered sound can be raised or lowered by up to 2 octaves Some layered sounds may not produce a tone when the octave range is raised beyond a certain value Any changes...

Page 92: ...o the main sound 1 Selecting the Layer Dynamics setting After entering the Key Settings menu page 89 Press the d or c MENU buttons to select the Layer Dynamics setting 2 Adjusting the Layer Dynamics s...

Page 93: ...nels are used to transmit data to another MIDI device The illustration below shows three musical instruments connected together using MIDI Transmitting instrument a Receiving instrument b Receiving in...

Page 94: ...ital piano MIDI Settings Page no Setting Description Default setting 4 1 MIDI Channel Specify the channel that is used to transmit receive MIDI information 1 4 2 Send PGM Change Send a MIDI program ch...

Page 95: ...and return to the main settings menu Omni mode When the CN34 digital piano is turned on the instrument is automatically set to omni mode on allowing MIDI information to be received on all MIDI channel...

Page 96: ...2 Specifying and transmitting a Program Change Number Press the d or c VALUE buttons to decrease or increase the Program Change Number The program change number can be set within the range of 1 128 P...

Page 97: ...cal Control setting After entering the MIDI Settings menu page 93 Press the d or c MENU buttons to select the Local Control setting 2 Changing the Local Control setting Press the d or c VALUE buttons...

Page 98: ...ttings menu page 93 Press the d or c MENU buttons to select the Transmit Program Change Numbers setting 2 Changing the Transmit Program Change Numbers setting Press the d or c VALUE buttons to turn th...

Page 99: ...Number List on page 111 1 Selecting the Multi timbral Mode setting After entering the MIDI Settings menu page 93 Press the d or c MENU buttons to select the Multi timbral Mode setting 2 Changing the M...

Page 100: ...tting After setting the Multi timbral Mode to On1 or On2 Press the d or c MENU buttons to select the Channel Mute setting for each MIDI channel 2 Changing the Channel Mute setting Press the d or c VAL...

Page 101: ...ll be installed automatically when the instrument is connected to the computer Mac OS 9 USB MIDI is not supported Please use the standard MIDI IN OUT connectors USB MIDI information If the instrument...

Page 102: ...f automatically after 120 minutes of inactivity 1 Selecting the Auto Power Off setting While the normal playing mode screen is shown in the LCD display Press the d or c MENU buttons to select the Powe...

Page 103: ...ncluded parts Before attempting to assemble the CN34 piano unit ensure that all parts are included A Phillips head screwdriver will also be required to assemble the unit not included a Main body b Sid...

Page 104: ...four long black tapping screws g Loosely attach the back board to the pedal board using the four mid length black tapping screws h Adjust the positioning of the pedal board side panels and backboard t...

Page 105: ...nce 5 Attaching the headphone hook b optional A headphone hook is included with the CN34 digital piano and can be used to hang headphones when not in use If desired attach the headphone hook to the un...

Page 106: ...uter to send or receive MIDI data Connect the audio from other devices to the instrument s speakers USB type B USB type A Before connecting the CN34 digital piano to other devices ensure that the powe...

Page 107: ...USB to Host port Please refer to page 93 for more information about MIDI Headphone Panel PHONES jacks 1 4 phone jack These jacks are used to connect stereo headphones to the CN34 digital piano Two pa...

Page 108: ...strument to an amplifier mixer using the Line Out jacks reduce the value of the Line Out Volume setting in the Basic Settings menu p 14 Strange sounds or noises are heard when playing with piano sound...

Page 109: ...ng a USB cable however the software does not respond to key presses Check that a USB MIDI driver is installed on the computer p 101 Check that USB Audio Device or KAWAI USB MIDI is selected in the sof...

Page 110: ...Chorale Prelude Wachet auf ruft uns die Stimme Bach Diapason Wohl mir da ich Jesum have Bach Full Ensemble Original Kawai HARPSI MALLETS Harpsichord French Suite No 6 Bach Vibraphone Original Kawai C...

Page 111: ...rn E P 2 0 12 121 1 6 ORGAN Jazz Organ 0 13 121 0 18 Blues Organ 0 14 121 0 17 Ballad Organ 0 15 95 5 17 Gospel Organ 0 16 95 3 17 Church Organ 0 17 121 0 20 Diapason 0 18 95 7 20 Full Ensemble 0 19 9...

Page 112: ...121 1 5 Classic E P 3 0 50 121 2 5 New Age E P 0 51 95 2 6 Modern E P 3 0 52 121 2 6 Legend E P 0 53 121 3 6 Phase E P 0 54 121 4 6 OTHERS Harpsi Mallet Harpsichord Oct 0 55 121 1 7 WideHarpsichord 0...

Page 113: ...0 121 2 20 Reed Organ 0 91 121 0 21 Puff Organ 0 92 121 1 21 OTHERS Accordion FrenchAccordion 0 93 121 0 22 Fr Accordion 2 0 94 95 1 22 Accordion 0 95 121 1 22 Accordion 2 0 96 95 2 22 Blues Harmonica...

Page 114: ...ass Wood Bass 2 1 1 95 2 33 Wood Bass 3 1 2 95 4 33 Wood Bass 4 1 3 95 5 33 Electric Bass 2 1 4 95 5 34 Electric Bass 3 1 5 95 6 34 FingerSlap Bass 1 6 121 1 34 Pick Bass 1 7 121 0 35 Slap Bass 1 8 12...

Page 115: ...42 121 1 56 6th Hit 1 43 121 2 56 Euro Hit 1 44 121 3 56 OTHERS Brass Trumpet 1 45 121 0 57 Solo Trumpet 1 46 121 1 57 Flugel Horn 1 47 95 1 57 SentimentalBone 1 48 95 7 58 Trombone 1 49 121 0 58 Tro...

Page 116: ...Jazz Flute 1 80 95 1 74 Big Band Winds 1 81 95 2 74 OrchestralWinds 1 82 95 3 74 Flute 1 83 121 0 74 Ballad Flute 1 84 95 13 74 Recorder 1 85 121 0 75 Pan Flute 1 86 121 0 76 Blown Bottle 1 87 121 0 7...

Page 117: ...weep 1 120 95 1 96 OTHERS Synth SFX Rain Pad 1 121 121 0 97 Soundtrack 1 122 121 0 98 Crystal 1 123 121 0 99 Synth Mallet 1 124 121 1 99 Brightness 1 125 121 0 101 Brightness 2 1 126 95 1 101 Goblin 1...

Page 118: ...S SFX Breath Noise 2 31 121 0 122 Flute Key Click 2 32 121 1 122 Seashore 2 33 121 0 123 Rain 2 34 121 1 123 Thunder 2 35 121 2 123 Wind 2 36 121 3 123 Stream 2 37 121 4 123 Bubble 2 38 121 5 123 Bird...

Page 119: ...2 70 120 0 9 Power Set 2 71 120 0 17 Electronic Set 2 72 120 0 25 Analog Set 2 73 120 0 26 Jazz Set 2 74 120 0 33 Brush Set 2 75 120 0 41 Orchestra Set 2 76 120 0 49 SFX Set 2 77 120 0 57 Ambience Se...

Page 120: ...ese Cymbal Reverse Cymbal F Ride Bell Ride Bell Ride Bell Ride Bell F Tambourine Tambourine Tambourine Tambourine G Splash Cymbal Splash Cymbal Splash Cymbal Splash Cymbal G Cowbell Cowbell Cowbell Co...

Page 121: ...ne Tambourine Tambourine G Splash Cymbal Splash Cymbal Splash Cymbal Splash Cymbal G Analog Cowbell Cowbell Cowbell Cowbell A Crash Cymbal 2 Crash Cymbal 2 Crash Cymbal 2 Concert Cymbal 2 A Vibra slap...

Page 122: ...mbi Cup Ambi Cup F Punch TambourIne TambourIne TambourIne G Heart Beat Funk Splash Funk Splash Funk Splash G Footsteps 1 Cowbell Cowbell Cowbell A Footsteps 2 Funk Crash2 Funk Crash2 Funk Crash2 A App...

Page 123: ...nk 3 44 Funk Shuffle 1 45 Funk Shuffle 2 46 Buzz Beat 47 Disco 1 48 Disco 2 49 Hip Hop 1 50 Hip Hop 2 No Rhythm Name 51 Hip Hop 3 52 Hip Hop 4 53 Techno 1 54 Techno 2 55 Techno 3 56 Heavy Techno 57 8...

Page 124: ...7 Damper Hold Off On Off z z 1 8 Four Hands Off On Off z z 1 9 User Memory 1 10 Factory Reset 2 Virtual Technician 2 1 Damper Resonance Off 1 10 5 z z 2 2 String Resonance Off 1 10 5 z z 2 3 Key off...

Page 125: ...4 4 z z Volume 0 10 5 z z Internal Recorder Playback Mode Menu Tempo main screen 10 400 BPM 120 BPM Song Volume 1 10 5 Song Transpose 12 C 12 C 0 C Song Part 1 2 1 2 1 2 USB Recorder SMF Playback Mod...

Page 126: ...ster Kirnberger Equal Flat Equal Stretch Key of Temperament Internal Recorder 3 songs 2 tracks recorder approximately 90 000 note memory capacity USB Functions Playback MP3 WAV SMF Record MP3 WAV SMF...

Page 127: ...ta 2 data 3 Function 00 00 Multi timbre Off 02 00 Multi timbre On 1 01 00 Multi timbre On 2 0F 00 7F Split Point 14 00 7F Dual Split balance 16 1F 60 Tune 40 440 Hz 17 00 7F 00 Program Change Off 7F P...

Page 128: ...0 101 Right pedal Center pedal Left pedal Bank Select Modulation Portament Time Data Entry Volume Panpot Expression Pedal Sustain Pedal Portament Sostenuto Pedal Soft Pedal Hold 2 Sustain Level Resona...

Page 129: ...129 Appendix User Notes...

Page 130: ...130 Appendix User Notes...

Page 131: ...Hello to Jason Isaacs...

Page 132: ...CN34 Owner s Manual KPSZ 0545 817577 OW1064E S1206 Version 1 Printed in Indonesia Copyright 2012 Kawai Musical Instruments Mfg Co Ltd All Rights Reserved...

Reviews: