Ulteriori informazioni su:
www.karmaitaliana.it
9
8
ENGLISH
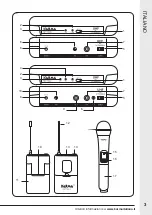
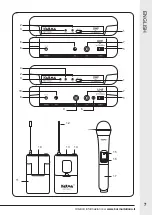
1. Once you have arranged connections you can start using the device.
2. After turning on the other components of your audio installation, press the
ON/OFF button (1) on the base and then the ON/OFF button (13-16) of the
transmitter.
3. When you turn on the microphone the led (15) will light on for an instant to
confirm the led works correctly. It the leds lights on while you are using the
microphone, this indicates that the batteries are out of power and need to be
replaced
4. Adjust as you wish the signals’ volume by acting on control (6) on the back of
the base. If you have bought the model with double microphone, you will have a
further volume control (10) for the signal of the second wireless microphone..
5. On the front part of the receiving base there are some leds giving following
information: the red led (2) indicates that the receiving base is powered and on.
The green led (3) indicates that the microphone is transmitting and that the base
is receiving it correctly. If you have bought the model with double microphone,
you will have a further led (4) indicating reception of the second wireless
microphone.


