background image


11 

4.1.5 Rear Wheel Attachment 

4.1.5.1 First ensure that the brake is in the OFF position. 
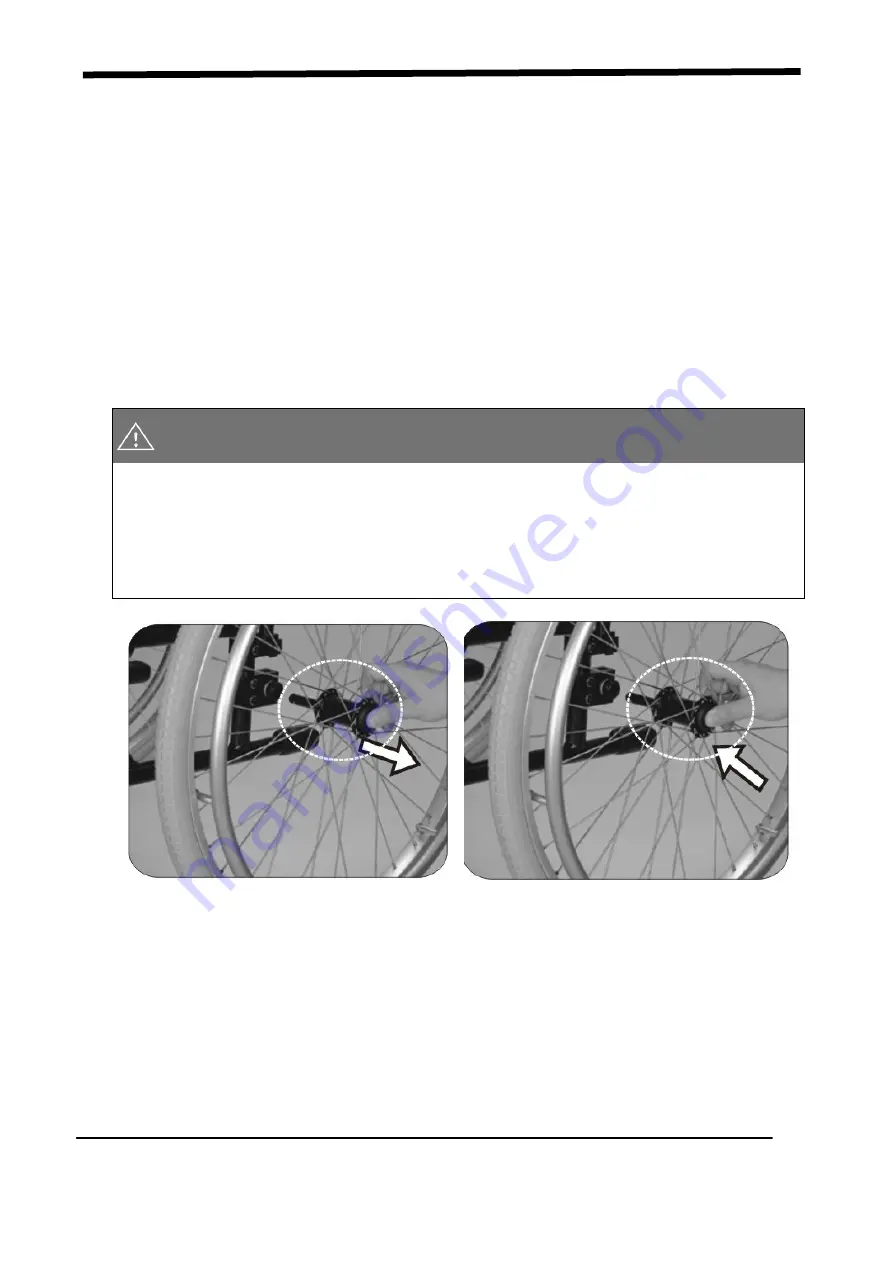
4.1.5.2 Take up the assembled wheel and axle and depress the button in the centre 

of the axle, as above. 

4.1.5.3 This retracts the ball bearings that will allow you to push the axle into the 

wheel bracket that is located on the lower rear frame of the wheelchair. 

4.1.5.4 When you remove your thumb from the button on the axle, the ball 

bearings should be visible protruding from the axle at the back of the 
wheel bracket. This will secure the wheel safely in the frame.    (See Figure 
4.10). 


CAUTION: 


You must make sure that the axle is fully located in the wheelchair bracket 
and that the ball bearings are fully open and have positively attached the 
wheel in the frame. 


The rear wheel can be mounted at different positions on the frame to alter 
the seat height and overall stability of the chair. Changing the wheel 
position should be carried out by your approved repairer or therapist. 


Figure 4.9 

Figure 4.10 


4.1.6 Important Do

s and Don

ts 

4.1.6.1 Do: Keep axles clean and lubricated with light oil or maintenance spray. 
4.1.6.2 Do: Maintain correct tyre pressure if using pneumatic tyres. 
4.1.6.3 Do not: Try to remove the wheels while the wheelchair is occupied even 

when using anti-tip levers. 


Summary of Contents for KM-2000 Series

Page 1: ...Manual Wheelchair Owner s Manual KM 2000 Series KM 2500 KM 2500L...

Page 2: ......

Page 3: ...the wheelchair if you are the attendant DO pay attention to keep the wheelchair balanced DO check the frame and components regularly and refer to this user guide during and after the warranty period D...

Page 4: ...olded This alters the centre of gravity and may cause the wheelchair to tip backwards The back should only be folded for storage or transport of the wheelchair DO NOT hang anything on the back joint t...

Page 5: ...KARMA dealer for service If all else fails contact KARMA directly via our website or give us a call and we can refer you to your new service provider CE MARKING This wheelchair complies with the requi...

Page 6: ...3 2 6 Streets 3 2 7 General 3 2 8 Upholstery 4 2 9 Anti tippers 4 2 10 Maximum User Weight Limit 4 2 11 Avoid General Misuse 4 2 12 Labeling 6 3 INTENDED USE PARTS 7 3 1 Intended Use 7 3 2 KM 2000 Par...

Page 7: ...tenance Record 19 6 OPTIONS AND ACCESSORIES 21 7 TROUBLESHOOTING 23 7 1 Trouble or Problems with Your Wheelchair 23 8 SPECIFICATIONS 24 9 CLEANING RECYCLING 25 9 1 Cleaning 25 9 2 Post Consumer Recycl...

Page 8: ...njury and or damage to your wheelchair SUGGESTION Follow these instructions to keep the wheelchair in good condition 1 4 This manual includes the repair and maintenance chart as well as the warranty 1...

Page 9: ...eize up causing you to lose control or fall out of the wheelchair 2 3 6 Whenever possible utilize help from an assistant attendant while negotiating inclines CAUTION Although the product has met ISO 7...

Page 10: ...tive tape on the wheelchair and or your clothing will make you more visible to drivers 2 6 2 Please comply with traffic safety code 2 6 3 Avoid potholes and rough terrain that might cause the casters...

Page 11: ...ction 8 SPECIFICATIONS Loads exceeding maximum capacity can damage your wheelchair and cause malfunctions yielding a safety hazard The warranty does not cover damage caused by improper operation of th...

Page 12: ...5 Figure 2 1 Figure 2 2 Figure 2 3 Figure 2 4 Figure 2 5...

Page 13: ...6 2 12 Labeling Please carefully read all the labeling on the wheelchair before driving it Do not remove them Protect them for future reference only for seat width 18 PU Casters...

Page 14: ...r seat width 18 Hand brakes are provided for both rear wheels 3 1 3 It has pneumatic tyres for traction and comfort It also has an extremely durable aluminum alloy frame with tough accessories and doe...

Page 15: ...Push Handle 2 Attendant brake optional 3 Side Panel 4 Brake 5 Rear Wheel KM 2500 6 Cross Brace Cross Bar 7 Caster 8 Backrest Upholstery 9 Armrest 10 Seat Upholstery 11 Calf Strap 12 Footplate KM 2500...

Page 16: ...holder See Figure 4 2 4 1 1 3 Flip the footplates down See Figure 4 3 4 1 1 4 Ready for action See Figure 4 4 Alternatively you can stand at the side of the wheelchair and complete step 1 by pulling t...

Page 17: ...2 4 Folding is now completed See Figure 4 8 Travel bag is optional Figure 4 5 Figure 4 6 Figure 4 7 Figure 4 8 CAUTION Be careful not to get your fingers caught when folding the wheelchair 4 1 3 Rear...

Page 18: ...safely in the frame See Figure 4 10 CAUTION You must make sure that the axle is fully located in the wheelchair bracket and that the ball bearings are fully open and have positively attached the wheel...

Page 19: ...e height is adjusted properly according to the user s calf length to reduce pressure on the body The footrest height must be more than 5 cm See Figure 4 12 4 2 Storing Make sure the wheelchair is fold...

Page 20: ...4 3 2 2 Move the wheelchair backwards so that the casters are pointing forwards and are in line with the rear wheels 4 3 2 3 Ensure that where possible the rear of the chair is against a wall or if n...

Page 21: ...locked when the chair is not being pushed See Figure 4 15 4 4 1 2 Always make sure that both feet are safely on the footplates and that clothing is safely tucked out of the way and cannot get caught...

Page 22: ...2 Tilting by the Attendant 4 4 2 1 Make sure both the user s feet are on the footplates and will not slip off Make sure the handgrips are secure and cannot slip off 4 4 2 2 Release both brakes 4 4 2...

Page 23: ...ld only be attempted by people experienced in wheelchair use Strong arms are also necessary It is always better to have the help of an attendant Leaning backwards causes the caster to rise higher BUT...

Page 24: ...the wheelchair back slightly and pull the tilted wheelchair far enough into the road so that the casters and footrests can be lowered clear of the kerb 4 4 6 Going Up Kerbs Please note This operation...

Page 25: ...hem and trip yourself up 5 INSPECTION AND MAINTENANCE 5 1 Daily Check Check the following items before traveling If you find anything abnormal visit your KARMA wheelchair dealer for further inspection...

Page 26: ...sing A maintenance service fee may apply WARNING Even if you don t use the vehicle for a long time the wheelchair should still be maintained regularly You should clean your wheelchair regularly Item W...

Page 27: ...re securely tightened Inspect the swing away footrest release lever for effective locking TYRES Inspect for flat spots cracks and wear Check tyre tread depth is more than 1mm If pneumatic tyres check...

Page 28: ...rs I V Pole Holder Height adjusts from 130 cm 51 to 200 cm 78 Attaches to all KARMA manual wheelchairs Oxygen Tank Holder Standard size attaches to the back of wheelchairs Attaches to all KARMA manual...

Page 29: ...ual wheelchairs Folding Drink Holder Collapses and adjusts to the size of the container 6 10 cm Attaches to all KARMA manual wheelchairs CAUTION Attaching accessories may alter the overall stability a...

Page 30: ...ngle Check that rear wheels are equally spaced from the seat frame 2 Sluggish Turn or Performance Check tyres for correct and equal pressure Check for loose nuts and bolts 3 Caster Flutter Wobble Chec...

Page 31: ...84 26 1 lb Seat Width mm in 400 16 470 18 400 16 470 18 Seat Depth mm in 400 15 7 in Seat Height mm in 470 18 5 in Backrest Height mm in 395 15 6 in Armrest Height mm in 210 8 3 in Calf Length mm in...

Page 32: ...is used in the rain or snow We suggest that you don t use your wheelchair in the rain or snow If you are traveling and get caught in the rain we suggest you try to find shelter while waiting it out If...

Page 33: ...2 2 Check with your local recycling center on where and how to recycle your wheelchair as this information varies from region to region 10 WARRANTY 10 1 Serial Number To ensure after sale service and...

Page 34: ...ant 10 2 3 2 Inspection adjustment cleaning etc 10 2 3 3 KARMA designated self inspection costs 10 2 4 Responsibilities 10 2 4 1 The Responsibilities of the User 10 2 4 1 1 Fully adhere to operation g...

Page 35: ...bring this owner s manual and the wheelchair to the dealership where the wheelchair was purchased for registration Full Name Gender Date of Birth Address Model Serial Number Date of Purchase Dealer s...

Page 36: ...110404000026 104 40072 Rev 16 2019 08...

Reviews: