


WORLD OF WELLNESS
Instructions for installation and use
p. 8/14
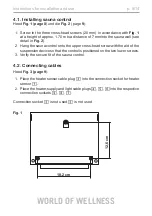
4.1. Installing sauna control
Heed
Fig. 1
(
page 8
) und die
Fig. 2
(page
9
).
1. Screw in the three cross-head screws (20 mm) in accordance with
Fig. 1
at a height of approx. 1.70 m to a distance of 7 mm into the sauna wall (see
detail in
Fig. 2
).
2. Hang the sauna control onto the upper cross-head screw with the aid of the
suspension device so that the control is positioned on the two lower screws.
3.
Verify the secure fit of the sauna control.
4.2. Connecting cables
Heed
Fig. 3 (page 9
).
1. Place the heater sensor cable plug
3
into the connection socket for heater
sensor
1
.
2. Place the heater, supply and light cable plugs
4
,
5
,
6
into the respective
connection sockets
9
,
8
,
7
.
Connection socket
2
is not used
2
is not used.
Fig. 1
12,6 cm
18,2 cm
Summary of Contents for 80460
Page 6: ...B 03 B 8 B 7 B 7 B 9 1870 mm 1870 mm 04 05 2x B 9 05 1 A 90 A B B 9 1870 mm B 8 1895mm 05 1...
Page 9: ...10 M 1 B 1 M 1 4 70 18x 09 1 09 1 09 11 1 11 4x70 3mm 6x 3x 11 1 6x 3x...
Page 11: ...B 3 B 3 15 S 1 4 5 40 12x 16 2x 4x35 B 12 B 12 B 11 3mm B 11 4 35 16x 42x S 1 B 3 4 5 40 3mm...
Page 24: ...03 04 60mm 06 05 07 08 D 3 4 5 30 3mm D 1 D 2 4 5 30 12x...
Page 25: ...Karibu Artikel Nr Artikel Nr I Nr Typ 70444 37 467 12 15011 Bio Saunaofen 3 6 kW ES SS P P...
Page 26: ...2 Mettre les pierres du sauna sur la grille de pierres...
Page 55: ...NL Vul het reservoir met maximaal 2 liter water 31...
Page 60: ...Pokl d n saunov ch kamenu na ro t Pozor V eobecn pokyny k pol v n POZOR NEBEZPEC OPAREN 36 CZ...
Page 62: ...38 Ersatzteilzeichnung...
Page 74: ...8 8 B H F 3 3 3 3 B H P B H B H P 1 P B H 1 1 B H 8 1 1 3 B H F F 1 H F 1 F 3 3 3...
Page 75: ...ISC GmbH Art Nr 086 50 009 93 15011 Stand 04 2015...
Page 160: ...WORLD OF WELLNESS NOTIZEN APPUNTI NOTES NOTE NOTITIES...
Page 161: ...WORLD OF WELLNESS NOTIZEN APPUNTI NOTES NOTE NOTITIES...
Page 162: ...WORLD OF WELLNESS NOTIZEN APPUNTI NOTES NOTE NOTITIES...


