6
English
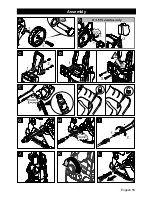
Mount loose parts delivered with appliance
prior to start-up.
Illustrations on Page 13
Illustration
Push the wheels into the intake and se-
cure with the enclosed plugs, watch for
positioning of plug.
Illustration
Place the bottom holder into the recess-
es and push forward until it audibly
locks in.
Insert the top holder and push down all
the way.
You will need the 2 included screws as well
as a Philips screwdriver PH 2.
Illustration
Slide the transport handle into the guide
and secure it with 2 screws.
You will need the 2 included screws as well
as a Philips screwdriver PH 2.
Illustration
Insert both detergent hoses onto the
hose fittings.
Install the dosage regulator and con-
nect using 2 screws.
Note
: During installation you must
make sure that the tongues of the dos-
age regulator match up with the intend-
ed recesses in the casing.
Illustration
Push the high pressure hose into the
trigger gun until it locks audibly.
Note:
Make sure the connection nipple
is aligned correctly.
Check the secure connection by pulling
on the high pressure hose.
몇
Warning
According to the applicable regula-
tions, the appliance must never be
used on the drinking water supply
without a system separator. Use a
suitable system separator manufactured by
KÄRCHER; or, as an alternative, a system
separator as per EN 12729 Type BA. Water
flowing through a system separator is con-
sidered non-drinkable.
Caution
Always connect the system separator to
the water supply, never directly to the appli-
ance!
Note:
Impurities in the water can damage
the high-pressure pump and accessories.
For protection, the use of the KÄRCHER
water filter (optional accessory, order no.
4.730-059) is recommended.
Observe regulations of water supplier.
For connection values, see type plate/tech-
nical data.
Use a fibre-reinforced water hose (not
included) with a standard coupling.
(Minimum diameter 1/2 inch (13 mm),
minimum length 7.5 m).
Illustration
Screw the coupling element to the wa-
ter connection on the appliance.
Push the water supply hose onto the
coupling unit, then connect it to the wa-
ter supply.
This high-pressure cleaner is suited to work
with the KÄRCHER suction hose with back-
flow valve (Optional accessory, order no.
4.440-238) to draw in surface water, e.g.
from water butts or ponds (see specifica-
tions for max. suction height).
Fill the KÄRCHER suction hose with
backflow valve with water, screw to wa-
ter supply and hang into the water butt.
Separate the high pressure hose from
the high pressure connection of the ap-
pliance.
Operation
Before Startup
Install wheels
Install the storage for trigger gun
(K 3.575 Jubilee only)
Install the transport handle
Install the dosage regulator for
detergent
Connect the high pressure hose to the
trigger gun
Water supply
Water supply from mains
Drawing in water from open reservoirs
Summary of Contents for K 3.550
Page 13: ...English 13 Assembly...
Page 14: ...14 English Notes...
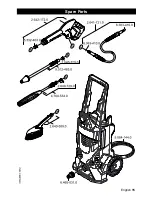
Page 15: ...English 15 Spare Parts...
Page 16: ......

