HD 3.1 / 31 P
9.139-169 (04/05)
English ....................... 2Español .................... 14Français ................... 26
Page 1: ...HD 3 1 31 P 9 139 169 04 05 English 2 Español 14 Français 26 ...
Page 2: ...ing a Break 9 Winterizing and Long Term Storage 9 Cleaning Tips 10 11 Optional Cleaning Accessories 11 Troubleshooting 12 13 Specifications Max Pressure 3100 PSI Water volume 3 1 GPM Detergent suction 0 15 0 20 GPM Engine 9 0 HP Honda GX 270 Part No 1 575 107 Serial No ______________ Kärcher Commercial USA To locate a dealer call 1 888 805 9852 or visit our website www karchercommercial us ...
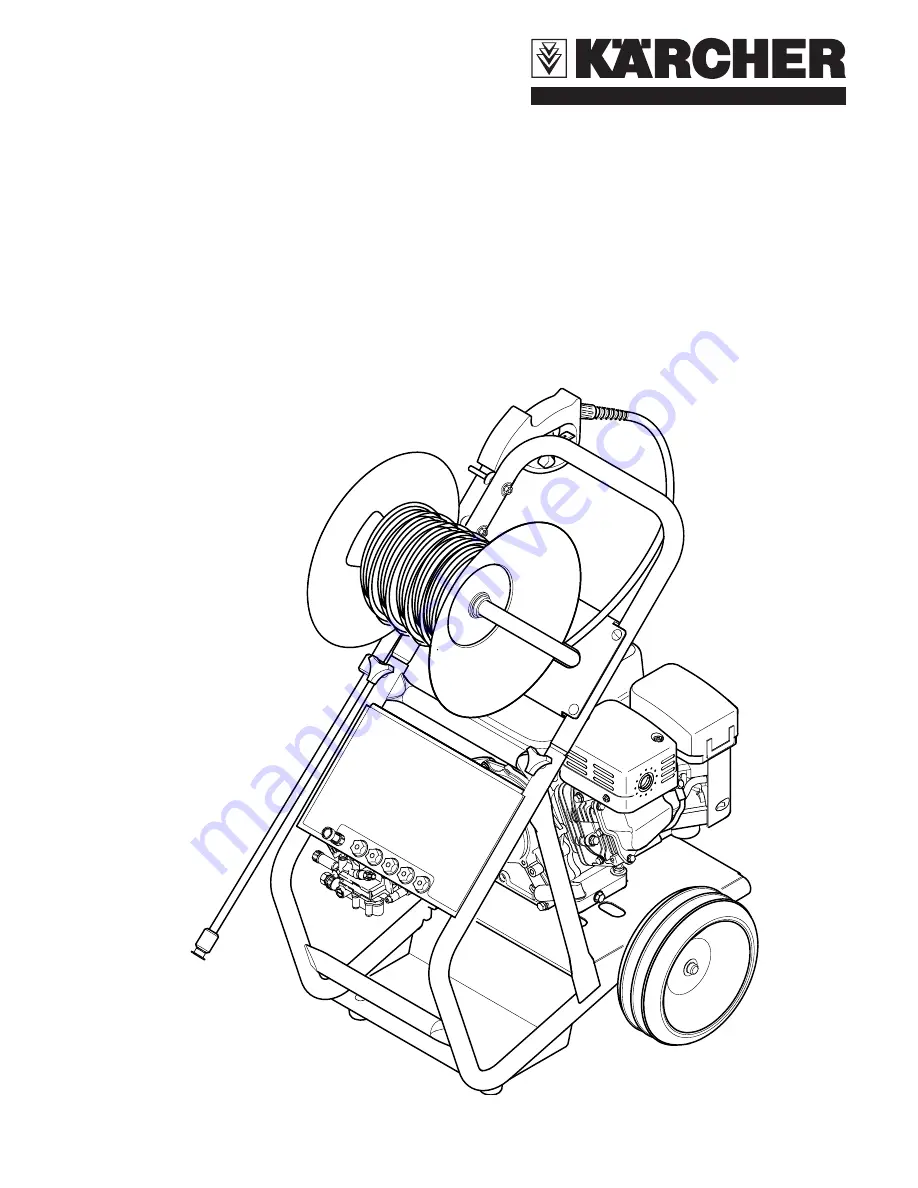
Page 3: ...n safety lock 4 High pressure hose 5 Gas tank 6 Spray wand 7 Dipstick 8 Water inlet with garden hose connector 9 High pressure outlet 10 Detergent filter 11 Detergent suction tube 12 Spark plug 13 Hose Reel 14 Quick connect nozzles 15 Oil fill cap pump 16 Drain plug washer for pump ...
Page 4: ...ssure quickly Be thoroughly fa miliar with the controls Stay alert watch what you are doing Do not operate the product when fatigued or under the influence of alcohol or drugs Do not stand on unstable surfaces Stand with both feet balanced at all times Avoid tipping the machine on its side The Gun Safety Lock PREVENTS the trigger from accidentally being engaged This safety feature DOES NOT lock tr...
Page 5: ... loaded collar of the wand back to insert your choice of quick connect nozzle Step 7 Attach the high pressure hose to the spray gun Step 8 Prior to initial startup cut off tip of oil reservior cap DANGER High pressure in nozzle area Risk of injury caused by improper locked nozzle Make sure you hear a click when inserting the nozzle tip into the wand Pull the nozzle to make sure it is seated proper...
Page 6: ... position Starting a Warm Engine If the engine has run out of fuel set choke lever to the CLOSED position after refueling If the engine has not run out of fuel leave the choke lever in the OPEN position Step 8 Engine with manual throttle Slide the throttle lever away from the SLOW position about 1 3 of the way toward the FAST position MAINTENANCE INTERVALS FOR PUMP We recommend that the oil be cha...
Page 7: ...page 5 step 5 step 6 The color coded quick connect nozzles provide a wide array of spray widths from 0 to 65 and are easily accessible when placed in the convenient rubber nozzle hol der which is provided on the back of the machine Red nozzle 0 for particularly stubborn accumulation of grime Yellow nozzle 15 for dirt accumulation over a surface Green nozzle 25 for dirt accumulation over a large su...
Page 8: ...int thinners gasoline oils Tri sodium phosphate products Ammonia products Acid based products These chemicals will harm the unit and will damage the surface being cleaned For best results see Cleaning Tips on pages 10 11 for specific information on how to clean different surfaces Always Use Kärcher Detergents for Best Results Kärcher biodegradable detergents are specially formulated to protect the...
Page 9: ...tle Move the throttle lever to theSLOW position to shut down engine Allow the engine to idle for a few seconds then move the throttle lever to the STOP position Engine with fixed throttle Move the engine stop switch to the OFF position For more details see engine manual Step 2 Press trigger to release water pressure Step 3 Engage gun safety lock WINTERIZING AND LONG TERM STORAGE 1 Disconnect all w...
Page 10: ... keeping the spray nozzle approximately 6 inches from the cleaning surface Caution Do not use Dirtblaster Spray Nozzle on siding as it may cause damage Cement Patios Brick and Stone with or without detergent Pre rinse cleaning surface with fresh water If using Kärcher All Purpose and Vehicle Wash Canada Pressure Wash or Degreaser place detergent suction tube directly into cleaning solution and app...
Page 11: ...ture with or without detergent Pre rinse furniture and surrounding area with fresh water If using Kärcher All Pur pose and Vehicle Wash Canada Pressure Wash place detergent suction tube directly into cleaning solution and apply to surface at low pressure Allow Kärcher detergent to remain on surface 1 3 minutes Do not allow detergent to dry on surface Rinse at high pressure in a sweeping motion kee...
Page 12: ...aries high and low Not enough inlet water supply Turn water on full force Check garden hose for kinks leaks or blockage Pump is sucking air Check that hoses and fittings are air tight Turn off machine and purge pump by squeezing trigger gun until a steady flow of water emerges through the nozzle Water inlet filter is clogged Remove filter and rinse out in warm water Spray nozzle is obstructed Blow...
Page 13: ... off machine and purgepump by squeezing trigger gun until a steady flow of water emerges through the nozzle Water leaks from pump Loose fittings Check that all fittings are tight Water seals are damaged or worn Call customer service Thermal protection device is activated Thermal protection device will auto reset Do not run pump for more than 5 minutes without spraying Oil Drip Oil seals are damage...