

22
English
Care and maintenance
DANGER
Risk of injury due to cuts from sharp blades and ac-
cidentally switching on the device!
Remove the security key from the device before all work
on the device!
Make sure that the ON/OFF button is not pressed.
Avoid unintentionally switching on the device.
Wear safety goggles and protective gloves when work-
ing on the device.
Always mount the blade guard before working on the
device and before transporting it.
Cleaning the device
ATTENTION
Risk of damage due to incorrect cleaning!
Only clean the device with a hand-held brush and damp
cloth.
Do not use solvent-based cleaning agents.
Do not immerse the device in water or other liquids.
Do not clean the device with a hose or high-pressure
water jet.
1. Release the ON/OFF button.
The device switches off.
2. Remove the security key from the device.
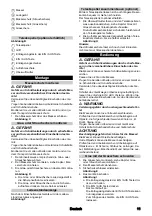
3. Remove cuttings with a hand-held brush.
Illustration T
4. Remove resin from the blades, e.g. with the Kärcher
Universal Stain Remover RM 769.
5. Oil the blades of the grass or shrub shears, see
chapter
.
6. Mount the blade guard, see chapter
7. Clean the device with a damp cloth if required.
Note
Clean the optionally available telescoping handle in the
same way.
Oiling the blades
Note
To maintain blade quality and optimum cutting results,
apply a little spray oil or thin machine oil to the blades of
the grass and shrub shears after each use.
1. Release the ON/OFF button.
The device switches off.
2. Remove the security key from the device.
3. Clean the device, see chapter
4. Place the device on a horizontal, level and oil-resist-
ant surface.
Illustration U
5. Apply a thin layer of oil to the blades of the grass and
shrub shears.
6. Switch on the device and let it run briefly.
7. Mount the blade guard, see chapter
8. Clean the base and dispose of oil residues in an en-
vironmentally friendly manner and in accordance
with local regulations.
Troubleshooting guide
Malfunctions often have simple causes that you can
remedy yourself using the following overview. When in
doubt, or in the case of malfunctions not mentioned
here, please contact your authorised Customer Service.
As the battery pack ages, even if it is looked after, its ca-
pacity reduces such that the full run time will no longer
be reached when fully charged. This does not indicate a
defect.
Error codes and error descriptions
Fault
Cause
Rectification
The device is not work-
ing.
The security key is not sitting properly in
the device.
1. Push the security key into the intake on the
device until it you feel it latch into place.
The charging state of the battery is too
low.
1. Charge the battery, see Chapter
.
The battery has overheated.
1. Allow the battery to cool down.
Note
The battery can get very warm.
2. Do not the place the device in direct sun-
light.
The battery or charger is defective.
1. Replace the battery or charger, see chap-
ter
The device stops during
operation
The device is overheated
1. Stop working and allow the device to cool
down.
Charge indicator
Error description
Error correction
An LED flashes slowly
and the motor is off.
The battery is fully discharged.
1 Charge the battery, see Chapter
.
All LEDs flash twice
every 2 seconds and
the motor is off.
The blades are blocked or contami-
nated.
1 Release the ON/OFF button.
2 Check whether there are any hard foreign bodies be-
tween the blades and remove them if necessary.
3 Clean and oil the blades, see chapter
.
The temperature protection function
of the motor is activated.
1 Allow the device to cool down.
Only use and store the device within the intended
temperature range.
Summary of Contents for GSH 2 Plus
Page 2: ...A ...
Page 3: ...B C D E F G H I ...
Page 4: ...J K L M N O P Q ...
Page 5: ...R S T U ...
Page 282: ......
Page 283: ......


