9
a.
Use the MODE button to make sure you are in VIDEO
mode (Video camera icon will be displayed in the top left
corner of the screen).
b.
Ensure you are not currently recording. If the red circle
record indicator is flashing at the top left of the KPT-500’s
screen, push the OK button to stop recording.
c.
Push the MENU button taking you to the VIDEO menu.
d.
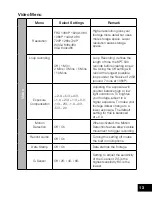
Use the DOWN button to highlight the setting named
Loop Recording and push OK.
e.
Use the UP and DOWN buttons to highlight the required
video length (The OFF setting will record the longest
possible loops keeping the file size under 2GB, which is
around 7 minutes at 1080P resolution).
f.
To confirm selection push the OK button, the KPT-500
will take you back to the VIDEO menu.
10. Set G-Sensor
The G-Sensor monitors any unnatural bumps or shakes and
logs the associated footage as Locked ensuring any footage
of potential crashes is not recorded over with the regular loop
footage.
To set the G-Sensor follow the directions below:
a.
Use the MODE button to make sure you are in VIDEO
mode (Video camera icon will be displayed in the top left
corner of the screen).
b.
Ensure you are not currently recording. If the red circle
record indicator is flashing at the top left of the KPT-500’s
screen, push the OK button to stop recording.
c.
Push the MENU button taking you to the VIDEO menu.
d.
Use the DOWN button to highlight the setting named
G-Sensor and push OK.


