background image

8


WARNING: 

Batteries can deteriorate, leak or explode, and 

can cause injury or fire. 

1. Do not shorten the battery terminals.

2. Do not charge Alkaline batteries.

3. Do not mix old and new batteries.

4. Do not dispose of batteries into household waste.

5. Do not dispose batteries in fire.

6. Defective or dead batteries must be disposed according to  

  local regulations.

7. Keep the batteries out of reach of children.


NOTE

If the laser level will not be used for a long period, 

remove the batteries from the battery compartment. 

This will prevent batteries from leaking and 

corrosion damage.

Summary of Contents for Prolaser GREEN Cross Line Laser 852G

Page 1: ...Prolaser Cross Line Laser Model No 852G User Manual...

Page 2: ...he most out of your laser tool APPLICATIONS The852GGREENProlaser CrossLineisinnovatively designed for a very broad range of professional and DIY jobs including Aligning tiles cabinets borders moldings...

Page 3: ...3 CONTENTS Features 4 Safety instructions 5 6 Battery installation Safety 7 8 Overview 9 Operating instructions 10 12 Maintenance 13 Field calibration test 14 19 Specifications 20 Warranty 21...

Page 4: ...and vertical line projection Self level in automatic mode when the laser is positioned within its self leveling range Visual out of leveling range warning Pulse mode emits pulses that can be detected...

Page 5: ...the laser level Do not look into a laser beam using magnifying optical devices such as binoculars or a telescope as this will increase the level of eye injury WARNING This product contains lead in so...

Page 6: ...injury Do not drop the laser Do not use solvents to clean the laser Do not use in temperatures below 10 C or above 45 C 14 F 113 F Do not operate the laser in explosive atmospheres such as flammable...

Page 7: ...y cover 3 Close the battery cover 4 Can be charged with any 5V charger and Type C USB cable BATTERY INSTALLATION SAFETY 1 Press down on the latch and open the battery cover 2 Insert 3 new AA batteries...

Page 8: ...ries 4 Do not dispose of batteries into household waste 5 Do not dispose batteries in fire 6 Defective or dead batteries must be disposed according to local regulations 7 Keep the batteries out of rea...

Page 9: ...9 OVERVIEW 1 On Off Locking Switch 2 Keypad a Pulse Mode button b Beam Selector button c Manual Mode button 3 Laser output window 4 Battery cover 5 tripod mount...

Page 10: ...surface or on a tripod 2 Slide the locking switch 1 to the ON position The laser level will generate the crossed horizontal and vertical lines 3 Choose the beams that you want to work with by pressin...

Page 11: ...he Manual push button mode M The laser will project the cross lines 2 Choose the beams that you want to work with by pushing the Beam Selector push button H V 3 To mark a slope tilt the laser using to...

Page 12: ...ser lines will flash at a very high frequency invisible to the human eye This will allow the detector to detect the laser lines The pulse mode can be activated in both Automatic and Manual modes 1 To...

Page 13: ...ser level with a clean soft cloth Do not use solvents Although the laser level is dust and dirt resistant to a certain degree do not store in dusty places as a long term exposure may damage internal m...

Page 14: ...orizontal line and finally check the leveling accuracy of the vertical line Checking the Height Accuracy of the Horizontal Line Up and down deviation 1 Set up the laser on a tripod or on a solid surfa...

Page 15: ...d mark on the wall the center of the cross lines as b1 see figure 2 6 Move the laser level towards wall B and position it approximately 0 5 meter from wall B 7 Mark on wall B the center of the cross l...

Page 16: ...3 mm otherwise to send the laser level to a qualified technician for repairs Checking the Level Accuracy of Horizontal Line Side to side inclination 1 Set up the laser on a tripod or on a solid surfa...

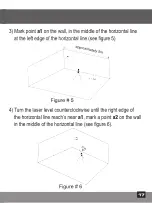
Page 17: ...at the left edge of the horizontal line see figure 5 4 Turn the laser level counterclockwise until the right edge of the horizontal line reach s near a1 mark a point a2 on the wall in the middle of t...

Page 18: ...the plumb line has settled Mark point a1 on the wall behind the plumb line near the plumb cone see figure 7 3 Set up the laser on a tripod or on a solid surface in front of the wall at a distance of a...

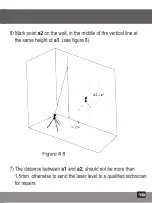
Page 19: ...e wall in the middle of the vertical line at the same height of a1 see figure 8 7 The distance between a1 and a2 should not be more than 1 5mm otherwise to send the laser level to a qualified technici...

Page 20: ...line width 2 mm 0 5mm 5m 0 10 0 02 at 20 Wavelength 515 5nm Laser Class II Power supply 3 AA batteries included 3 7V Li Ion battery pack optional Battery life up to 15 hours of continuous operation L...

Page 21: ...hase with the proof of purchase Model 852G Serialnumberstickerispositionedonthebatterycompartment lid CE CONFORMITY CERTIFICATE This product meets the standards of the Electromagnetic Compatibility EM...

Reviews: