Kaon KSC-570 User Manual Download Page 14

9

DIGITAL SATELLITE RECEIVER

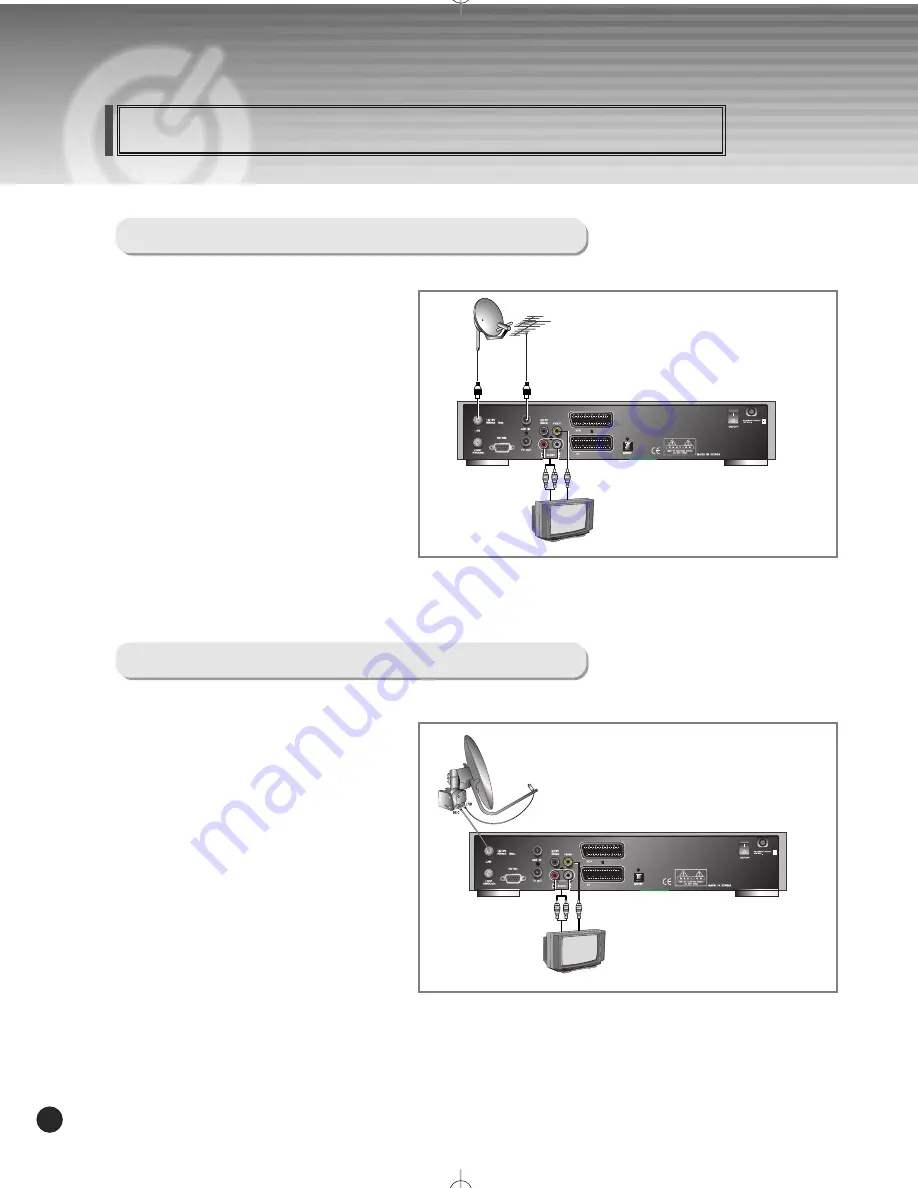
Connecting Your Equipment

1. Connect one end of RCA/Cinch cable to 

the RCA/Cinch jack on the back of the STB

and the other end to a RCA/Cinch jack on

your TV. 

If your TV doesn’t have a RCA/Cinch jack, 

connect one end of RF cable to the TV OUT

on the back of the STB and the other end to 

a RF input jack on your TV.

2. Connect one end of RF cable to the ANT IN 

on the back of the STB and the other end to a

terrestrial antenna connection or the jack for

the public antenna on the wall.

3. Finally connect the coaxial cable from the LNB to the LNB IN jack on back of the STB.

1. Connect one end of RCA/Cinch cable to the 

RCA/Cinch jack on the back of the STB and

the other end to a RCA/Cinch jack on your TV.

If your TV doesn’t have a RCA/Cinch jack,

connect one end of RF cable to the TV OUT

on the back of the STB and the other end to a

RF input jack on your TV.

2. Connect one end of your coaxial cable to 

the LNB IN connector on the STB and 

the other end to the REC or Receiver 

connector on the DiSEqC 1.2 motor.

3. Connect the coaxial cable from the LNB to the LNB connector on the DiSEqC 1.2 motor.

(To RCA/Cinch on your TV)

(To RCA/Cinch on your TV)

(If your TV doesn’t have RCA/ Cinch Jack)

(If your TV doesn’t RCA / Cinch Jack)

TV with Terrestrial Antenna

TV with Motorized System (DiSEqC 1.2)

k1.5 500 SAT(Eng)  1/5/06 5:52 PM  

˘

` 9   mac-4 HP LaserJet 5100 Series  T

Summary of Contents for KSC-570

Page 1: ...Digital Satellite Receiver KSC 570 User s Manual ...

Page 2: ...ing serious personal injury and damage to the receiver Do not block or cover the slot opening in the receiver These are provided for ventilation and protection from overheating Never place the receiver near or over a radiator or any heat source Do not place the receiver in an enclosure such as a cabinet without proper ventilation Do not stack the receiver on top of or below other electronic device...

Page 3: ...ult protection For added protection during a lightning storm or when the receiver is left unattached and unused for long periods of time unplug it from the wall outlet and disconnect the lines between the receiver and the antenna This will provide some protection against electrical damage caused by lightning or power line surges Do not attempt to service the receiver yourself as opening or removin...

Page 4: ...DIGITAL SATELLITE RECEIVER OWNER S MANUAL SIMPLE SPEEDY OPERATION HANDBOOK Before operation Please read the entire manual thoroughly and retain it for future reference ...

Page 5: ...Channel Search Channel List Edit Channel List Program Guide System Setting Common Interface Utility Option ...

Page 6: ...nnel Search Installation None DiSEqC Switch Channel Search Installation DiSEqC 1 2 Channel Search Installation USALS Channel List Edit Channel List Program Guide System Setting Menu Language Audio Language Subtitle Language SCART Output option Screen Type Banner Time RF Mode option RF Channel option Local Time 3 5 6 7 12 16 16 18 19 19 22 25 28 29 32 33 33 34 34 34 35 35 35 36 36 ...

Page 7: ...Factory Reset System Information Common Interface Utility option PVR Guide Option Function Recording Record Menu File List Fast Forward Rewind Quick Search Slow Motion Time Shift Instant Replaying Delayed Recording Format HDD Troubleshooting Technical Specifications Menu Map 36 37 37 38 38 38 39 39 39 40 41 43 43 43 44 45 45 46 46 47 48 48 49 50 52 ...

Page 8: ...3 DIGITAL SATELLITE RECEIVER Remote Control Unit ...

Page 9: ...4 DIGITAL SATELLITE RECEIVER Remote Control Unit ...

Page 10: ...ume Up Down or select item of sub menu 4 OK Select a program a highlighted line or parameter value 5 EXIT Exit from parameter and cancel selected function 6 MENU To see main menu 7 SEG DISP 4 digit 7 segment display channel information 8 CAM Slots Depending on model 2 Slots for Common Interface CAM VIACCESS IRDETO NAGRAVISION CRYPTOWORKS CONAX with SmartCard ...

Page 11: ...ort to the TV or other equipment 6 AUDIO Audio connection port to the TV or other equipment 7 0 12V To connect 12V to an external 0 12V switch 8 TV OUT To connect a TV via a coaxial cable 9 ANT IN To connect to television antenna input 10 RS 232 To connect to a personal computer for software upgrade 11 LNB To connect to a satellite antenna and cable jacks 12 LOOP THROUGH Used to connect a RF signa...

Page 12: ...ct your STB to a TV set with SCART if your TV set is equipped for it Alternatively you can use A V TV out UHF or S Video jacks 2 Connect STB to a VCR Connect the SCART jack from the VCR to the back of your STB Alternatively you can use A V TV out UHF or S Video jacks 3 Connect STB to a Hi Fi System Connect a RCA stereo cable from the AUDIO L R jacks S PDIF on your STB to the LINE AUX SPARE or EXTR...

Page 13: ...you have finished all of the connections If you want to enjoy watching scrambled broadcasting channels you need to purchase the CAMs and smart cards from a service provider s sales department However broadcasting channels from multiple service providers call for multiple CAMs and Smart cards STB which who have only the CAMs and smart cards provided by the one service provider can show several broa...

Page 14: ...the LNB to the LNB IN jack on back of the STB 1 Connect one end of RCA Cinch cable to the RCA Cinch jack on the back of the STB and the other end to a RCA Cinch jack on your TV If your TV doesn t have a RCA Cinch jack connect one end of RF cable to the TV OUT on the back of the STB and the other end to a RF input jack on your TV 2 Connect one end of your coaxial cable to the LNB IN connector on th...

Page 15: ...or LNB A input connector of the DiSEqC switch Do the same for any other LNBs that you have Connect one end of a coaxial cable to the RF output connector of the DiSEqC switch connect the other end to the LNB IN socket on the STB 2 DiSEqC 1 2 USALS Connection To the digital receiver you can connect either a single satellite antenna directly or LNB of multi feed equipment When installing the USALS pl...

Page 16: ...ng Diode on the STB and keys are explained as below Standby Mode Current Program Number on TV List System Booting Current Program Number on Radio Location Power Off TV Mode MICOM Version STB Mode Upgrade Boot Loader Version Upgrade Procedure Download Upgrade Complete Down Load Procedure Front Panel Display Message ...

Page 17: ...creen 3 When you press the COLOR button you can use banner as a simple channel operation In this case you can get a simple EPG on right view 2 Favorite Banner 1 During Channel Banner is appearing when you press SUB T RED Button you can get Favorite Banner and Lock Banner 2 If you already made your favorite channel in Channel Control menu you can get favorite channel on this view 3 The banner will ...

Page 18: ...aring when you press INFO BLUE Button you can get Channel Information Banner 2 Using Channel Information Banner you can get a detailed channel listing information 6 Volume Control Mute 1 To control audio volume press Volume Volume buttons 2 Volume control bar will be appeared in bottom of the TV screen 3 After time out in 1 second volume control bar will disappear To temporarily stop the volume pr...

Page 19: ...n reserve a desired program at a desired time by using the Timer function 1 Once Daily Weekly Reservation Use the UP DOWN LEFT RIGHT buttons in the Timer Setting screen to select the date and time Press the OK button to save the selected time on the Disk icon The program will record at each and every selected time Once once Daily daily Weekly weekly Off off 2 Reservation from EPG Option Selects th...

Page 20: ...buttons and then press OK button to get it 10 Soundtrack 1 When you want to change the Audio Language of current channel press the A LANG button on the remote control The on screen menu is displayed on the left side of the screen 2 Use UP DOWN buttons to choose the audio you want 3 To cancel or exit press the A LANG button again You can change a default audio language in the system setting menu mo...

Page 21: ...you the convenience of selecting various languages adjusting the time and channel search 1 Automatic Installation by Easy Installation The Installation Wizard is user friendly to assure easy set up of the receiver by the new user 2 System Connection Connect STB to all peripheral devices such as TV Audio Video etc 3 Power On Turn on the STB power and other devices 4 Power Off When you press the STA...

Page 22: ...ng the keys and press the OK button to change language The Language of Menu Audio or Subtitle will be changed to the selected lan guage Local Time You can set your local time according to your location To set the local time press NUMERIC buttons Channel Search You can search the channels according to the DiSEqC mode Press OK button Channel Search screen will appear OK OK Easy Installation ...

Page 23: ...ing information Channel Search DiSEqC Set Mode None Switch Motor USALS Channel List Shows Favorite 1 8 Lock all channels sort CAS sort Satellite sort Network sort Genre sort Edit Channel List Edits Favorite 1 8 Lock Skip Delete Move Genre Program Guide Shows Now Next Weekly Program guide System Setting Set Menu Language Audio Language Subtitle Language SCART Output Screen Type Banner Time RF Mode ...

Page 24: ...button The keypad will be displayed so that you can edit or add satellite name you want Input degree you want using NUMERIC buttons or LEFT RIGHT buttons And press OK button to save To delete satellite list on the list press YELLOW button to select delete mode in pop up menu And press OK button 2 TP list When the GREEN button is pressed it can be toggled Satellite list and TP list Press YELLOW but...

Page 25: ...LEFT RIGHT buttons to select the FEC of the transponder Press YELLOW button to edit add or delete the TP list Pop up menu will appear Input Mode Frequency Symbol Rate Polarity and FEC and Press OK button to save You can select the value of Auto 1 2 2 3 3 4 5 6 and 7 8 Network You can select Yes or No When you select Yes you can find more transponders using the home network Video PID Audio PID PCR ...

Page 26: ...r On or OFF 7 22KHz Depending on the user s antenna switch box or LNB You can supply either 22KHz by setting ON or not by setting OFF 8 0V 12V Depending on the user s antenna switch box You can choose either 0V 12V 9 Tone Burst Depending on the user s antenna switch box off SAT A or SAT B 10 DiSEqC You can select and use appropriate port for your DiSEqC switch box Press OK button to select DiSEqC ...

Page 27: ...on The keypad will be displayed so that you can edit or add satellite name you want Input degree you want using NUMERIC buttons or LEFT RIGHT buttons And press OK button to save To delete satellite list on the list press YELLOW button to select delete mode in pop up menu And press OK button 2 TP list When the Green button is pressed it can be toggled Satellite list and TP list Press YELLOW button ...

Page 28: ...an select the value of Auto 1 2 2 3 3 4 5 6 and 7 8 Network You can select Yes or No When you select Yes you can find more transponders using the home network Video PID Audio PID PCR PID You can set PID to search for services Use the LEFT RIGHT buttons or NUMERIC buttons to input the value Press OK button to start Scanning 3 Position After selecting a satellite please select position number To cha...

Page 29: ...un the motor Fine Drive Normal Drive To move the motor press LEFT RIGHT button Go to zero To move the zero position press OK button Store to location To store the current position press OK button East Limit To set the east limit by current position press OK button West Limit To set the west limit by current position press OK button Clear Limit To clear the stored limit value press OK button After ...

Page 30: ... The keypad will be displayed so that you can edit or add satellite name you want Input degree you want using NUMERIC buttons or LEFT RIGHT buttons And press OK button to save To delete satellite list on the list press YELLOW button to select delete mode in pop up menu And press OK button 2 TP list When the GREEN button is pressed it can be toggled Satellite list and TP list Press YELLOW button to...

Page 31: ...8 Network You can select Yes or No When you select Yes you can find more transponders using the home network Video PID Audio PID PCR PID You can set PID to search for services Use the LEFT RIGHT buttons or NUMERIC buttons to input the value Press OK button to start Scanning 3 Degree Press the NUMERIC buttons and enter te degree 4 LNB Freq Select the proper LNB frequency referring to your LNB using...

Page 32: ...r Fine Drive Normal Drive To move the motor press LEFT RIGHT button Go to zero To move the zero position press OK button East Limit To set the east limit by current position press OK button West Limit To set the west limit by current position press OK button Clear Limit To clear the stored limit value press OK button Note After the Degree Longitude and Latitude is enterted accurately the DiSEqC Mo...

Page 33: ...t use the SUB T RED button on the remote control unit repeatedly The channel list moves in the following sequence ALL Favorite from 1 to 8 Lock 4 Press the TV RADIO button to toggle between TV channel list and Radio channel list 5 To get the channel sort list press the GREEN button Pop up window will be displayed on the screen 6 Select the sort list you want with UP DOWN buttons and then press OK ...

Page 34: ...b menu you want in the list and press OK button The selected sub menu will be displayed at the right folder 4 Among the all channel list the selected channel can be moved to the right folder of Favorite 1 8 Lock Delete Skip Move Press OK button to add from edit list at right folder 5 To remove the channel list from edit list at right folder press OK button The edited list will be removed 6 To rena...

Page 35: ...LUE button 2 Lock 1 From here you can lock channels in any of the list in order to prevent e g your children from watching 2 Select the channel you want to lock and press OK button 3 Repeat the procedure for each channel you want to lock When you lock a channel in any list the channel will be locked automatically in all other lists 3 Delete 1 You can delete TV or Radio channel from the current lis...

Page 36: ...e to desired channel and press the OK button 3 And press the INFO BLUE button to change the position of the channel you want 4 Using UP DOWN buttons select the channel you want to move and press OK button 5 The position of the channel will be moved OK OK OK OK Edit Channel List 1 You can edit TV and Radio list of the genre which is various Movie News and Factual Entertainment Sport Children Øs Fac...

Page 37: ...G move the highlighted channel by pressing LEFT RIGHT UP DOWN buttons and then press OK button 3 EPG Information 1 To view the Program Guide press the EPG button on the remote control unit The EPG information will be displayed on the bottom of the screen 2 Each press of UP DOWN buttons will change the displayed EPG information by one hour 3 Each press of LEFT RIGHT buttons will change the displaye...

Page 38: ...tton 2 Select sub menu you want in System Setting with UP DOWN buttons The sub menu will be shown at the right side of the screen 3 Using button to move the cursor on sub menu or return to Setup List using button 1 Menu Language Here you may select in which language the menus will be shown 1 Use the UP DOWN buttons to move to the language you want and then press OK button You can choose the langua...

Page 39: ...Dutch Hungarian Albanian Option 3 Subtitle Language In this menu You can change default language for subtitle when changing services 1 Use the UP DOWN buttons to move to language you want and then press OK button You can choose the language from a selection of English Spanish Finnish Norwegian Swedish German French Turkish Italian Slovenian Ukrainian Russian Czech Latvian Arabic Farsi Danish Bulga...

Page 40: ...3 For easy selection of Screen Type press the P SIZE button on your remote control 6 Banner Time When you switch channels an information banner will be shown for a few seconds You can select for how long the banner will be shown 1 Select the banner time you want and then press OK button 2 Each selectable time items has meaning of the interval time during a channel banner stays on changed channel s...

Page 41: ...Calendar pop up window will be displayed Select year using SUB T RED and GREEN button Select month using YELLOW and INFO BLUE button Select date using UP DOWN or LEFT RIGHT buttons 2 Adjust hour and minute with UP DOWN buttons and move the field with LEFT RIGHT buttons 3 When the OK button is pressed the selected time applies 10 Menu Transparency From 20 to 63 will give the variable transparency o...

Page 42: ...de 3 To verify the new PIN code re enter a new PIN code in the highlighted confirm PIN code If the PIN code is correct the message Success will be displayed on the display window Note If you forget the PIN code press the RGYB Color button in sequence i e Red Green Yellow Blue button The PIN code will be changed to 0000 12 Parental Lock When you change Parental Lock to On or Off service channel can...

Page 43: ...sing S PDIF Output 1 If selecting OFF the digital audio will not be output 2 When selecting PCM the unzipped digital audio is output through S PDIF 3 When selecting Dolby Digital if the current channel is dolby audio channel the zipped dolby stream is output through S PDIF 14 M Lock If you select On you will have to enter the PIN code every time when you enter the Channel Search Menu and Channel L...

Page 44: ...et Use this option only if you have to start the complete installation procedure from scratch If you continue from here all your previous settings and all channels will be cleared The default data will be loaded If you press OK button it asks for your confirmation If you want to reset press OK button or press EXIT button to exit this menu 18 System Information Displays the system information MODEL...

Page 45: ...oth services Each smart card contains your subscription details You can view your entitlement via the COMMON INTERFACE menu by using the MENU button as below 1 Press MENU button and select Common Interface then Slot1 and Slot2 will be showed up on the screen and the menu will be appeared If you use Slot1 for Irdeto you will see Irdeto on the screen Also if you use Slot2 for Viaccess you will see V...

Page 46: ... BlackJack Sokoban and etc 2 Demonstration Select Demonstration in the Utility menu with UP DOWN buttons and press OK button you can see the Automatic Operation Function Press the EXIT button to quit the Automatic Operation Function completely OK OK 3 Calendar Select Calendar in the Utility menu with UP DOWN buttons and press OK button you can see the Calendar OK Menu Guide Utility option 41 DIGIT...

Page 47: ...the Utility menu with UP DOWN buttons and press OK button you can see the Calculator OK OK Select the size and position of video you want to expanded with RED GREEN LEFT RIGHT buttons and press OK button you can see the expanded video Press EXIT button in the video only you can see the white frame Press EXIT button to quite the expanded video completely RED Expand the size GREEN Reduce the size OK...

Page 48: ...nter of the screen Time for Recording This reserves the time in hours and minutes to end the Recording Power Off After Recording when the blank area is checked the power will turn off after recording 2 In order to save and exit after selecting all of the Recording configurations press the OK button in the bottom of the screen 3 In order to exit without saving the current Recording press the CANCEL...

Page 49: ... file select it from the FILE LIST and press the OK button The selected file will begin playing 5 To delete saved files on the FILE LIST press the SUB T RED button A POP UP WINDOW will appear on the screen Press the OK button to delete and the EXIT button to cancel 6 To LOCK UNLOCK a file from the FILE LIST press the GREEN button Note In order to PLAY or UNLOCK a LOCKED channel from the FILE LIST ...

Page 50: ... again The speed can be controlled through a selection of 5 different speeds 4 Press the STOP button at the desired place to PLAY at the recorded speed 5 Quick Search 1 The QUICK FORWARD and QUICK REPLAY buttons on the remote control will skip to 10 seconds before or ahead of the current place 2 Using LEFT RIGHT buttons designate the place you want 3 Pressing the OK button will play at the designa...

Page 51: ...eed There are 5 different Slow Motion speeds 3 Press the STOP button to PLAY at the recorded speed 7 Time Shift 1 When the PAUSE button is pressed during current broadcasting the screen will stop and the TIME SHIFT function will start The top right hand side of the screen will display the Delay Time at this point 2 Pressing the PAUSE button again will begin play from the place it was stopped Note ...

Page 52: ...LAY button is pressed it will skip to 10 seconds before the current time 2 Pressing the FAST FORWARD button you will be able to check the content under Time Shift quickly The top right hand side of the screen will display a symbol at this point and when the time counter goes from to the real screen will appear and the symbol will disappear Note The Time shift and Instant Replay will save up to app...

Page 53: ...ervation from EPG Option Selects the desired program to be recorded from the EPG screen Pressing the YELLOW button will open the Delayed Recording Window 10 Format HDD The HDD can be formatted and all saved files deleted from this menu 1 Select the Format HDD List from the System Settings Menu 2 Press the OK button 3 A POP UP WINDOW will appear at the center of the screen Press the OK button to FO...

Page 54: ...channel and video output and correct Check the signal level if this is low then try adjusting the alignment of your dish Check the volume level of the TV and STB Check the mute status of the TV and STB Check the connection of audio cord Point remote control directly towards the receiver Check and replace batteries Check that nothing blocks the front panel Check the whether the Common Interface mod...

Page 55: ...or Frequency Range MPEG TS A V Decoder Video Resolution Input Bit Rate Transport Stream Audio Decoding Audio Mode 1 2 2 3 3 4 5 6 7 8 F type female 75 Ohm 950MHz 2150MHz 2 45 Mbaud QPSK CH 21 69 for the modulation PAL B G I SECAM L NTSC M selectable 75 Ohms 169 2 Male Female UHF 470 860MHz 720 576 Max 90 Mbit s MPEG 2 ISO IEC 13818 1 MPEG Musicam Layer 1 2 Single Dual Channel ...

Page 56: ...ommon Interface Embedded CAS PVR SW Upload RCA Cinch Video Output CVBS SCART CVBS RGB RCA Cinch Volume Mute Control Resolution 20 bits DAC Max 2Vrms S PDIF of Dolby Digital Bitstream Out Transfer rate 115Kbps 9 PIN D Sub Type 1Mbyte 2Mbytes Option 8Mbytes 16Mbytes Option STi 5518 AC 90 to 260V 50 60Hz Max 42W Separate Internal Fuse SMPS 340 60 250 mm 2 5kg 0 C 50 C 20 C 60 C 2 Slots of DVB CI Opti...

Page 57: ... Main Menu System Setting Subtitle Language SCART Output Menu Language Audio Language Screen Type Banner Time RF Mode RF Channel Local Time Menu Transparency Change PIN Code Parental Lock Utility Option Common Interface Receiver Lock SPDIF Output Menu Lock Auto Power Factory Reset System Information ...

Page 58: ...101050 K1 5_ENGLISH ...

Reviews: