background image

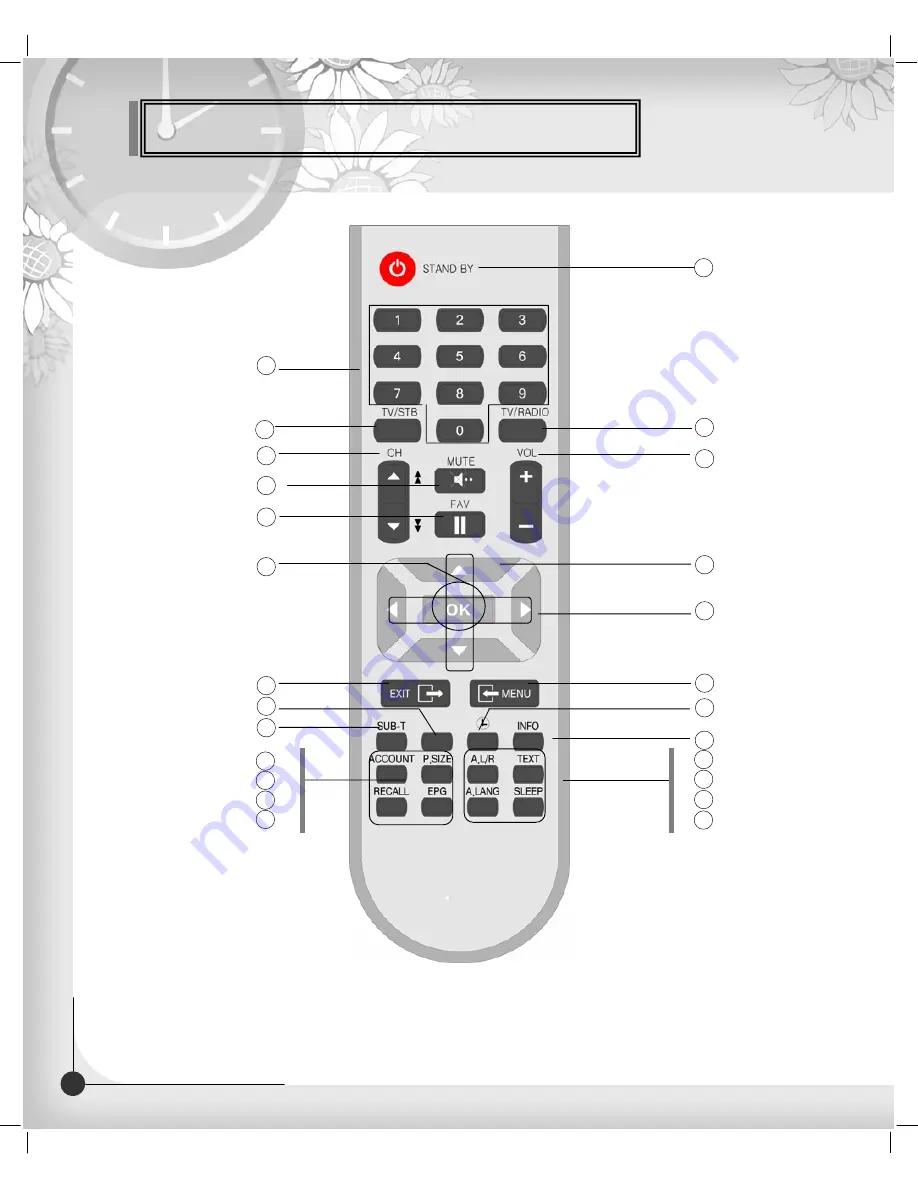
Remote Control Unit

3

DIGITAL CABLE RECEIVER

Note! 1: When inserting batteries, make sure that the polarity (+/-) is correct.
Note! 2: The design of the Remote Control Unit may be changed without any

notice in advance.

MUET

5

PAUSE

6

OK

7

EXIT

10

GREEN

13

SUBTITLE(RED)

12

CH UP/DOWN

3

NUMERIC BUTTON

2

STAND BY

1

VOL UP/DOWN

4

LEFT/RIGHT

9

UP/DOWN

8

INFO(BLUE)

15

YELLOW

14

MENU

11

P.STD

P.SIZE

RECALL

EPG

A L/R

TEXT

A.LANG

SLEEP

16

17
18

19

21

23

20

22

TV/STB   

24

25

TV/RADIO

Summary of Contents for KCF-220 MCO

Page 1: ......

Page 2: ...ous personal injury and damage to the receiver Do not block or cover the slot opening in the receiver These are provided for ventilation and protection from overheating Never place the receiver near or over a radiator or any heat source Do not place the receiver in an enclosure such as a cabinet without proper ventilation Do not stack the receiver on top of or below other electronic devices The ap...

Page 3: ...t them Pay particular attention to the cords that plugs in the convenience receptacles and the point where they exit from the unit Use an outlet that contains surge suppression or ground fault protection For added protection during a lightning storm or when the receiver is left unattached and unused for long periods of time unplug it from the wall outlet and disconnect the lines between the receiv...

Page 4: ...DIGITAL CABLE RECEIVER OWNER S MANUAL SIMPLE SPEEDY OPERATION HANDBOOK Before operation Please read the entire manual thoroughly and retain it for future reference ...

Page 5: ...nce will not occur in a particular installation If this equipment does cause harmful interference to radio or television reception which can be determined by turning the equipment off and on the user is encouraged to try to correct the interference by one or more of the following measures Reorient or relocate the receiving antenna Increase the separation between the equipment and receiver Connect ...

Page 6: ...Channel List Edit Channel List Program Guide System Setting CA System Option Utility Option Manual Search Automatic Search ...

Page 7: ...Basic Operation 12 Menu Guide 19 Main Menu 19 Channel Search 20 Channel List 22 Edit Channel List 23 Program Guide 26 System Setting 27 Menu Language 27 Audio Language 27 Subtitle Language 28 SCART Output 28 Screen Type 28 Banner Time 29 RF Mode 29 RF Channel 29 1 DIGITAL CABLE RECEIVER ...

Page 8: ...nge PIN Code 30 Parental Lock 31 Receiver Lock 31 S PDIF Output Option 31 Auto Power 32 Factory Reset 32 System Information 32 CA System option 33 Utility option 34 Troubleshooting 36 Technical Specifications 37 Menu Map 39 2 DIGITAL CABLE RECEIVER ...

Page 9: ...ign of the Remote Control Unit may be changed without any notice in advance MUET 5 PAUSE 6 OK 7 EXIT 10 GREEN 13 SUBTITLE RED 12 CH UP DOWN 3 NUMERIC BUTTON 2 STAND BY 1 VOL UP DOWN 4 LEFT RIGHT 9 UP DOWN 8 INFO BLUE 15 YELLOW 14 MENU 11 P STD P SIZE RECALL EPG A L R TEXT A LANG SLEEP 16 17 18 19 21 23 20 22 TV STB 24 25 TV RADIO ...

Page 10: ...n Menu on the screen or return to the previous menu 12 SUBTITLE RED To enable or disable subtitle or change the channel list mode 13 GREEN To see the current information Banner guide 14 YELLOW To sort channel list 15 INFO BLUE To display the information box on the screen 16 P STD To change picture standard Option 17 P SIZE To change screen size 18 RECALL To return to the previous channel 19 EPG To...

Page 11: ...CABLE RECEIVER 1 POWER STAND BY Switch the receiver power ON or OFF 2 CH Up Down Channel Up Down or select item of sub menu 3 SEG DISP 4 digit 7 segment display channel information 4 Smartcard Slot Option 1Slot for Smartcard ...

Page 12: ...4 RS 232 To connect to a personal computer for software upgrade 5 ANT To connect to a CATV line and CATV ANT jack 6 RF LOOP OUT To connect other cable receiver 7 TV OUT option To connect a TV via a coaxial cable 8 RF LOOP IN option To connect to a general aerial antenna and cable jacks to a RF input jack on the STB 9 S VHS Video connection port to a TV or other equipment via SUPER VIDEO ...

Page 13: ...ance in setting up your system that is best suited to your requirements 1 Connect STB to a TV set Connect your STB to a TV set with SCART option if your TV set is equipped for it Alternatively you can use A V TV out UHF or VHF or S Video jacks 2 Connect STB to a Hi Fi System Connect a RCA stereo cable from the AUDIO L R jacks S PDIF on your STB to the LINE AUX SPARE or EXTRA input jacks on your Hi...

Page 14: ...ith it to enjoy higher quality sound Connect S PDIF coaxial cable to a digital amplifier 4 Loop Through If you have another analogue or digital STB and you wish to use the same CATV line then you can connect it via the loop through Connect one end of the coaxial cable to the Loop Through on the STB and connect the other end to the CATV ANT IN jack on your second STB ...

Page 15: ...inch jack connect one end of RF cable to the TV OUT on the back of the STB and the other end to a RF input jack on your TV 2 Connect one end of RF cable to the ANT IN on the back of the STB and the other end to a terrestrial antenna connection or the jack for the public antenna on the wall 3 Finally connect the coaxial cable from the CATV line to the ANT jack on back of the STB To RCA Cinch on you...

Page 16: ...RS232 port of the STB 4 After that connection make sure the STB is in STANDBY status Front panel displays 5 Then run the downloaded file by double click it on your PC 6 Then power on STB by pressing the power button of front panel or by pressing the power button of RCU 1 Upgrade via Personal Computer 7 Then upgrading starts the PC will shows the progress in the window and also will appear on the f...

Page 17: ...the 7 segment LED Light Emitting Diode on the STB and keys are explained as below Standby Mode System Booting Power Off MICOM Version Boot loader Version Download Down load procedure Current program number on TV list Current program number on RADIO list TV Mode STB Mode Upgrade Upgrade procedure Upgrade end ...

Page 18: ...el operation In this case you can get a simple EPG on right view 1 Program Information After the television channels have been programmed you will see the information box each time you change the channels 1 During Channel Banner is appearing when you press GREEN Button you can get Now Information Banner 2 Using Now Information Banner you can get a simple EPG of Now Information 2 Now Information Ba...

Page 19: ...ns 2 Volume control bar will be appeared in bottom of the TV screen 3 After time out in 1 second volume control bar will disappear To temporarily stop the volume press the MUTE button To cancel mute press the MUTE button again or press the LEFT RIGHT buttons 5 Volume Control Mute 1 Press the RED button popup window will be displayed on the screen 2 Select the off then subtitle function is off 3 Se...

Page 20: ...vation from EPG Option Select the desired program to be reserved from the EPG screen Pressing the YELLOW button will open the Timer Window 7 Timer 1 When you press OK button during receiving service stream you can get Channel List view 2 Using UP DOWN buttons in Channel List view you can choose another channel 3 After moving highlight on a channel then press OK button 4 Press RED button to change ...

Page 21: ... the audio you want 3 To cancel or exit press the A LANG button again You can change a default audio language in the system setting menu mode 9 Soundtrack 1 Press the A LR button on the remote control unit to change the output 2 Then on screen menu is displayed on the top right side of the screen 3 Press the A LR button repeatedly to change the sound mode Mono Left Right Stereo 10 To change the au...

Page 22: ...Basic Operation 16 DIGITAL CABLE RECEIVER Memo ...

Page 23: ...Installation gives you the convenience of selecting various languages adjusting the time and channel search The Installation Wizard is user friendly to assure easy set up of the receiver by the new user 1 Automatic Installation by Easy Installation Connect STB to all peripheral devices such as TV Audio Video etc 2 System Connection Turn on the STB power and other devices 3 Power On When you press ...

Page 24: ...pressing the keys and press the OK button to change language The Language of Menu Audio or Subtitle will be changed to the selected language Language You can set your local time according to your location To set the local time press NUMERIC buttons Local Time You can search the channels according to the Automatic or Manual mode Press OK button Channel Search screen will appear Channel Search ...

Page 25: ... completely Main Menu shows the following information Channel List Shows Favorite 1 8 all channels sort CAS sort Edit Channel List Edits Favorite 1 8 Lock Skip Delete Move Program Guide Shows Now Next Weekly Program guide System Setting Set Menu Language Audio Language Subtitle Language SCART Output Screen Type Banner Time RF mode RF Channel Local Time Menu Transparency Change PIN Code Parental Lo...

Page 26: ...able signal using NUMERIC buttons 4 Input a proper Symbol Rate of the cable signal using NUMERIC buttons 5 Select the Constellation AUTO 16 32 64 128 or 256 QAM using LEFT RIGHT buttons 6 press OK button 7 When searching is started the name of channels searched will be displayed on the screen 8 When searching is finished the Search finished message will be displayed on the center of the screen 9 P...

Page 27: ...using LEFT RIGHT buttons 5 Select the spectral Invert Auto Off or On 6 Select for the Network Search Off or On When you select On you can find more services using the home network 7 press OK button 8 When searching is started the name of channels searched will be displayed on the screen 9 When searching is finished the Search finished message will be displayed on the center of the screen 10 Press ...

Page 28: ...st use the SUBTITLE RED button on the remote control unit repeatedly The channel list moves in the following sequence ALL Favorite from 1 to 8 4 Press the TV RADIO button to toggle between TV channel list and Radio channel list 5 To get the channel sort list press the GREEN button Pop up window will be displayed on the screen 6 Select the sort list you want with UP DOWN buttons and then press OK t...

Page 29: ... list and press OK button The selected sub menu will be displayed at the right folder 4 Among the all channel list the selected channel can be moved to the right folder of Favorite 1 8 Lock Delete Skip Move Press OK button to add from edit list at right folder 5 To remove the channel list from edit list at right folder press OK button The edited list will be removed 6 To rename the channel press Y...

Page 30: ...tion 1 From here you can lock channels in any of the list in order to prevent e g your children from watching 2 Select the channel you want to lock and press OK button 3 Repeat the procedure for each channel you want to lock When you lock a channel in any list the channel will be locked automatically in all other lists 2 Lock 1 You can delete TV or Radio channel from the current list 2 Select the ...

Page 31: ...red channel and press the OK button 3 And press the INFO BLUE button to change the position of the channel you want 4 Using UP DOWN buttons select the channel you want to move and press OK button 5 The position of the channel will be moved 5 Move 1 You can edit TV and Radio list of the genre which is various Movie News and Factual Entertainment Sport Children s Factual Education Lifestyle Drama Mu...

Page 32: ...EFT RIGHT UP DOWN buttons and then press OK button Weekly Program Guide The program guide supplies information such as program listings and ending times for all available programs 1 Select Program Guide in the main menu with UP DOWN buttons and press OK button In the viewing program when you press the EPG button you can get this view Note The Program Guide information may not be supplied by servic...

Page 33: ... a selection of English Spanish Finnish Norwegian Swedish German French and etc 2 Audio Language You will be asked to enter your PIN code before you can enter this menu The PIN code preset to 0000 from the factory The code can be changed from the Change PIN Code menu Refer to page 30 If you want to customize the system to suit you better you can specify some settings from the submenus in the Syste...

Page 34: ...se select CVBS 4 SCART Output option If you have a TV set with the 4 3 picture format and the transmission is in 16 9 you can select 4 3 letterbox 4 3 full screen and 16 9 full screen 1 Select the aspect ratio of TV which is connected to STB and then press OK button Note 1 Fullscreen will fill up the screen but cut off some information on the left and right sides 2 Letterbox will give a complete p...

Page 35: ...selecting might be wrong Select an RF Mode and then press OK button RF Mode PAL BG PAL I PAL DK SECAM L NTSC M 7 RF Mode option When you switch channels an information banner will be shown for a few seconds You can select for how long the banner will be shown 1 Select the banner time you want and then press OK button 2 Each selectable time items has meaning of the interval time during a channel ba...

Page 36: ...on The transparency will be applied on the screen 10 Menu Transparency From here you can change the PIN code from the standard 0000 DO NOT FORGET IT Without it you are not able to access to any of the functions where the code is required You can change password for Parental Lock and Receiver Lock simultaneously 1 Input the current PIN code using numeric button on the remote control 2 In the highli...

Page 37: ... you can see all channels without PIN code 12 Parental Lock If you select On you will have to enter the PIN code every time when you enter the Installation Menu and the Channel Edit Menu 14 Menu Lock You can hear digital audio of the Dolby 5 1 channel using S PDIF Output 1 If selecting OFF the digital audio will not be output 2 When selecting PCM the unzipped digital audio is output through S PDIF...

Page 38: ...annels will be cleared The default data will be loaded If you press OK button it asks for your confirmation If you want to reset press OK button or press EXIT button to exit this menu 17 Factory Reset 1 If the Auto Power is set to On and power is off the Set turns on automatically and turns into the channel mode which you were watching before power breakdown 2 If the Auto Power is set to Off and p...

Page 39: ...a the CA System menu by using the MENU button as below 1 Press MENU button and select CA System then Smartcard Slot will be showed up on the screen and the menu will be appeared If you use Slot 1 for Conax you will see Conax on the screen Select the item and then you will see information for card Press EXIT button if you wish to exit from this menu 2 If you inserted the Smartcard and switch on the...

Page 40: ...uzzle Slider Mine Snake Pocker BlackJack Sokoban and etc 1 Game Select Calendar in the Utility menu with UP DOWN button and press OK button you can see the Calendar 3 Calendar Select Demonstration in the Utility menu with UP DOWN buttons and press OK button you can see the Automatic Operation Function Press the EXIT button to quite the Automatic Operation Function completely 2 Demonstration 34 DIG...

Page 41: ...RECEIVER Utility Option function Select Zoom in the Utility menu with UP DOWN button and press OK button 4 Zoom Select Calculator in the Utility menu with UP DOWN button and press OK button you can see the Calculator 5 Calculator ...

Page 42: ...e level of the TV and STB Check the mute status of the TV and STB Check the connection of audio cord Remote Control does not operate Point remote control directly towards the receiver Check and replace batteries Check that nothing blocks the front panel Service is not running or scrambled Check the whether the Common Interface module and Smartcard is correctly inserted Check that the Smartcard is ...

Page 43: ... 21 69 or VHF CH 3 4 for the modulation RF Modulator TV Standard PAL B G I D K NTSC M selectable RF Connector 75 Ohms 169 2 Male Female Frequency Range UHF 470 860MHz VHF 55 25 63 25MHz Video Resolution 720 576 MPEG TS A V Decoder Input Bit Rate Max 90 Mbit s Transport Stream MPEG 2 ISO IEC 13818 1 Audio Decoding MPEG Musical Layer 1 2 Audio Mode Single Dual Channel 37 DIGITAL CABLE RECEIVER ...

Page 44: ...Mbytes Optional System Resources SDRAM 8Mbytes 16Mbytes Optional Main CPU MPEG Chip STi 5518 Input Voltage AC 90 to 260V 50 60Hz Power Supply Power Consumption Max 25W Protection Separate Internal Fuse Type SMPS Size W H D 180 45 250 mm Physical Specification Net Weight Operating Temperature 1 2kg 0 C 50 C Storage Temperature 20 C 60 C Option Function Embedded CAS TF CAS ChinaCrypt NDS IRDETO Nagr...

Page 45: ...ge Audio Language Subtitle Language SCART Output Screen Type Banner Time RF Channel RF Mode Local Time Menu Transparency Change PIN Code Parental Lock Auto Power Factory Reset System Information Manual Search Automatic Search CA System Channel List SPDIF Output 39 DIGITAL CABLE RECEIVER ...

Page 46: ...102675 ...

Reviews: