SAFETY NOTES
a. The trolley is only to be used for the transportation of up to 12 11930 Orchestra Music Stands.
a.
Other loads are not permissible; in particular the transport of individuals is prohibited.
b. The best way to protect the trolley, the music stands and the surroundings is to maneuver
b.
the 11935 Trolley carefully.
c. The trolley must always be guided. Pushing the trolley is not permitted and is a source of risk.
d. The surface must be suitable for casters. The surface must be even and weight-bearing.
e. In the case of obstacles (moldings, carpets, rugs, landings among others) be sure to maneuver
e.
the trolley very carefully.
f. Inspect the trolley, in particular the casters to ensure that they are clean and in functioning order.
d. Casters are always to be operated using one's foot - using one's hand bears the risk of pinching or wedging one's hand.
h. When the trolley is not in use the two movable casters brakes should be set.
i. Place and secure the music stands on the trolley according to the instructions.
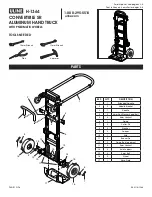
COMPONENTS
- Carefully remove the parts from the package and
-
place them on the floor.
- Perform a visual inspection to ensure that all of the
-
parts are there and in working condition.
1
Transport trolley with 2 locking casters and 2 fixed casters.
2
Handle tube
Accessory bag:
3
Rubber cable with 2 hooks, ø8 x 400 mm
4
4x hexagon socket screws M6 x 16 mm
5
Allen wrench/hexagon key SW4
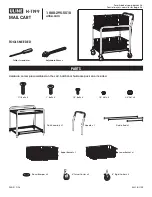
ASSEMBLY
6
Place the handle tube into
2
the drill hole located on
6
the frame of the transport trolley
1
7
Place the hexagon socket screws (4) into the side of
7
the frame and screw both ends of the handle tube to
7
the transport trolley (4x). To accomplish this use the
7
Allen wrench / hexagon key
5
.
LOADING the TROLLEY
Load the trolley with the 11930 Orchestra Music Stands
designed for the trolley.
8
Flip the music desk of the music stand down and
8
retract the extension tube as far as it will go. Reasons:
8
- This ensures the minimum distance between the
8
-
Orchestra Music Stands (70 mm) and results in the
8
-
maximum use of the transport capacity of up to 12
8
-
Orchestra Music Stands.
8
- A lower center of gravity of the load improves the
8
-
maneuverability of the trolley.
1
9
Place the tripod of the Orchestra Music Stand on the
19
trolley
10
Lift the individual leg in the direction of the handle
10
tube
2
a bit...
11
...and turn the tripod until the lifted leg can be placed
11
in the middle rail. The other two legs automatically
11
are placed under the side guide rails.
12
Now move the stand in the direction of the handle
12
tube as far as it will go.
13
Check: a small portion of the leg sticks out from the
13
frame.
14
Continue with the other Orchestra Music Stands in
14
the same manner as described in Points
8
-
12
.
15
ALTERNATIVELY the tripod can also be placed at
15
the front in the guide rails and then we pushed in the
15
direction of the handle tube.
Thank you for choosing this product. The instructions provide directions and the important setup
and handling steps. We recommend you keep these instructions for future reference.
SETUP INSTRUCTIONS
COMPONENTS
ASSEMBLY
LOADING the TROLLEY
11935 Trolley for orchestra music
stands »Overture«
- Perfect for up to 12 Music Stands 11930
- Sturdy, robust, compact and quick
- Simple installation and handling
- With high quality, large casters
- A rubber cable secures the music stands
- Width 510 x Depth 1180 x Height 170(930) mm, 18 kg