Using Your Kambrook Hair
Clipper
1. Place a towel around the neck of the
person to prevent hair from falling down
inside the collar.
2. Position the person in a chair so that
his/her head is at your eye level.
3. Comb the hair to remove all the
tangles, hold the clipper in a relaxed,
comfortable grip to help you maintain
accurate cutting control.
4. Before using the clipper ensure that the
blades are free of any hair clippings and
the blades are well oiled. (See Maintaining
Your Kambrook Clipper on page 6)
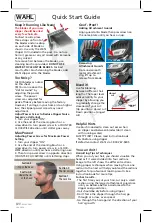
Medium to Long Cut
(with attachment combs)
A-1
A-2
A-3
A-4
1. Start by combing the hair in its natural
direction.
2. Place the largest attachment comb
onto the hair clipper and start by
trimming the sides from the bottom
upwards. Hold the hair clipper lightly
against the hair with the teeth of the
attachment comb pointing up but flat
against the head. Slowly lift the hair
clipper up and outward through the hair,
cutting only a small amount at a time.
(Diagram A-1)
3. Repeat around sides and back of head.
(Diagram A–2 & A–3)
4. If you desire shorter hair, either change
to a lower number attachment comb or
apply more pressure and less lift away
from head with the present attachment
comb.
5. For the top of the head, you will give a
fairly short cut if you use the #4
attachment comb.With the teeth flat
against the head, slowly start trimming
from the front to the back. (Diagram A-4)
Note:The entire procedure requires practice, and it
is always better to leave the hair longer in the first
few haircuts.
Outlining
B-1
B-2
1. Outlining requires no attachment comb.
Take the hair clipper and push the
lever up to the close – cut position
(see “adjustable lever”).
2. Comb hair into the style. Position hair
clipper between the side burns and the
ear. (Diagram B-1)
3. Make sure the corner edge of the blade
is up against the hairline.With the outline
of the hair as your guide, slowly move the
hair clipper over, around and behind the
ears. (Diagram B-2)
4. For the back of the neck and side
burns, hold the clipper up side down, and
holding it against the skin at the length
desired, move downwards.
5