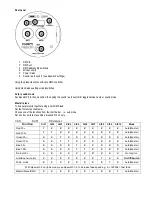
Rear panel
1.
DMX in
2.
DMX out
3.
DMX address dip switches
4.
Mic sensitivity
5.
Power mains
6.
Sound / auto switch (see dipswitch settings)
Using the preset functions without a DMX controller
Using stand alone settings via dipswitches
Auto / sound mode
Set dipswitch 8 to the on position, then using the sound / auto switch (6) toggle between auto or sound mode
Master / slave
To link several units together using a 3pin DMX lead
Set the first unit as the master
Choose one of the functions from the chart below. i.e. auto mode
Set all other units to slave mode, dipswitch 10 on only.
1=ON
0=OFF
X=No function
Function
DIP1
DIP2
DIP3
DIP4
DIP5
DIP6
DIP7
DIP8
DIP9
DIP10
Mode
Red 50
﹪
1
0
0
0
0
0
0
0
0
0
Auto(Master)
Red 100
﹪
1
1
0
0
0
0
0
0
0
0
Auto(Master)
Green 50
﹪
0
0
1
0
0
0
0
0
0
0
Auto(Master)
Green 100
﹪
0
0
1
1
0
0
0
0
0
0
Auto(Master)
Blue 50
﹪
0
0
0
0
1
0
0
0
0
0
Auto(Master)
Blue 100
﹪
0
0
0
0
1
1
0
0
0
0
Auto(Master)
No function
0
0
0
0
0
0
X
0
0
0
No function
Auto/Sound control
0
0
0
0
0
0
0
1
0
0
On/Off/Switch
Fade mode
0
0
0
0
0
0
0
0
1
0
Auto(Master)
With dipswitch 9 on (fade mode) use dipswitch 1-6 to increase fade speed e.g. 9 + 123456 = fast fade
Master/Slave/DMX
0
0
0
0
0
0
0
0
0
1
Auto(Master)
1
2
3
5
4
6


