
Kam laser 60 controller
Using your mini controller with your Kam laser 60
Make sure the dipswitches on the rear on the laser are set as follows
Dip switch 1 and 10 in the on position
Mode:
There are 4 mode functions, 0 = sound to light mode 1 = automatic mode 2 = mini controller mode with sound activation 3
= mini controller mode with manual movement
Light:
This button operates the black out function, pressing this button will turn the laser light output off, pressing once again will
turn the black out mode off and the laser light will be on
Page:
There are 5 steps on this button 0-4 each page runs in conjunction with the pattern select buttons; each page activates a
different selection of patterns
PAUSE:
This function has just one step and when pressed once this will pause the movement of the image, when the button is
pressed again this will unfreeze the image
V MOVE:
This button has one step 0-1 in the 0 position the image will be standard, in the 1 position the image will scan up and
down. NOTE. In mode 2 the scanning function will be sound activated, in mode 3 the scanning function will be automatic
H MOVE:
This button has one step 0-1 in the 0 position the image will be standard, in the 1 position the image will scan left to right.
NOTE. In mode 2 the scanning function will be sound activated, in mode 3 the scanning function will be automatic
H CONVERSION:
This button has one step 0-1 in the 0 position the image will be standard, in the 1 position the image will rotate.
NOTE. In mode 2 the scanning function will be sound activated, in mode 3 the scanning function will be automatic
RESET:
This button resets the unit back to its original star up position and defaults to mode 0 sound to light mode
SPEED UP:
This button has 12 steps 0 - A + 11 in the 0 position the image is in the standard static position, pressing this button will adjust
the speed of the image depending on what program is selected ie. Setting an image to rotate, this will increase the rota-
tion speed of the image 11 being the fastest speed
SPEED DOWN:
This button has 11 steps, and will reduce the speed of the image set by the controller, this button only operates as a speed
reduction button if the unit has already had the speed increased using the speed up button. if the speed is set in the 0
position this button will not function
To obtain individual patterns using the mini controller,
Press the mode button until 3 is displayed in the led display
At this point 3 horizontal lines in will display
1.
Switch on the laser
2.
press the mode button to display 3 in the led screen
3.
press the pattern select buttons 0 - 7 to select desired pattern
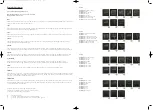
Page 0
Pattern 0
3x horizontal lines
Pattern 1
tunnel
Pattern 2
2x witches hat
Pattern 3
2x square
Pattern 4
lge tunnel
Pattern 5
horizontal flat beam
Pattern 6
vertical flat beam
Pattern 7
2 x horizontal flat beam
Page 1
Pattern 0
2 x vertical flat beam
Pattern 1
cross
Pattern 2
small vertical flat beam
Pattern 3
small horizontal flat beam
Pattern 4
small vertical flat beam
Pattern 5
small horizontal flat beam
Pattern 6
diagonal flat beam
Pattern 7
diagonal flat beam
Page 2
Pattern 0
vertical rectangle
Pattern 1
lge square
Pattern 2
lge tunnel
Pattern 3
lge triangle
Pattern 4
lge M
Pattern 5
lge flat beam
Pattern 6
lge flat beam
Pattern 7
lge flat beam
Page 3
Pattern 0
lge flat beam
Pattern 1
lge flat beam
Pattern 2
triangle
Pattern 3
lge S
Pattern 4
square
Pattern 5
square
Pattern 6
square
Pattern 7
small square
Kam C-60 laser controller manual 1.qxp:Layout 1 24/4/08 18:17 Page 3