background image

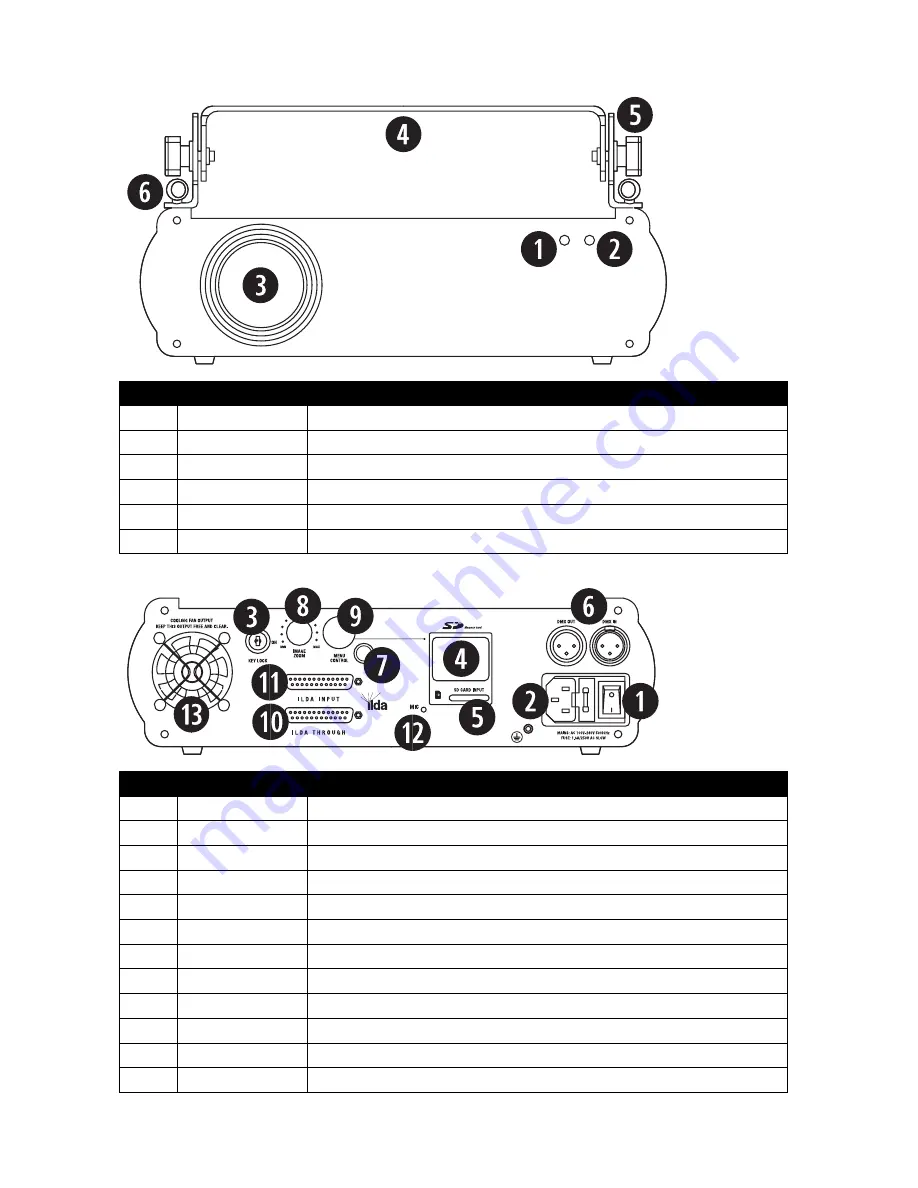
Front panel functions 


Number


Feature


Function


1


Power indicator LED


Illuminates red when the unit is turned on to show the unit is powered up.


2


Sound indicator LED


Flashes when an audio signal is received by the built-in microphone for reference.


3


Laser output aperture


The laser light is emmited from here. Never look directly into the hole when the unit is on.


Handle bracket 

Adjustable handle for carrying the unit and for mounting. 

Handle adjustment 

Adjusts the angle of the handle bracket. 

Safety chain eyelets 

Attach safety chains to these eyelets when mounting the unit. 

 
Rear panel functions 


Number


Feature


Function


1


Power switch


Turns the unit on or off when connected to the mains power supply.


2


Power supply input


Attach the mains cable here. Built-in fuse and spare fuse.


3


Key switch


Even when powered up, the unit will not operate without the key inserted and turned to on.


Information display 

Menu display to control and select the software from an inserted SD card. 

SD card input 

Slot for inserting an SD card. 

DMX input/output 

3 pin XLR connectors for DMX communication 

Remote connect 

Safety connector (optional) used to turn the unit of immediately. 

Image zoom knob 

Controls the projected laser image size from 5% to 100%. 

Menu control knob 

Rotate the control knob to adjust the menu. Press to select/confirm/exit/etc.  

10 

ILDA through 

Standard ILDA interface. Used to connect to other ILDA lasers. 

11 

ILDA input 

Standard ILDA interface. Automatically switches between the internal program and ILDA. 

12 

Microphone 

Receives audio signal for use in Sound-to-Light mode. 

Summary of Contents for Energy SD1

Page 1: ...visit www kam co uk Kam products are manufactured by Lamba plc Unit 1 Southfields Road Dunstable Bedfordshire United Kingdom LU6 3EJ Telephone 44 0 1582 690600 Fax 44 0 1582 690400 Email mail lambaplc com Web www lambaplc com If this product is ever no longer functional please take it to a recycling plant for environmentally friendly disposal Due to continuous product development specifications an...

Page 2: ...d to alert the user to the presence of important operating and maintenance instructions in the literature accompanying the appliance Please read and pay attention to all laser safety warning sticker labels on the unit LASER RADIATION AVOID EYE OR SKIN EXPOSURE TO DIRECT OR SCATTERED RADIATION CLASS 4 LASER PRODUCT CAUTION CLASS 4 LASER RADIATION WHEN OPEN AVOID EYE OR SKIN EXPOSURE TO DIRECT OR SC...

Page 3: ...alled out of reach of people and outside of areas where persons may walk by or be seated l Before rigging make sure that the installation area can hold minimum point load of 10 times the device s weight l The device should be well fixed a free swinging mounting is dangerous l Do not cover any ventilation opening as this may result in overheating Before first time use the unit should be inspected f...

Page 4: ...ins power supply 2 Power supply input Attach the mains cable here Built in fuse and spare fuse 3 Key switch Even when powered up the unit will not operate without the key inserted and turned to on 4 Information display Menu display to control and select the software from an inserted SD card 5 SD card input Slot for inserting an SD card 6 DMX input output 3 pin XLR connectors for DMX communication ...

Page 5: ... that shows the current selected file or folder 7 Total number of files in current directory The Menu Control knob 9 IMPORTANT this is a rotary knob AS WELL as a button that can be pressed Rotate the knob to choose your selection in the the Information Display 4 Press it once to confirm your selection Press it for TWO seconds to jump to the main menu or to return to the previous level in the menu ...

Page 6: ...n the unit has been set to its recommended settings see above it is now ready to start operating To change the unit s mode settings hold down the Menu Control knob for three seconds and the secondary menu will appear The menu comprises of Mode Setting Sensitivity Back and Exit 1 Select the Mode from the menu options 2 Choose PRG ILD this will access the ILDA files as a list on the SD card 3 Next s...

Page 7: ...ed Exit Setting Sensitivity Back Exit Mode ILD show PRG ILD list Built in show DMX Sound active Exit PRG ILD list mode This mode plays a group of animations To operate in this mode select PRG ILD list from the Mode menu then scroll down and select Exit Rotate the Menu Control knob to view the available folders To select and play the contents of a folder simply press the Menu Control knob when the ...

Page 8: ... the show will now begin to play again The layout for the Built in show mode menu is illustrated below X mirror Sound range 0 87 Y mirror Colour setting Single colour RGY Multi colour Scan rate Exit Setting Sensitivity Back Exit Mode ILD show PRG ILD list Built in show DMX Sound active Exit DMX mode This mode allows you to operate the laser using DMX To operate in this mode select DMX from the Mod...

Page 9: ... flip Colour setting Single red green yellow RGB Compatible with the initial setting Scanning speed Set your scanning speed 0 20K Play speed The rate change of the pattern speed The larger the numerical value the slower the playback speed Effective only in the ILD play mode DMX instructions Several operating modes were pre programmed into the unit on DMX channel 1 Before controlling other DMX chan...

Page 10: ...ode selection 000 Laser black out 0001 049 Pattern out through the mode Channel values of 1 6 will see the pattern shrink 050 099 Pattern out of bounds foldback mode Channel values of 51 56 will see the pattern shrink 100 149 Pattern out through the mode Channel values of 101 106 will see the pattern shrink 150 199 Pattern out of bounds foldback mode Channel values of 151 156 will see the pattern ...

Page 11: ...00 063 Adjusts the angle of rotation manually 064 191 Bends stretches and morphs the image 192 223 Clockwise rotation 224 255 Anti clockwise rotation CH18 horizontal 000 063 Manually adjusts the horizontal movement 064 255 Bends stretches and morphs the image CH19 vertical 000 063 Manually adjusts the vertical movement 064 255 Bends stretches and morphs the image CH20 horizontal shrinking 000 063 ...

Page 12: ...191 Single colour rotation 192 255 Blending transition Product specification Mains input AC100 240V 50 60Hz Fuse 250V T1 6A Total power 1500mW Scanner angle 1 36 Scanner speed 20K Music control Audio sound activated Laser power 550mW 638nm red laser 150mW 532nm green laser 800mW 450nm blue laser Laser classification Class 4 Operating temperature 10 40 DMX connections 3 pins XLR male female DMX cha...

Reviews: