background image

Undercounter Refrigerators and Freezers

PAGE 23

7o - AdjUstInG tHE dRAWER PERIMEtER HEAtERs:

This parameter allows the customer to turn ON and OFF the anti-condensate door/drawer 
perimeter heaters. This parameter is set to the highest setting (100) at the factory so that 
the door/drawer heaters stay on continuously. If you choose to have the door/drawer 
heaters cycle on and off, lower this parameter to approximately 30.  If condensation forms 
around the door/drawers, increase the parameter until condensation stops. The exact 
setting will vary depending on ambient conditions. 
 

Follow the instructions to enter the customer access code on page 8.  

When the control displays             Thermostat Set High, press the down arrow 

key            until the control display reads  

       DewPoint Compensation Factor.  Press 

the set button         .  Press the arrow keys                   to adjust the factor to your desired 

setting.   When the display shows the factor you want press the set button          .   The 

display will then read                 DewPoint Compensation Factor.   You can use the up 

or down arrow keys                 to scroll to the next parameter or press the alarm cancel 

button to exit          .

7. MIcRoPRocEssoR contRol 

(cont.)

SET     

SET     

)

)

)

7P - AdjUstInG tHE RooM tEMPERAtURE oFFsEt:

The  room  temperature  offset  parameter  allows  a  service  technician  or  end  user  the 
ability to have the display show a temperature that is within three degrees of the actual 
temperature being read by the cabinet air sensor.  This allows for continuity of reading 
between  different  temperature  reading  devices.  (i.e.:  thermistor  vs.  thermocouple  vs. 
handheld thermometer) This parameter is preset at the factory to “-2.50F”. 

Follow the instructions to enter the customer access code on page 8.  

When the control displays   

  Thermostat  Set  High,  press  the  down  arrow  key               

until  the control display reads 

         Room Temperature Offset. Press the set 

button           . Use the arrow keys    

      to adjust the offset to your desired setting.  

When the display shows the offset you want press the set button           .  The display will 

then read               Room Temperature Offset.  

You can use the up or down arrow keys                 to scroll to the next parameter, or press 

the alarm cancel button to exit          . 

SET     

SET     

)

)

)

Summary of Contents for KU044SC

Page 1: ...IES FULL SIZE UNDERCOUNTER REFRIGERATORS KU044SC KU072SC KU100SC SALES KAIRAK 1158 N Gilbert St Anaheim CA 92801 Phone 714 870 8661 Web www kairak com MNFG KAIRAK 4401 Blue Mound Road FT Worth TX 7610...

Page 2: ...ice Parameters g Adjusting Thermostat Set Point High h Adjusting Thermostat Set Point Low i Changing The Temperature Scale j Setting The 24 Hour Clock k Setting The Date l Setting Daylight Savings Tim...

Page 3: ...ial tag SERIAL MODEL VOLTS Hz PH TOTAL CURRENT AMPS MINIMUM CIRCUIT AMPS MAXIMUM OVERCURRENT PROTECTION AMPS LIGHTS WATTS HEATERS AMPS REFRIGERANT TYPE OZ DESIGN PRESSURE HIGH LOW REFRIGERANT TYPE OZ...

Page 4: ...extreme heat or cold Allow enough clearance between the unit and the side wall in order to make use of the door stay open feature at 1200 self closing feature operates up to 900 The door s must be ab...

Page 5: ...contained models are shipped standard with a NEMA 5 15P plug and 9 foot cord Select only a dedicated electrical outlet for power source NOTE Do not under any circumstances cut or remove the round grou...

Page 6: ...s and the condenser fan circuit will be de energized thru the normally closed contacts and the compressor will restart When the evaporator coil sensor reaches 400 F the coil is fully defrosted or if t...

Page 7: ...140 degrees F the compressor will restart and when the temperature drops below 120 degrees F the alarm will reset WARNING DISCONNECT ELECTRICAL POWER SUPPLY BEFORE CLEANING ANY PARTS OF THE UNIT To cl...

Page 8: ...slip into place 5C CLEANING THE CABINET SURFACES WARNING DISCONNECT ELECTRICAL POWER SUPPLY BEFORE CLEANING ANY PARTS OF THE UNIT Exterior stainless steel should be cleaned with warm water mild soap...

Page 9: ...When the bolts from the lower hinge plate are removed remove the lower hinge plate and then the door from the top hinge bracket plate and then the door from the top hinge bracket The hinge plate pin a...

Page 10: ...Housing The face of the control is water resistant to provide for protection during cleaning Parameter Service Levels See Customer Service Parameters on Page 9 Defrost Lockouts See Setting Defrost Lo...

Page 11: ...rm style 7 microprocessor control Cont High Cabinet Air Temperature The audible alarm will sound and the display will read HI CAb when the temperature inside the cabinet rises above a pre programmed l...

Page 12: ...y will read ELE LOS when the unit regains power after an outage To turn off the audible alarm and or clear the visual text press the alarm cancel button Condenser Clean The audible alarm will sound an...

Page 13: ...re If you enter the wrong security code the controller will revert back to displaying the cabinet temperature You can exit the parameters at any time by pressing the alarm cancel button or by waiting...

Page 14: ...n The display will show three zeros with the center zero flashing Press the down arrow key to sequence through F E d C b A 9 8 7 etc When you reach A press set The display will show zero A zero with t...

Page 15: ...o scroll through the options 7 microprocessor control Cont Defrost Lockout 3 Defrost Lockout 4 Dew Point Compensation Factor Room Temperature Offset Audible Alarm Style Cabinet Air Sensor Temp Evapora...

Page 16: ...he up or down arrow keys to scroll to the next parameter or press the alarm cancel button to exit SET SET 7h ADJUSTING THERMOSTAT SET POINT LOW This parameter sets the low point of the desired cabinet...

Page 17: ...h press the down arrow key until the control display reads Temperature Scale Press the set button The display will start with the current setting either for degrees Fahrenheit or for degrees Celsius U...

Page 18: ...the up or down arrow keys to scroll to the next parameter or press the alarm cancel button to exit 7j SETTING THE 24 HOUR CLOCK The internal time clock must be set in order for the data storage memor...

Page 19: ...correct day is displayed press the set button The display will then read Date You can use the up or down arrow keys to scroll to the next parameter Press the alarm cancel button to exit 7l SETTING DA...

Page 20: ...ss the down arrow key until the control display reads Start Manual Defrost Press the set button The display will show Press either arrow key The display will show Press the set button NOTE Kairak refr...

Page 21: ...nflicts with other internal programs The defrost lockouts can not be programmed to run back to back For example if dL1 is set to 080 then a defrost cycle would be locked out from 8 00 am to 10 00 am B...

Page 22: ...High press the down arrow key until the control display reads or Press the set button The display will show Off Press the arrow keys to set the start time When the correct time is displayed press the...

Page 23: ...ad DewPoint Compensation Factor You can use the up or down arrow keys to scroll to the next parameter or press the alarm cancel button to exit 7 microprocessor control Cont SET SET 7p ADJUSTING THE RO...

Page 24: ...on off the audible alarm feature on the Microprocessor control The audible alarm is preset from the factory to OFF The customer can choose between an audible alarm that sounds for 3 seconds then auto...

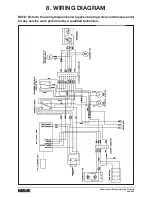
Page 25: ...dercounter Refrigerators and Freezers PAGE 25 8 Wiring Diagram Note Refer to the wiring diagram below applies to refrigerators and freezers units for any service work performed by a qualified technici...

Page 26: ...iod of time c Microprocessor Control setting is too high Readjust per instructions on p 9 and 10 d Clean Condenser 4 Food Compartment is too cold a Check if a large quantity of very cold or frozen foo...

Page 27: ...freight bill before freight charges are paid File claim for damages with freight agent immediately BLU fixtures manufactured by Kairak hold a 3 year parts and labor warranty Kairak holds a 5 year comp...

Page 28: ...Undercounter Refrigerators and Freezers PAGE 28 NOTES...

Page 29: ...Undercounter Refrigerators and Freezers PAGE 29 NOTES...

Page 30: ...ES KAIRAK 1158 N Gilbert St Anaheim CA 92801 Phone 714 870 8661 Web www kairak com MNFG KAIRAK 4401 Blue Mound Road FT Worth TX 76106 KAIRAK a division of ITW Food Equipment Group LLC All Rights Reser...

Reviews: