

Mounting
While holding the coupler in place measure back from the assembled couplers
pulling face 15/16” and mark the location. Make sure the trucks will clear the
back of gear box on your tightest radius curve. You may need to trim the trucks,
coupler gear box or move the mounting hole closer to the end of the car for truck
clearance. Now using the Kadee
®
#246 Tap & Drill set, drill a tap hole for a 2-56
screw with a #50 drill, and then tap the mounting hole on the scribed centerline.
Burnish the mounting surface & bottom of the gearbox with #231 Greas-em. Now
mount the assembled coupler on the centerline of car with the 2-56 x 3/8” screw
provided (if screw is to long use appropriate length flat machine screw) through
the Centering Bushing. (Note: the Bushing spring may dislodge easily until the
2-56 screw is secured.) Make sure the gearbox is in line with the centerline of
the car before snugging down the screw. The gearbox should move freely and
snap back to the centerline.
FINAL CHECKS
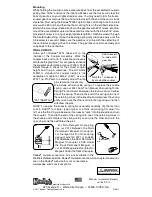
Add a puff of Kadee
®
#231 Greas-em on the
insides of the Coupler Assembly. Work the
coupler back and forth to lubricate and evenly
distribute the graphite. This will greatly enhance
the coupler’s performance. Use our #205 or #206
Height Gauge to check for the correct coupler
height and trip pin clearance. The HO-Scale
N.M.R.A. standard for coupler height is the
centerline of coupler at 25/64” (.390”). Use our
#237 Trip Pin Pliers to carefully adjust the trip
pin clearance if necessary.
We include extra knuckle springs. To replace the knuckle
spring, use our #241 Dual Tool (Manual Uncoupling Tool &
Spring Pic) and insert it between the last two coils on either
end of the spring. Then slip the end of the spring onto one of
the retaining cones in the knuckle and compress the spring
until you can slip the other end onto the opposing cone then
withdraw the pick.
NOTE: To secure the knuckle spring more durably carefully dip the last two
coils in DUCO
®
(or similar type of glue) or a thick slow drying CA glue (“do
not” use the thin CA glue because it can easily “wick” into the knuckle and ruin
the coupler). Then slip the end of the spring onto one of the retaining cones in
the knuckle and compress the spring until you can slip the other end onto the
opposing cone then withdraw the pick.
For Non-Delayed Uncoupling
use our #312 Between the Rails
Permanent Magnet Uncoupler.
For Delayed Action Uncoupling
use our code 100 #321 or code 83
#322 Between the Rails Permanent
Magnet Uncoupler, #308 Under
the Track Permanent Magnet, or
our #309 Magne-Electric (Electro-
Magnet) Under the Track Uncoupler.
Kadee
®
coupler conversion lists are available in the
Walthers Reference Book. Kadee
®
coupler conversion list & coupler conversions
are on the Kadee
®
web site for your convenience.
www.kadee.com/conv/convpl.htm
Add Greas-em
to inside draft
gear box
Work the Greas-em in
by moving the coupler
#
241 “Dual Tool”
Made & Assembled Entirely
in the U.S.A.
673 Avenue C • White City, Oregon • 97503 -1078 U.S.A.
© 2011 Kadee
®
Quality Products Co.
010611
Quality Products Co.
WARNING:
CHOKING HAZARD - Small Parts
Not for children under 14 years.