Kabuto AERO-R1 Instruction Manual Download Page 17

WARNING!

After you moved the adjustment locks, please make sure the strap is not loosen on 
the adjustment lock. It is dangerous to use the helmet with the part kept loosen, as 
the chinstrap cannot be fixed at the right length, resulting the in helmet to fall off from 
your head.

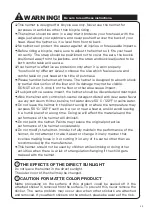
Adjusting the XF-7 Adjuster

XF-7 Adjuster is a mechanism at the rear of the helmet to keep the helmet from moving. 
Adjust the XF-7 Adjuster so it keeps the helmet on your head securely. 
First, loosen the XF-7 Adjuster dial, and then put on the helmet. Then, hold the front side of the 

helmet against your head and tighten the adjuster dial. (See below)

Hold the front side of the helmet 
and tighten the XF-7 Adjuster using 
the adjuster dial. 

Be careful with your hair, especially long hair, so it does not get 
tangled in the XF-7 Adjuster.

Turn the dial to the left

Loosen

Tighten

Turn the dial to the right

Put on the helmet, fasten the strap buckle and adjust the adjustment locks so they can be 
placed firmly on the side of your face. Check that the 

A

 part is placed correctly. If the strap 

around your ears is loose or tight, change the position of the adjustment lock.

How to adjust the adjustment locks

How to change the Adjustment lock position

How to adjust the XF-7 Adjuster 

Adjuster Dial

Adjustment lock

Adjustment lock

Down

Up

Loosen


 then pull 

 to move the 

adjustment lock 
position.

Hold the front part and turn the dial.

Correct

positions of the

straps

CAUTION!

16

Summary of Contents for AERO-R1

Page 1: ...AERO R1 AERO R1 INSTRUCTION MANUAL BE SURE TO READ THIS MANUAL BEFORE USING THE HELMET KEEP THE MANUAL IN A SAFE PLACE FOR FUTURE REFERENCE NOTES BEFORE USE 2017 04...

Page 2: ...MOFF MOFF MOFF 35 MOFF MOFF MOFF 1...

Page 3: ...1 2 XF 7 3 4 A I 5 6 XF 7 XF 7 2...

Page 4: ...2 2 3 XF 7 XF 7 3XF 7 1 O O 3...

Page 5: ...XF 7 3 XF 7 A XF 7 XF 7 4...

Page 6: ...XF 7 1 4 2 XF 7 XF 7 XF 7 XF 7 3 4 3 4 4 XF 7 4 XF 7 5 XF 7 XF 7 4 3 1 2 3 4 4 5 XF 7 5...

Page 7: ...4 180 XF 7 XF 7 Kabuto Kabuto XF 7 XF 7 AR 3 6...

Page 8: ...Kabuto A I A I 7...

Page 9: ...A I Anti Insect Net 5 A I A I XF 7 A I A I XF 7 A I 2 XF 7 XF 7 XF 7 A I 8...

Page 10: ...AERO R1 35 Kabuto 6 9...

Page 11: ...10...

Page 12: ...11...

Page 13: ...BE SURE TO READ THIS MANUAL BEFORE USING THE HELMET KEEP THE MANUAL IN A SAFE PLACE FOR FUTURE REFERENCE NOTES BEFORE USE AERO R1 INSTRUCTION MANUAL 12...

Page 14: ...or motorcycle riding or any other activities Please obey all traffic rules Features of materials MOFF instant deodorizing fiber The AERO R1 s strap uses a new deodorant fiber MOFF developed with nanot...

Page 15: ...r Adjustment Lock Strap buckle Liner Fastening the strap buckle 1 Adjusting the strap and adjustment locks 2 Adjusting the XF 7 Adjuster 3 Shield 4 Replacing the Normal inner pad set and A I Net Anti...

Page 16: ...e down the strap will be loose and the helmet will not fit your head firmly If the strap buckle is removed from the strap completely make sure to place it back in the correct direction Adjusting the l...

Page 17: ...below Hold the front side of the helmet and tighten the XF 7 Adjuster using the adjuster dial Be careful with your hair especially long hair so it does not get tangled in the XF 7 Adjuster Turn the di...

Page 18: ...ing part past third slit to the fourth hole gets a little tighter Then hold around the arm fixing base portion pull the XF 7 Adjuster slowly to detach the mounting part Attach Place the thumb between...

Page 19: ...Parts List on our website for more information about replacement Replacement Optional AR 3 shield Please refer to Parts List on our website for more information about replacement and optional AR 3 shi...

Page 20: ...er hook and loop fastener inside the helmet hook and loop fastener inside the helmet Front spacer Front Pad Or the front side of the A I net Figure shows when attaching the inner pads When attaching t...

Page 21: ...ough the A I Net Insert the XF 7 Adjuster in the attachment holes on the both sides See Fig 1 Attach the A I Net on the correct position Detach First detach the XF 7 Adjuster from the helmet by pullin...

Page 22: ...ings wear out over time Please check the model of your helmet before purchasing a lining set CORRECT Wear it from the front to the rear horizontally WRONG Please refer to Parts List on our website for...

Page 23: ...only when it is worn properly You should try di erent sizes to choose the size which feels secure and comfortable on your head at the time of purchase Please handle the helmet with care The helmet is...

Page 24: ...OGK KABUTO Co Ltd 6 3 4 NAGATANISHI HIGASHI OSAKA 577 0016 JAPAN TEL 06 6747 8031 Kabuto WEB...

Reviews: