34
Para determinar cuál es la combinación de la
cerradura desde la parte delantera de la
cerradura, no existe ningún procedimiento. Una
combinación perdida deberá anularse quitando la
cámara de combinación de la caja de la cerradura;
luego se podrá colocar una nueva combinación.
CERRADURA DESMONTAjE
1. Quite la placa posterior de la cerradura
sacando los seis tornillos que van en esa placa.
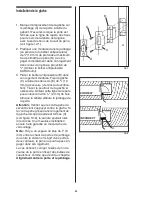
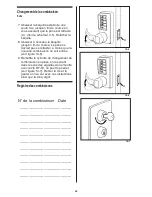
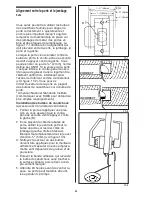
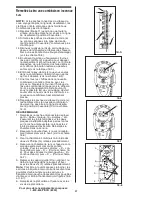
2. Saque los dos tornillos Phillips (F), que fijan el
soporte de guía (D) a la caja delantera. Tome el
soporte y deslícelo hacia atrás para que separe
del embrague (ilustrac. 18-1).
3. Levante el varillaje de la cámara (A) para
sacarlo del eje de control (B), palanqueando
con un destornillador de cabeza plana. Marque
el varillaje para asegurarse que vuelve a colo-
carlo en su lugar correspondiente (ilustrac. 18-
1).
4. Quite la cámara de combinación (E) sacando
los tornillos Phillips (G), situados en cada
extremo de la cámara (ilustrac.18-1).
5. Quite el cojinete del eje (C) del eje de control
(ilustrac. 18-1).
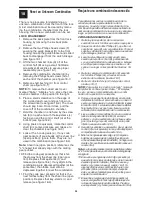
NOTA: Para quitar los 3 echó a un lado " marcado
del protector contra el polvo; Kaba, " El “simplex,”
los etc., ponen el compartimiento de la combi-
nación en la posición a la derecha.
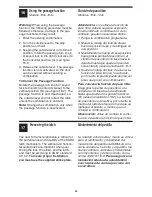
6. Coloque un pequeño destornillador en el borde
del protector contra el polvo echado a un lado 3
y empuje hacia abajo en el destornillador (véase
el cuadro 18-2). La cubierta debe hacer estallar
flojamente. Una vez que hace, llevar a cabo la
cubierta del compartimiento de la combinación.
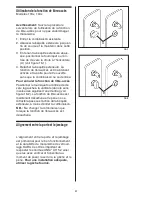
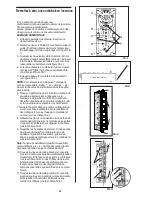
7. Lleve a cabo el compartimiento en una mano al
lado de la lengüeta del tornillo (b) en cada
extremo con el revestimiento de los llave-vásta-
gos (c) usted y el eje del control (d) en la parte
inferior (véase el cuadro 18-3).
8. Usando los alicates o equivalente, gire el eje del
control (d) a la izquierda y lance para despejar el
compartimiento (véase el cuadro 18-3).
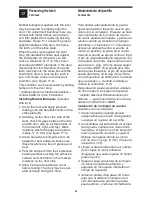
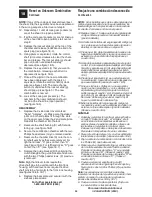
9. Mire los 5 engranajes del código (e). Si algunos
bolsil los del engranaje del código (f) están ya en
a línea del esquileo (posición abierta), no haga caso
de ellos. No se utilizan en la combinación (véase el
cuadro 18-4).
Nota: La línea del esquileo (posición abierta) se refiere
al “L” formó pies alinea ya con el bolsillo del engranaje
conjugado.
10.Encuentre el engranaje del código pocket/s (e)
que está lo más lejos posible lejos de la línea del
esquileo (posición abierta). Presione ese key-
stem/s (c) y lance (véase el cuadro 18-4). Si
algunos dígitos en la combinación fueron pre
sionados juntos (al mismo tiempo), después
éstos se deben también presionar juntos para r
eajustar la combinación.
11.Encuentre el engranaje del código pocket/s (e)
que es el siguiente lo más lejos posible lejos de
la línea del esquileo (posición abierta). Presione
ese key-stem/s (c) y lance (véase el cuadro 18-4).
There is no procedure for determining an
unknown combination from the front of the lock.
A lost combination must be cleared by remov-
ing the combination chamber from the lock
housing, then a new combination can be set.
LOCK DISASSEMBLY
1. Remove the back plate from the front lock
housing by removing the six back plate
screws.
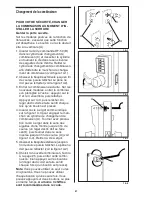
2. Remove the two Phillips head screws (F)
securing the guide bracket (D) to the front
housing. Grasp the guide bracket and slide it
back to disengage it from the clutch linkage.
(see figure 18-1)
3. Lift the two chamber links (A) off of the
control shaft (B) using a small flat blade
screwdriver. Mark links to assure proper
reassembly. (see figure 18-1)
4. Remove the combination chamber (E) by
removing the Phillips head screws (G) at
each end of the chamber. (see figure 18-1)
5. Remove shaft bushing (C) from control
shaft. (see figure 18-1)
NOTE: To remove the 3-sided dust cover
marked "Kaba," “Simplex,” etc., place the com-
bination chamber in the position to the right.
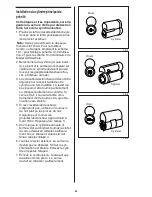
6. Place a small screwdriver on the edge of
the 3-sided dust cover and push down on
the screwdriver (see figure 18-2). The cover
should pop loose. Once it does, pull the
cover off of the combination chamber.
7. Hold the chamber in one hand by the screw
tab (b) on each end with the key-stems (c)
facing you and the control shaft (d) at the
bottom (see figure 18-3).
8. Using pliers or equivalent, rotate the control
shaft (d) counter-clockwise and release to
clear the chamber (see figure 18-3).
9. Look at the 5 code gears (e). If any code
gear pockets (f) are already at the shear line
(open position), ignore them. They are not
used in the combination (see figure 18-4).
Note: Shear line (open position) references the
“L” shaped feet already align with the mating
gear pocket.
10.Find the code gear pocket/s (e) that is far-
thest away from the shear line (open posi-
tion). Depress that key-stem/s (c) and
release (see figure 18-4). If any digits in the
combination were depressed together (at the
same time), then these must also be
depressed together to reset the combination.
11. Find the code gear pocket/s (e) that is the
next farthest away from the shear line (open
position). Depress that key-stem/s (c) and
release (see figure 18-4).
Reset an Unknown Combination
Reajuste una combinación desconocida
18

