background image

User manual

Installing and configuring B-COMM Java

Kaba Terminal 9420 MID 

k1evo706en-2011-07

27

Defining communication parameters for the terminal

The terminal then restarts with the latest settings.

The system can take about one minute to restart. Wait until you see the 

Welcome


message in the display.

2

1

3

4

Summary of Contents for 9420 MID

Page 1: ...EN Kaba Terminal 9420 MID User manual Doc no k1evo706en 2011 07 ...

Page 2: ...Ulrich Bremi Strasse 2 Phillipp Reis Strasse 14 Tiverton Industrial Estate A 3130 Herzogenburg DE 63303 Dreieich Tiverton Devon www kaba at www kaba de EX16 6SS www kaba co uk This documentation may not be reproduced in any manner or otherwise reused without the written consent of Kaba AG Kaba is a registered trademark of Kaba AG Copyright by Kaba AG 2011 ...

Page 3: ...measures for installation 8 2 3 Disposal of packaging 8 2 4 Disposing of the terminal 8 3 Product description 9 3 1 Function 9 3 2 System environment 9 3 3 Communication via ports 10 3 4 Setting up 10 3 5 Scope of supply 11 3 6 Additional accessories 11 3 7 Dimensions 11 3 8 Technical specifications 12 3 9 Installation preparations 14 3 9 1 IT infrastructure 14 3 9 2 Network connection 15 3 9 3 Po...

Page 4: ...LAN01 26 5 5 Testing and completing the communication 28 5 5 1 Sending text to the display 28 5 6 Project specific configuration 30 5 6 1 Loading parameters on to the terminal 30 5 7 Next steps in KEM 33 5 8 Fault rectification 33 6 Repairs maintenance 34 6 1 Cleaning the housing 34 6 2 Changing the battery 34 6 3 Replacing the terminal 35 6 4 Service module 36 6 4 1 Mode of operation 36 6 4 2 Sta...

Page 5: ...ned specialist personnel are working on the system and does not replace product training 1 3 Content and purpose The content of these instructions is limited to the installation and configuration of the Kaba Terminal 1 4 Supplementary documentation Please refer to the technical datasheets or the catalogue for Kaba evolo components to obtain technical information and help with planning installation...

Page 6: ... of terms To make the manual easier to read the Kaba Terminal 9420 MID is also referred to as terminal WARNING Indicates a potentially dangerous situation that could lead to serious injury or death CAUTION Indicates a potentially dangerous situation that can lead to minor injury Risk of explosion Indicates a potentially dangerous situation that can lead to minor injury ATTENTION Identifies a possi...

Page 7: ... terminal may only be connected to the mains by a qualified electrician The terminal housing may only be removed from the docking station by a qualified electrician De energise the device before removing the terminal housing from the docking station Switch off the power if the device is connected permanently Pull out the mains plug in the case of devices supplied from a disconnectable source Preve...

Page 8: ...ucts Do not dispose of used batteries with household waste Dispose of used batteries in accordance with national and local requirements Store the batteries to be disposed of carefully in order to avoid short circuits compression or corrosion of the battery housing ATTENTION Danger of damage to electronic components from electrostatic discharge This product contains electronic components that are s...

Page 9: ...r badge or removes them 3 2 System environment Access authorisations are managed by the Kaba evolo Manager software In order to use the terminal in the Kaba evolo system the B COMM Java software must also be installed This program is used to configure terminal communication between the Kaba evolo Manager software and the network Kaba evolo system concept B COMM Java B COMM Java Helper Server Inter...

Page 10: ...e docking station acts as a wall mounting element for the device The terminal housing is easily inserted into and secured in the docking station 1 click installation feature The docking station is fixed securely to the wall Feeds for the installation cables are located on the bottom and on the rear of the station TCP port UDP port Applications 1433 Kaba evolo Manager SQL Database Kaba Terminal to ...

Page 11: ...owing accessories Installation CD with B COMM Java and documentation User manual Installation material 3 semicircular wood screws 4 5 x 35 mm 3 seal washers 3 S6 dowels 3 6 Additional accessories Network cable Kaba evolo Manager software 3 7 Dimensions B Web Terminal dimensions 1 2 3 4 5 6 7 8 9 C 0 E 207 158 135 65 264 96 230 223 120 ...

Page 12: ...y Mains voltage 100 240 V AC Frequency 50 60 Hz Power consumption max 200 mA Operating environments Protection class IP54 bottom cable entry using enclosed grommets Temperature 10 55 Humidity 10 95 rH not condensing PoE Power over Ethernet in accordance with IEEE 802 3af 12 95 W and IEEE802 3at 25 5 W Supported supply process Spare pair supply via fast Ethernet free 4 5 and 7 8 core pairs Phantom ...

Page 13: ... EN 300 330 2 V1 5 1 EN 301 489 1 V1 8 1 EN 301 489 3 V1 4 1 EN 50364 2001 and as set out in the EU Directives 1999 5 EC R TTE Directive 73 23 EEC Low Voltage Directive 89 336 EEC EMC Directive To our knowledge this device does not use or contain any substances in concentrated form whose placing on the market in products is prohibited according to the requirements of Directive 2002 95 EC RoHS ...

Page 14: ...any naming conventions for the connection of network devices to the corporate network If there are the Kaba standard name must be adjusted manually in the terminal before starting the installation and configuration process Ch 6 4 4 3 Is the terminal operated with a static IP address If operation is with a static IP address this must be set manually in the terminal before starting the installation ...

Page 15: ...rox 15 to 18 cm out of the wall The RJ 45 plug must be fitted 3 9 3 Power supply If a 230 V power supply is used it must be prepared by a qualified electrician The power supply is connected directly to the connection terminal on the terminal also by the qualified electrician For details of the connection terminals see section 4 4 page 18 If the power supply is a PoE Power over Ethernet system the ...

Page 16: ...try The installation cables can be fed into the housing either from the bottom or the rear The docking station has cutouts specifically for this purpose The IEC 60529 protection type specified in the technical specifications can only be achieved if the cable entry from below is fitted with the cable grommets or cable glands supplied Cable entry from below Cable entry from the rear ...

Page 17: ...ions in the vicinity of the display making the display more difficult to read Do not install the terminal where it will be exposed to direct sunlight 4 3 Wall mounting First make the holes required for the installation cable s Feed the cables in from the bottom or the rear Fastening the docking station The docking station is fastened directly to the wall using screws dowels The docking station has...

Page 18: ...ld extend approx 18 cm from the wall to ensure that the clearance between the docking station and the terminal housing is large enough to allow the network plug to be inserted The network cable is then looped and inserted into the indentation on the rear of the terminal housing 4 4 2 Connecting the mains voltage Only devices with BEX120 motherboard The connection to the mains voltage may only be c...

Page 19: ...ains fuse Only devices with BEX120 motherboard The mains fuses are under the cover 1 Cover fixing positions Remove metal cover 1 1 Remove screw 2 TORX T10 2 Remove protective earth gland 3 M4 nut wrench size 7 3 Push the metal cover 1 up slightly to detach it and then remove it BEX120 1 2 3 ...

Page 20: ... to the docking station For safety reasons safety of device and persons the electronic components and connections in the docking station must not be accessible In the case of devices with an optional motherboard in the docking station the terminal housing must therefore be installed immediately after installing the docking station The terminal housing can be installed later in the case of devices ...

Page 21: ...using and loop it into the indentation on the rear of the terminal housing 2 Push the terminal housing 1 onto the docking station 2 until the clips 3 on the side latch in place Do not tilt the terminal housing while doing so 3 Fasten the terminal housing to the docking station using an M4x10 TORX TR 4 locking screw You will need a SoftFinish TORX T20H screwdriver with a hole at the tip of the blad...

Page 22: ... on page 14 The following will appear on the display when the terminal is switched on Serial number e g 000000014 IP address e g 10 3 5 143 Make a note of these items as they will be required for configuration purposes 5 3 Installing B COMM Java A user with Administrator rights has to install the program Deactivate any firewall programs 1 Run the Setup exe file in the Kaba evolo Terminal folder on...

Page 23: ...minal entry highlighted If there is no terminal in the Terminal Discovery area please refresh the display as follows 1 Right click on the Terminal Discovery entry 2 Select Refresh from the context menu If the terminal is still not displayed there may be a network problem Refer to the fault rectification section Chapter 6 5 Page 41 ...

Page 24: ...ansport the information destined for the terminal over the network The stream must be stopped before the communication parameters can be configured 1 Highlight the stream 2 Stop the stream using the Stop button in the toolbar Stopping the communication channel 5 4 2 Configure the stream BCLAN01 1 Highlight the stream 2 Right click and choose Configure from the context menu Configuration context me...

Page 25: ...a DHCP environment Configuring the network parameters Deactivating this option results in the IP address selected by the DHCP server being used instead of the name allocated by the DNS server 5 4 3 Restarting the stream BCLAN01 The stream must be restarted if the configuration is changed 1 Highlight the stream 2 Restart the stream using the Start button in the toolbar Restarting the communication ...

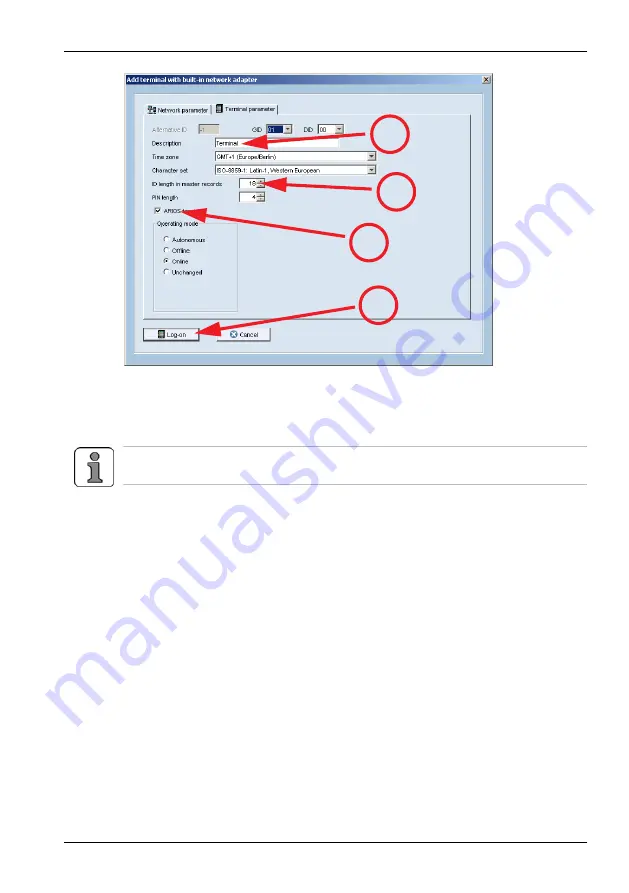
Page 26: ...ocated to it Drag the Terminal B web entry in the Terminal Discovery area on to BCLAN01 Allocating a terminal to its specified communication channel A configuration window will now appear in which the final settings for this communication path are defined 1 Enter the name of the terminal e g Terminal1 in the Description field 2 Set the value of ID length in master records to 18 3 Select the Arios ...

Page 27: ...ba Terminal 9420 MID k1evo706en 2011 07 27 Defining communication parameters for the terminal The terminal then restarts with the latest settings The system can take about one minute to restart Wait until you see the Welcome message in the display 2 1 3 4 ...

Page 28: ... 5 1 Sending text to the display To test that the communication between the terminal and your PC is functioning correctly the B COMM program sends a text string to the terminal Starting the Send text to display function Drag Send display information to the stream BCLAN01 1 Select BCLAN01 2 Select Dynamic 3 Enter text e g Test 4 OK to confirm ...

Page 29: ...en 2011 07 29 Defining the information to be displayed Assuming the communication channel has been configured correctly the text entered earlier e g Test will now appear on the display If nothing appears refer to the list of possible error causes see list Chapter 6 5 Page 41 1 2 3 4 ...

Page 30: ...responding languages have been prepared and can be found in the Parameter download area Drag Drop the appropriate parameter file on to the terminal entry Note To be able to configure the terminal correctly you need to know which authorisation rights have been configured for the site in KEM terminalCid_DE Cid is short for Card ID and indicates that the KEM project must be set to CID Mode terminalUi...

Page 31: ...1evo706en 2011 07 31 Note The status of the data transmission can be seen on the terminal under Recent order terminalCID_DE parameter Download Running terminalCID_DE parameter Download Finished OK The terminal reboots Wait until this is complete and the Welcome message appears ...

Page 32: ...ned to the site can be used This sitekey also has to be assigned to the terminal so that the terminal is integrated into the site to prevent it being used in any other sites 1 Connect 9108MID desktop reader to PC 2 Choose ARIOS SiteKey management from the Configuration menu Arios Sitekey management function 3 Place security card C on desktop reader Reading and transferring site data 4 Use Read to ...

Page 33: ...ow allocated to the terminal 7 OK to confirm The terminal can now be used with the Kaba evolo Manager 5 7 Next steps in KEM Information about how to configure the terminal with the Kaba evolo Manager can be found in the Kaba evolo Manager user manual 5 8 Fault rectification Information about rectifying problems and faults can be found in Chapter 6 5 Page 41 ...

Page 34: ...such as ethanol or isopropanol Do not use aggressive cleaning products Do not use any cleaning products containing a powder additive Avoid scratching and scouring instead use a soft lint free cloth and a mild window cleaner 6 2 Changing the battery The device uses a type CR2032 lithium manganese dioxide battery for storing parameters master records and other data records The battery is situated on...

Page 35: ...ctive delivery state Procedure 1 Replace the old terminal with the replacement terminal 2 After switching on the replacement terminal the serial number of the replaced terminal must first be entered 3 A connection is automatically established and B COMM Java then transfers a modified licence file and all the existing applicable parameters to the replacement terminal 4 The replacement terminal is r...

Page 36: ...ervice functions across the network Local setting of communication parameters devices with display and keyboard only Remote setup transfer of parameters to the reboot cmd file 6 4 2 Starting service mode A service switch is located on the rear of the terminal housing and is accessible when the terminal housing is taken off the docking station The device software recognises a change of the switchin...

Page 37: ...when the memory configuration is changed The device starts in these cases with the device software Performing a cold start resets parameters to their default values and deletes master records and entries Network settings and group and device addresses are retained 6 4 3 Accessing the terminal using a web browser The terminal can only be accessed using a web browser if the terminal is in service mo...

Page 38: ...maintenance User manual 6 4 4 Changing the terminal name 1 Access the terminal using the web browser 2 Select Ethernet Parameters Summary of configuration options for the terminal 3 Change the terminal name 4 Save the changes Submit Terminal details 2 3 4 ...

Page 39: ...4 5 Setting a static IP address 1 Access the terminal using the web browser 1 Select Ethernet Parameters 2 Deactivate Enable DHCP 3 Enter Terminal IP address 4 Enter Net mask 5 Enter Gateway IP address 6 Enter DNS Server address 7 Save data Submit Network communication details 2 7 ...

Page 40: ... Kaba evolo Terminal program 2 Start the terminal in service mode 3 Start the FTP browser and connect to the terminal Enter the IP address of the terminal User name root Password Bedanet Login screen in FTP browser e g Filezilla 4 Delete the registration file folder data registration Registration file to be deleted registration 5 Access the terminal using the web browser see section 6 4 3 page 37 ...

Page 41: ...ot started 1 Right click on My Computer Manage Device Manager Service Applications 2 Restart Kaba Terminal to KEM Feeder 3 Restart BCLAN01 Several network cards present wrong one configured B COMM Java services must be installed manually Contact your support team Starting B COMM Java Message B COMM Java Server is down B COMM Java services not started 1 Right click on My Computer Manage Device Mana...

Page 42: ... My Computer Manage Device Manager Service Applications 2 Restart Kaba Terminal to KEM Feeder 3 Repeat Send Display information Parameter download failed BCLAN01 communication channel not started correctly 1 Restart BCLAN01 2 Check communication using Send Display information command B COMM Java services not started correctly 1 Right click on My Computer Manage Device Manager Service Applications ...

Reviews: