6
Cold Lamination
For cold lamination, the laminating pouch is coated with a special adhesive. Unlike
hot lamination, cold lamination bonds the foil through pressure, not heat. Cold
lamination is suitable for non-permanent sealing. The cold laminating pouch can
usually be removed from the laminated material without leaving any residues.
1.
Switch the On/Off switch to
ON
.
2.
Set the function switch to
COLD
.
3.
Remove the protective foil from the laminating pouch.
4.
Place the material to be laminated inside the laminating pouch. For an optimal
lamination result, leave an all-round spacing of 3 to 5 mm from the edges of the
pouch .If the material to be laminated is not in a standard paper format, also place
an insert inside the laminating pouch that corresponds with the paper format of
the laminating pouch. Position the document to be laminated at the front edge of
the closed end of the laminating pouch.
5.
Feed the prepared laminating pouch with the closed side first, keeping it straight,
into the infeed of the laminator. The laminator automatically draws in the
laminating pouches and ejects it on the output side.
Using the Paper Cutter
Caution!
Risk of cuts through sharp-edged cutter blade. The cutter blade is very sharp!
Never reach in towards or take hold of the cutter blade.
1.
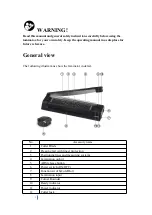
Release the locking mechanism (12) holding the Cutter arm.
2.
Move the cutter arm upwards.
3.
Place the material to be cut under the pressing rail and press the rail downwards.
4.
Then use your other hand to move the cutter arm down and produce the cut.
The cutter is equipped with a special screw to secure it from dropping unintentionally
or suddenly. This means the blade always remains at the position in which it is
released.The function of the screw between the blade and base of the cutter can
deteriorate. Check it regularly. Tighten the screw using an appropriate
tool at regular intervals so that the cutter blade does not drop of its own accord.
Summary of Contents for OL381C
Page 1: ......


