background image

9

5. Digitale radio DAB+

Gelieve, om de digitale radio DAB+ te ontvangen, in het hoofdmenu over te schakelen naar de bron 

„Digitale radio“.

 Bij de eerste omschakeling wordt er een automatische afstemming van de zenders 

gestart. Op het display verschijnt 

„Scannen...“

, het aantal tot nu toe gevonden zenders en een 

overeenkomstige voortgangsbalk. Een aantal zenders biedt bijkomende informatie als zogenaamde 
Slideshow aan.
Om deze in een groot formaat op het display van de radio weer te geven, drukt u op de toets 

<OK>


op de afstandsbediening of aan de radio. Door de toets opnieuw in te drukken, schakelt het display 
weer terug.

5.1 Afstemming van de zenders

Om naar ontvangbare zenders te zoeken, kunt u een automatische afstemming van de zenders starten. 
Roep daarvoor met de toets 

<MENU>

 het menu op en kies 

„Volledige scan“

. Op het display verschijnt


„Scannen...“

, het aantal tot nu toe gevonden zenders en een overeenkomstige voortgangsbalk.  

Daarna zijn de zenders in alfabetische volgorde opgeslagen. 
Zenders die bij een vorige afstemming van de zenders gevonden worden, maar op het gegeven mo-
ment niet te ontvangen zijn, worden in de zenderlijst met een 

„?“

 vóór de zendernaam aangegeven.

5.2 Handmatig instellen

U kunt ensembles ook handmatig instellen. Roep daarvoor met de toets 

<MENU>

 het menu op en 

selecteer 

„Handm. afstmmn.“

. Daarna het gewenste kanaal selecteren en met 

<OK>

 bevestigen. 

Nu wordt er informatie over het ensemble en wordt de signaalsterkte aangegeven. Door nogmaals te 
drukken op de toets 

<OK> 

worden de betreffende zenders in de lijst opgeslagen.

5.3 Stationslijst

Druk op de toets 

<MENU>

 en bevestig 

„Stationslijst“

 met 

<OK>

. Gebruik de toetsen 

<OMHOOG/

OMLAAG>

 of de 

<NAVIGATE>

 regelaar voor de selectie van een zender en druk op 

<OK>

 om te 

bevestigen. Het apparaat begint automatisch met de weergave.

Opmerking:

 De ontvangstkwaliteit van een zender is van factoren zoals weer, plaats van opstelling 

en antenne-oriëntering afhankelijk. Indien een zender uit de zenderlijst niet ontvangbaar is, wijzigt u 
de oriëntatie van de antenne of de plaats van opstelling van de radio. Niet meer ontvangbare zenders 
kunnen uit de zenderlijst verwijderd worden. 

5.4 Niet (meer) ontvangbare zenders wissen

Zenders die niet meer ontvangen kunnen worden, kunnen uit de lijst gewist worden. Druk daarvoor 
op de toets 

<MENU>

 end selecteer 

„Inkorten“

. Selecteer bij 

„Doorgaan met inkorten lijst 

radiozenders?“


„JA“

 en deze zenders worden gewist. Door het selecteren van 

„NEE“

 wordt u weer 

naar het menu geleid, zonder de zenders te wissen.

5.5 Favorieten (geheugenplaatsen)

Om DAB+ zenders op te slaan, staan er 40 geheugenplaatsen (favorieten) ter beschikking.

Summary of Contents for CR-ST80DAB

Page 1: ...DAB Stereo Kompaktradio CR ST80DAB BEDIENUNGSANLEITUNG JVCKENWOOD Corporation DEUTSCH FRAN Ç AIS ITALIANO ENGLISH NEDERLANDS ...

Page 2: ...io DAB 6 UKW Radio 7 Bluetooth Audio 8 Analoge Anschlüsse 9 Einstellungen 9 1 Sleep 9 2 Wecker 9 3 Equalizer 9 4 Uhrzeit 9 5 Beleuchtung 9 6 Sprache 9 7 Werkseinstellung 9 8 Software Version 10 Störungsbehebung 11 Wartung 12 Entsorgung 13 Technische Daten 14 Garantie DEUTSCH Seite 3 6 7 8 9 11 12 13 13 13 13 15 15 16 16 16 16 17 17 18 19 20 ...

Page 3: ...äuse dienen der Belüftung des Geräts um den zuverlässigen Betrieb des Geräts sicherzustellen und um das Gerät vor Überhitzung und einer möglichen Selbstentzündung zu schützen Blockieren Sie die Lüftungsöffnungen nicht Installieren Sie das Gerät nach Angaben des Herstellers Blockieren Sie niemals die Belüftungsöffnungen indem Sie das Gerät auf einem Bett Sofa Teppich oder einer ähnlich weichen Unte...

Page 4: ...trischen Schlägen oder anderen Unfällen führen 1 13 Sicherheitsprüfung Bitten Sie den Kundendiensttechniker nach der Beendigung von Wartungs oder Reparaturarbeiten an diesem Gerät um die Durchführung einer Sicherheitsprüfung um festzustellen ob sich das Gerät im einwandfreien Betriebszustand befindet 1 14 Wärme Installieren Sie das Gerät nicht in der Nähe von heißen Oberflächen wie z B Heizkörpern...

Page 5: ...erie während der Verwendung Lage rung oder des Transports ausgesetzt sein kann niedriger Luftdruck in großer Höhe den Austausch einer Batterie durch einen falschen Typ der eine Sicherung umgehen kann z B bei einigen Lithium Batterietypen die Entsorgung einer Batterie in Feuer oder einem heißen Ofen oder das mechanische Quetschen oder Schneiden einer Batterie das Belassen einer Batterie in einer Um...

Page 6: ...tenne 1 Entriegeln Sie vorsichtig die Antenne am linken Teil des Gehäuses 2 Drehen Sie die Antenne nach oben und ziehen Sie alle Elemente komplett heraus 3 Richten Sie die Antenne aus um den besten Empfang zu erhalten 2 4 Fernbedienung Standby Ein Aus Wecker aus Schlummer einstellen Quellenauswahl öffnen schließen Menü öffnen schließen Wecker einstellen Dimmer 3 stufig Wiedergabe starten pausieren...

Page 7: ...ionstasten 1 5 3 Auswählen Bestätigen 4 Quellenauswahl 5 Menü 6 Favoriten Speicherplätze 7 Wecker 8 Zurück 1 4 3 1 Display 2 UKW DAB Antenne 3 USB Anschluss nur für Firmware Updates 4 Anschluss Steckernetzteil 5 Line Out Anschluss 6 Aux In Anschluss Rückseite Draufsicht 6 2 5 6 7 8 ...

Page 8: ...eil des Displays erscheint ein durch gestrichenes Lautsprechersymbol Ein weiterer Tastendruck stellt die ursprüngliche Lautstärke wieder her 3 4 Zusätzliche Informationen Durch wiederholtes Drücken der Taste INFO können je nach Quelle und Sender zusätzliche Informationen angezeigt werden Beschreibung Name des Senders des aktuellen Programms Inhalte Themen etc Genre Es wird der Programmstil Genre d...

Page 9: ...stellen Rufen Sie dazu mit der Taste MENU das Menü auf und wählen Man einstellen aus Danach den gewünschten Kanal auswählen und mit OK bestätigen Nun werden Informationen zum Ensemble und die Signalstärke angezeigt Ein weiterer Tastendruck auf OK speichert die entsprechenden Sender in der Liste 5 3 Senderliste Drücken Sie die Taste MENU und bestätigen Sie Senderliste mit OK Verwenden Sie die Taste...

Page 10: ...r Fernbedienung aufrufen Verwenden Sie die Tasten HOCH RUNTER oder den NAVI GATE Regler zur Auswahl eines Senders und drücken Sie OK zur Bestätigung Hinweis Die Speicherplätze können nicht gelöscht sondern nur mit anderen Sendern überschrieben werden Gespeicherte Sender werden im unteren Teil des Displays durch einen Stern mit dazugehöriger Speicherplatznummer gekennzeichnet 5 6 DRC Dynamic Range ...

Page 11: ...o Empfang eine leichte Qualitätsver besserung erzielt werden Drücken Sie dazu die Taste MENU und wählen Sie Audio Einst aus Im nachfolgenden Menü Stereo möglich oder Nur Mono auswählen Die aktuelle Einstellung wird durch ü gekennzeichnet 6 4 Favoriten Speicherplätze Zur Speicherung von UKW Sendern stehen 40 Speicherplätze Favoriten zur Verfügung 6 4 1 Speichern von UKW Sendern auf den Direktwahlta...

Page 12: ...ach verfüg baren Bluetooth Geräten Wählen Sie KENWOOD CR ST80DAB aus und starten Sie den Koppelungs vorgang Nach erfolgreichem Pairing erscheint im Display Verbunden Jetzt kann die Musikwiedergabe über das Endgerät gesteuert werden Verwenden Sie dazu die Musik App Ihrer Wahl Eine grundlegende Bedienung von Wiedergabe Pause und Titelsprung vorwärts rückwärts ist über die ent sprechenden Tasten auf ...

Page 13: ...alten Sie können dabei zwischen 15 30 45 60 90 oder 120 Minuten wählen Aus löscht die vorher eingestellte Zeitspanne Drücken Sie dazu bei gewählter Audio Quelle die Taste MENU und wählen Sie Einstellungen Anschließend mit den Tasten HOCH oder RUNTER im Menü navigieren und Sleep auswählen Mittels der Tasten HOCH oder RUNTER im Menü Zeiteinst Sleep die gewünschte Zeitspanne auswählen und mit der Tas...

Page 14: ... die gewünschte Weckdauer ein Zur Verfügung steht folgende Auswahl 15 30 45 60 90 120 Minuten 9 2 7 Lautstärke Stellen Sie hier bitte die gewünschte Wecklautstärke ein Hinweis Ein aktivierter Wecker wird mit einem Weckersymbol und der Nummer des aktiven Weckers unten im Display angezeigt Im Standby Modus sehen Sie zusätzlich auch noch die eingestellte Weckzeit 9 2 8 Ausschalten des Weckers nach de...

Page 15: ...ren Das aktive Klangprofil wird mit ü gekennzeichnet 9 4 Uhrzeit Im Menü Uhrzeit können Einstellungen für Zeit und Datum vorgenommen werden Dabei stehen folgen de Optionen zur Verfügung 9 4 1 Menü Zeit Datum einst Hier können Zeit und Datum manuell eingestellt werden Mit den Tasten HOCH oder RUNTER auf der Fernbedienung oder dem NAVIGATE Regler können die Werte verändert werden Mit den Tasten LINK...

Page 16: ...instellung Helligkeitseinstellung für Betrieb und Standby Auswahlmöglichkeiten Mittel Niedrig Die ausgewählten Optionen sind mit ü gekennzeichnet Mit der Taste DIMMER auf der Fernbedie nung läßt sich die Beleuchtung in 3 Stufen einstellen 9 6 Sprache Im Menü Sprache können Sie die Menüsprache des Radios festlegen Zum Auswählen einer Sprache benutzen Sie bitte die Tasten HOCH oder RUNTER und bestät...

Page 17: ...ilden Reinigungsmittel leicht angefeuchtetes Tuch Benutzen Sie keine Reinigungsmittel die Alkohol Ammoniak oder Scheuermittel enthalten Vorsichtshinweise zur Kondensationsbildung Kondensation Tau kann sich im Innern des Geräts bilden wenn zwischen der Temperatur des Geräts und der Umgebungstemperatur ein wesentlicher Unterschied besteht Sollte im Innern des Geräts Kondensati on auftreten ist eine ...

Page 18: ...ten Entsorgung dieses Produktes schützen Sie die Umwelt und die Gesundheit Ihrer Mitmenschen Unsachgemässe oder falsche Entsorgung gefährden Umwelt und Gesundheit Weitere Informationen über das Recycling dieses Produktes erhalten Sie von Ihrer Gemeinde oder den kommunalen Entsorgungsbetrieben Achtung Das Zeichen Pb unter dem Symbol für Batterien zeigt an dass diese Batterie Blei enthält Die Blueto...

Page 19: ...KW DAB DAB Abstimmbereich BAND III 174 928 MHz 239 200 MHz UKW Abstimmbereich 87 50 MHz 108 00 MHz USB USB Geräte USB ist nur für Software Updates Service vorgesehen Nicht für Musikwiedergabe oder Geräteladung BLUETOOTH BLUETOOTH Version V5 0 Leistungsklasse Klasse 1 Maximale Sendeleistung 7 52 dbm Reichweite ca 10 Meter kann je nach Umgebung abweichen Frequenzbereich 2 402 GHz 2 480 GHz BLUETOOTH...

Page 20: ...agen werden Unterscheidet sich außerdem das Produkt von den durch den offiziellen Importeur vertriebenen Produkten und sollten für die Reparatur dieses Produktes Eratzteile nicht verfügbar sein muß der Benutzer die Kosten für Hin u Rücktransport des Gerätes in das Kaufland tragen Gleiches gilt wenn im betreffenden Land aus anderen berechtigten Gründen keine Garantieleistungen angeboten werden könn...

Page 21: ...21 Für Ihre Notizen ...

Page 22: ......

Page 23: ...DAB Compact Stereo Radio CR ST80DAB OPERATING INSTRUCTIONS JVCKENWOOD Corporation GERMAN FRAN Ç AIS ITALIANO ENGLISH NEDERLANDS ...

Page 24: ...M Radio 7 Bluetooth Audio 8 Analogue connections 9 System settings 9 1 Sleep 9 2 Alarm clock 9 3 Equalizer 9 4 Time 9 5 Backlight 9 6 Language 9 7 Factory Reset 9 8 Software version 10 Troubleshooting 11 Maintenance 12 Disposal 13 Technical specifications 14 Guarantee ENGLISH Page 3 6 7 8 9 11 12 13 13 13 13 15 15 16 16 16 16 17 17 18 19 20 ...

Page 25: ...ation holes Install the device according to the manufacturer s instructions Never block the ven tilation holes by placing the device on a bed sofa rug or similar soft surfaces This device should not be installed in a bookshelf or built in wardrobe unless adequate ventilation is ensured 1 5 Power supply This device may only be connected to the mains voltage with the supplied mains adapter Use the p...

Page 26: ...not be exposed to excessive heat such as direct sunlight fire or the like 1 15 Batteries If you do not use the radio for a month or more remove the batteries from the battery com partment of the remote control to prevent it from leaking Immediately dispose of leaking batteries properly and observe all relevant legal regulations Leaking batteries can cause injury and damage the device Never mix bat...

Page 27: ...ironment that may cause an explosion or leakage of flammable liquids or gases a battery that is exposed to extremely low air pressure which may cause an explosion or leakage of flammable liquids or gases EU Declaration of Conformity Hereby JVCKENWOOD Corporation declares that the radio equipment type CR ST80DAB complies with Directive 2014 53 EU The full text of the EU Declaration of Conformity is...

Page 28: ...ed in the battery compartment 2 3 DAB FM telescopic antenna 1 Carefully unlock the antenna on the left side of the casing 2 Turn the antenna upwards and pull out all the elements completely 3 Align the antenna for the best reception 2 4 Remote control Standby On Off Alarm clock off Set snooze Open close source selection Open close menu Set alarm clock 3 stage dimmer Start pause playback Select tra...

Page 29: ...tation buttons 1 5 3 Select Confirm 4 Source selection 5 Menu 6 Favorites Presets 7 Alarm clock 8 Back 1 4 3 1 Display 2 FM DAB antenna 3 USB connection Firmware updates only 4 Connection power supply 5 Line out connection 6 Aux in connection Backside Top view 6 2 5 6 7 8 ...

Page 30: ...lower part of the display Another pressing of the button restores the original volume 3 4 Additional information By repeatedly pressing the INFO button depending on the source and station additional informa tion can be displayed Description Name of the station the current program content topics etc Genre The program style genre of the station is displayed Signal level and signal error Bit rate Cha...

Page 31: ...sembles manually To do this use the MENU button to call up the menu and select Manual Tune Then select the desired station and confirm with OK Now information about the ensemble and the signal strength are displayed Another pressing of the OK button saves the corresponding stations in the list 5 3 Station list Press the MENU button and confirm Station list with OK Use the UP DOWN buttons or the NA...

Page 32: ...y locations by briefly pressing the FAVORITE button on the radio or FAV on the remote control Use the UP DOWN buttons or the NAVIGATE knob to select a station and press OK to confirm Note The memory locations cannot be deleted but can only be overwritten with other stations Stored stations are marked in the lower part of the display by an asterisk with the corresponding memory location number 5 6 ...

Page 33: ...or or Forced Mono in the following menu The current setting is indicated by ü 6 4 Favorites Presets 40 memory locations favourites are available for storing FM stations 6 4 1 Storing FM stations on the direct selection buttons 1 5 on the radio On the radio you can assign memory locations 1 5 using the number keys To do this select the desired station and press a number key until Preset x saved app...

Page 34: ...l pairing Connected appears on the display Now the music playback can be controlled via the terminal To do this use the music App of your choice Basic operation of play pause and skip forward backward is possible using the corresponding buttons on the remote control Note Some terminal devices require a PIN code when connecting then enter 0000 7 2 Automatic connection after pairing has already take...

Page 35: ...can choose between 15 30 45 60 90 or 120 minutes Sleep Timer Off deletes the previ ously set period of time To do this press the MENU button while the audio source is selected and select System Settings Use the UP or DOWN to navigate in the menu and select Sleep Using the UP or DOWN keys in the Set Sleep Timer menu Sleep select the required time period and confirm with the OK key Exit the menus ag...

Page 36: ...e The following options are available 15 30 45 60 90 120 minutes 9 2 7 Volume Please set the desired alarm volume here Note An activated alarm clock is shown with an alarm symbol and the number of the active alarm clock at the bottom of the display In standby mode you can also see the set alarm time 9 2 8 Switching off the alarm clock after waking up To switch off the alarm clock until the next al...

Page 37: ...ate The following options are available 9 4 1 Set Time Date menu The time and date can be set here manually The values can be changed using the UP or DOWN button on the remote control or the NAVIGATE knob Use the LEFT RIGHT or OK button to select the individual blocks of numbers and to save the values 9 4 2 Auto Update menu Here you can specify the source from which the time and date should be upd...

Page 38: ...ed options are marked with ü With DIMMER on the remote control the lighting can be set in 3 levels 9 6 Language In the Language menu you can set the menu language of the radio To select a language please use the UP or DOWN buttons and confirm this by pressing the OK button Alternatively the selection can also be made with the NAVIGATE knob The following languages are available Danish German Englis...

Page 39: ...nd care Cleaning the housing Use a cloth lightly moistened with a mild detergent Do not use detergents containing alcohol ammonia or scouring agents Cautions on condensation Condensation dew may form inside the unit if there is a significant difference between the tempera ture of the unit and the ambient temperature If condensation occurs inside the unit proper function is no longer guaranteed In ...

Page 40: ...e protecting the environment and the health of your fellow human beings Improp er or incorrect disposal endangers the environment and health For more information about the recycling of this product please contact your local authority or your municipal waste disposal service Attention The Pb sign under the battery symbol indicates that this battery contains lead The Bluetooth word mark and logos ar...

Page 41: ...ange BAND III 174 928 MHz 239 200 MHz FM tuning range 87 50 MHz 108 00 MHz USB USB devices USB is for software update service use only Not for Music playback and charging BLUETOOTH BLUETOOTH version V5 0 Power class Class 1 Maximum transmission power 7 52 dbm Reach About 10 meters may vary depending on the environment Frequency range 2 402 GHz 2 480 GHz BLUETOOTH profile A2DP Advanced Audio Distri...

Page 42: ...he product differs from the products distributed by the official importer and if replacement parts are not available for repairing this device the user must carry the costs for the transport of the device to and from the land of purchase The same applies if no warranty coverage can be offered in the country under consideration because of other justifiable reasons C Exceptions from warranty coverag...

Page 43: ...21 For your notes ...

Page 44: ......

Page 45: ...Radio compacte stéréo DAB CR ST80DAB NOTICE D EMPLOI JVCKENWOOD Corporation DEUTSCH FRAN Ç AIS ITALIANO ENGLISH NEDERLANDS ...

Page 46: ...o Bluetooth 8 Ports analogiques 9 Configuration 9 1 Mode sommeil 9 2 Réveil 9 3 Égaliseur 9 4 Heure 9 5 Rétroéclairé 9 6 Langue 9 7 Régl en usine 9 8 Version logiciel 10 Élimination des défaillances 11 Maintenance 12 Mise au rebut 13 Caractéristiques techniques 14 Garantie FRANÇAIS Page 3 6 7 8 9 11 12 13 13 13 13 15 15 16 16 16 16 17 17 18 19 20 ...

Page 47: ... d assurer le bon fonction nement de l appareil et le protéger contre toute surchauffe qui pourrait occasionner une auto igni tion N obturez pas les orifices de ventilation Installez l appareil conformément aux consignes du fabricant N obturez pas les orifices de ventilation en posant l appareil sur un lit un canapé un tapis ou un autre support mou similaire En absence d une ventilation suffisante...

Page 48: ...près la réalisation d opérations de maintenance ou de réparation priez le technicien du service clients d effectuer un contrôle de sécurité afin de s assurer du parfait état de fonctionnement de l appareil 1 14 Chaleur N installez pas l appareil à proximité de surfaces chaudes telles que par exemple des radiateurs radiateurs soufflants poêles ou autres appareils pouvant dégager de la chaleur y com...

Page 49: ...le peut être exposée pendant l utilisation le stockage ou le transport d une pression atmosphérique faible à grande altitude du remplacement de la pile par un type inadapté qui peut shunter une sécurité par ex certains types de piles au lithium la mise au feu ou dans un four chaud d une pile ou l écrasement ou le sectionnement mécanique d une pile de l exposition prolongée d une pile à un environn...

Page 50: ...ion l antenne installée sur la partie supérieure du boîtier 2 Tournez l antenne vers le haut et extrayez la entièrement 3 Orientez l antenne de sorte à obtenir une réception optimale 2 4 Télécommande Veille Marche Arrêt réveil désactivé Régler la fonction sommeil Ouvrir fermer le choix de la source Ouvrir fermer le menu Réglage du réveil Variateur d éclairage à 3 niveaux Démarrer interrompre la le...

Page 51: ...tionner confirmer 4 Choix de la source 5 Menu 6 Favoris emplacements mémoire 7 Réveil 8 Précédent 1 4 3 1 Afficheur 2 Antenne FM DAB 3 Port USB Uniquement pour les mises à jour du progiciel 4 Connecteur du bloc d alimentation à fiches 5 Port Line Out 6 Port Aux In Face arrière Vue d en haut 6 2 5 6 7 8 ...

Page 52: ...s affiche dans la partie inférieure de l écran Au prochain actionnement de la touche le volume précédent est rétabli 3 4 Informations complémentaires L actionnement répété de la touche INFO permet d afficher des informations complémentaires en fonction de la source et de la station Description Nom de la station du programme actuel contenus thèmes etc Genre Le style de programme genre de la station...

Page 53: ...MENU pour ouvrir le menu puis sélectionnez l option Réglage manuel Sélectionnez ensuite le canal souhaité et confirmez par OK Les informations au sujet de l ensemble et de la puissance du signal s affichent alors Un nouvel actionnement de la touche OK mémorise les stations correspondantes dans la liste 5 3 Liste des stations Appuyez sur la touche MENU et confirmez l option Liste de stat par OK Uti...

Page 54: ...ent aux emplacements mémoire en appuyant brièvement sur la touche FAVORITE de la radio ou FAV de la télécommande Utilisez les touches HAUT BAS ou le bouton de réglage NAVIGATE Naviguer pour sélectionner une station puis appuyez sur OK pour confirmer Remarque Les emplacements mémoire ne peuvent pas être supprimés mais ils peuvent être écrasés par d autres stations Les stations enregistrées sont ide...

Page 55: ...éception mono permet éventuellement d obtenir une légère amélioration de la qualité Appuyez à cet effet sur la touche MENU puis sélectionnez l option Réglage audio Sélectionnez dans le menu suivant l option Stéréo admis ou Sta tions mono Le réglage actuel est indiqué par un astérisque ü 6 4 Favoris emplacements mémoire Vous disposez de 40 emplacements mémoire pour mémoriser des stations FM favoris...

Page 56: ...he Déconnecté Ou vrez alors les réglages Bluetooth du terminal à apparier et lancez la recherche d appareils Bluetooth disponible sur ce terminal Sélectionnez l option KENWOOD CR ST80DAB et lancez le processus d appariage Lorsque l appariage s est terminé avec succès l écran affiche Connecté Vous pouvez à présent gérer la diffusion de musique via le terminal Utilisez à cet effet l appli de musique...

Page 57: ...tion Arrêt efface le laps de temps réglé précédemment Après avoir sélectionné la source audio appuyez sur la touche MENU et sélectionnez Configuration Déplacez vous ensuite dans le menu à l aide des touches HAUT ou BAS et sélectionnez l option Mode sommeil Sélectionnez le laps de temps souhaité à l aide des touches HAUT ou BAS dans le menu Mode sommeil et confir mez par la touche OK Quittez ensuit...

Page 58: ...e souhaitée Les options suivantes sont disponibles au choix 15 30 45 60 90 120 minutes 9 2 7 Volume Réglez ici le volume souhaité pour le réveil Remarque Un réveil activé est indiqué par le symbole de réveil et le numéro du réveil activé affichés en bas de l écran En mode veille l heure réglée pour le réveil s affiche également 9 2 8 Désactivation du réveil après le réveil Pour désactiver le révei...

Page 59: ...st identifié par un astérisque ü 9 4 Heure Le menu Heure vous permettent de définir les paramètres pour la date et l heure Vous disposez des options suivantes à cet effet 9 4 1 Menu Régl heure date Cette option sert à régler manuellement la date et l heure Les touches HAUT ou BAS de la télécommande ou le bouton de réglage NAVIGATE Naviguer permettent de modifier ces valeurs Les touches GAUCHE DROI...

Page 60: ...ibles Élevé Moyen Bas Niveau attén Réglage de la luminosité pour le fonctionnement et le mode Veille Options disponibles Moyen Bas Les options sélectionnées sont identifiées par ü La touche DIMMER de la télécommande permet de régler 3 niveaux d intensité d éclairage 9 6 Langue Le menu Langue permet de définir la langue des menus de la radio Pour sélectionner une langue utilisez les touches HAUT ou...

Page 61: ...e du boîtier Utilisez un chiffon légèrement humecté avec un détergent doux N utilisez pas de détergents contenant de l alcool de l ammoniac ou d abrasifs Mises en garde au sujet de la formation de condensation La condensation rosée peut se former à l intérieur de l appareil si la différence entre la température de l appareil et la température ambiante est trop importante Si la condensation se form...

Page 62: ...ncitoyens Une mise au rebut non conforme ou erronée occasionne des risques pour l environnement et la santé Vous pouvez obtenir des informa tions plus détaillées au sujet du recyclage de ce produit auprès de votre commune ou des entreprises de traitement de déchets communaux Attention Le sigle Pb sous le symbole des piles indique que ces piles contiennent du plomb La marque et les logos Bluetooth ...

Page 63: ... accord DAB BANDE III 174 928 MHz 239 200 MHz Gamme d accord FM 87 50 MHz 108 00 MHz USB Appareils USB L USB est uniquement destiné aux mises à jour de logiciels service Pas pour la lecture de musique ou le chargement d appareils BLUETOOTH Version BLUETOOTH V5 0 Classe de performances Classe 1 Puissance émettrice maximale 7 52 dbm Portée Env 10 m peut varier en fonction de l environnement Plage de...

Page 64: ...les frais d adaption du Produit aux normes et exigences applicables En outre si le Produit est d un type différent des produits mis sur le marché par l importateur officiel du pays dans lequel le Produit est présenté pour réparation au titre de la garantie et que les pièces de rechange appropriées ne sont pas disponiblesdans ce pays ou que la réparation de garantie n est pas possibledans de pays p...

Page 65: ...21 Pour vos notes ...

Page 66: ......

Page 67: ...Radio stereo compatta DAB CR ST80DAB MANUALE DI ISTRUZIONI JVCKENWOOD Corporation DEUTSCH FRAN Ç AIS ITALIANO ENGLISH NEDERLANDS ...

Page 68: ... Audio Bluetooth 8 Collegamenti analogici 9 Configurazione del sistema 9 1 Sleep 9 2 Sveglia 9 3 Equalizzatore 9 4 Ora 9 5 Retroilluminazione 9 6 Lingua 9 7 Ripristino di default 9 8 Versione software 10 Risoluzione dei problemi 11 Manutenzione 12 Smaltimento 13 Dati tecnici 14 Garanzia ITALIANO Pagina 3 6 7 8 9 11 12 13 13 13 13 15 15 16 16 16 16 17 17 18 19 20 ...

Page 69: ...istruzioni del produttore Non bloccare mai le aperture di ventilazione collocando l appa recchio su un letto un divano una moquette o una superficie morbida simile Questa unità non deve essere installata in una libreria o in un armadio a meno che non vi sia un adeguata ventilazione 1 5 Alimentazione della tensione Questo apparecchio può essere collegato alla tensione di rete solo con l alimentator...

Page 70: ...ollo di sicurezza per determinare se l apparecchio è in perfette condizioni di funzionamento 1 14 Calore Non installare l unità in prossimità di superfici calde come radiatori termoventilatori stufe o altre apparecchiature compresi gli amplificatori che potrebbero surriscaldarsi Non collocare mai oggetti con fiamme libere come candele o lanterne sopra o vicino al prodotto Non esporre le batterie i...

Page 71: ... esposta durante l uso lo stoc caggio o il trasporto bassa pressione dell aria ad alte quote sostituzione di una batteria con una batteria di tipo errato che può bypassare un fusibile ad esem pio alcuni tipi di batterie al litio lo smaltimento di una batteria nel fuoco o in una stufa calda o lo schiacciamento meccanico o il taglio di una batteria lasciare una batteria in un ambiente con temperatur...

Page 72: ...are con cautela l antenna nella parte inferiore dell alloggiamento 2 Girare l antenna verso l alto ed estrarre completamente tutti gli elementi 3 Allineare l antenna per ottenere la migliore ricezione 2 4 Telecomando Stand by On Off sveglia off Impostazione funzione snooze Aprire chiudere selezione della sorgente Aprire chiudere il menu Impostazione sveglia Dimmer a 3 livelli Avvia riproduzione pa...

Page 73: ...ione Conferma 4 Selezione sorgente 5 Menu 6 Preferiti spazi di memoria 7 Sveglia 8 Indietro 1 4 3 1 Display 2 Antenna FM DAB antenna 3 Porta USB solo per aggiornamenti del firmware 4 Collegamento Alimentatore a spina 5 Collegamento Line Out 6 Collegamento Aux In Lato posteriore Pianta 6 2 5 6 7 8 ...

Page 74: ...uovamente il tasto si ripristina il volume originale 3 4 Ulteriori informazioni Premendo ripetutamente il tasto INFO possono essere visualizzate informazioni aggiuntive a secon da della sorgente e della stazione Descrizione Nome del canale del programma corrente dei contenuti degli argomenti ecc Genere Viene visualizzato lo stile del programma genere del canale Livello del segnale ed errore del se...

Page 75: ... Per fare questo richiamare il menu con il tasto MENU per aprire il menu e selezionare Sinton Manuale Selezionare quindi il canale deside rato e confermare con OK Ora vengono visualizzate le informazioni sulla stazione e sulla potenza del segnale Premendo nuovamente il tasto OK si salvano le stazioni corrispondenti nella lista 5 3 Elenco dei canali Premere il pulsante MENU e confermare Lista stazi...

Page 76: ... memoria in modo comodo col tasto FAVORITE alla radio o FAV sul telecomando Utilizzare i tasti SU GIU o NAVIGATE per selezionare una stazione e premere OK per la conferma Avvertenza Le posizioni di memoria non possono essere cancellate possono essere sovrascritte solo con altre stazioni Le stazioni salvate vengono contrassegnate sulla parte inferiore del display con una stella con il relativo nume...

Page 77: ... miglioramento della qualità può essere ottenuto passando alla ricezione mono Per fare questo premere il tasto MENU e scegliere Impostaz audio Nel menu seguente selezionare Ricezione stereo oppure Solo mono L impostazione attuale è indicata da ü 6 4 Preferiti spazi di memoria Sono disponibili 40 posizioni di memoria Preferiti per memorizzare le vostre stazioni UKW preferite 6 4 1 Memorizzazione de...

Page 78: ...mpostazioni Bluetooth sul dispositivo da accoppiare e avviare la ricerca dei dispositivi Bluetooth disponibili Selezionare KENWOOD CR ST80DAB e iniziare il processo di accoppiamento Dopo il successo dell accoppiamento il display mostra Conesso Ora la riproduzione della musica può essere controllata tramite il dispositivo terminale Utilizzate l applicazione musicale di vostra scelta Il funzionament...

Page 79: ...liere tra 15 30 45 60 90 o 120 minuti Off cancella il periodo di tempo precedentemente impostato Per fare questo premere il pulsante con la sorgente audio selezionata MENU e scegliere Config di sist Poi usare i tasti SU oppure GIU navigare nel menu e selezionare Sleep Con i tasti SU o GIÙ nel menu Sleep Timer selezionare il periodo di tempo desiderato e confermare con il tasto OK Col tasto MENU la...

Page 80: ...siderata È disponibile la selezione seguente 15 30 45 60 90 120 minuti 9 2 7 Volume Impostare il volume desiderato per la sveglia Avvertenza Un allarme attivato è indicato da un icona di allarme e dal numero della sveglia nell an golo in basso del display In modalità standby viene visualizzata anche l ora della sveglia impostata 9 2 8 Spegnimento della sveglia dopo il risveglio Per spegnere la sve...

Page 81: ...dio attivo è contrassegnato con ü 9 4 Ora Nel menu Ora è possibile effettuare le impostazioni per l ora e la data Sono a disposizione i seguenti profili 9 4 1 Menu Impost ora data Qui è possibile impostare manualmente l ora e la data Con i tasti SU oppure GIU sul teleco mando e col regolatore NAVIGATE è possibile cambiare i valori Con i tasti SINISTRA DESTRA oppure OK vengono selezionati i singoli...

Page 82: ...ilità di scelta Alto Medio Basso Livello affievol Impostazione della luminosità per il funzionamento e stand by Possibilità di scelta Medio Basso Le opzioni selezionate sono contrassegnate con ü Con il tasto DIMMER sul telecomando è possibile impostare l illuminazione su 3 livelli 9 6 Lingua Nel menu Lingua è possibile impostare la lingua del menu della radio Per selezionare una lingua utilizzare ...

Page 83: ...o con un detergente delicato Non utilizzare detergenti contenenti alcool ammoniaca o abrasivi Precauzioni per evitare la formazione di condensa La condensa rugiada può formarsi all interno dell apparecchiatura se vi è una differenza significativa tra la temperatura dell apparecchiatura e la temperatura ambiente Se all interno dell unità si forma della condensa non è possibile garantire il corretto...

Page 84: ...to si protegge l ambiente e la salute degli altri esseri umani Uno smalti mento improprio o non corretto mette in pericolo l ambiente e la salute Per ulteriori informazioni sul riciclaggio di questo prodotto contattare l autorità locale o l azienda comunale di gestione dei rifiuti Attenzione Il segno Pb sotto il simbolo della batteria indica che questa batteria contiene piombo Il marchio denominat...

Page 85: ...o di sintonizzazione DAB BAND III 174 928 MHz 239 200 MHz Gamma di sintonia UKW 87 50 MHz 108 00 MHz USB Dispositivi USB L USB è previsto solo per gli aggiornamenti software assistenza Non per la riproduzione di musica o per la ricarica del dispositivo BLUETOOTH Versione BLUETOOTH V5 0 Classe di prestazione Classe 1 Massima potenza di trasmissione 7 52 dbm Autonomia Circa 10 metri può variare a se...

Page 86: ...ove vigono standard e requisiti diversi da quelli italiani il servizio di garanzia sarà reso in Italia a condizione che l utilizzatore si accolli il costo di adattare il prodotto agli standard ed ai requisiti ivi vigenti Inoltre qualora il Prodotto sia di tipo diverso da quelli commercializzati dall impor tatore ufficiale della nazione dove viene portato per la riparazione in garanzia ed in quella...

Page 87: ...21 Appunti ...

Page 88: ......

Page 89: ...DAB stereo compacte radio CR ST80DAB GEBRUIKSAANWIJZING JVCKENWOOD Corporation DEUTSCH FRAN Ç AIS ITALIANO ENGLISH NEDERLANDS ...

Page 90: ... 7 Bluetooth audio 8 Analoge aansluitingen 9 Systeeminstellingen 9 1 Slaapstand 9 2 Wekker 9 3 Equaliser 9 4 Tijd 9 5 Backlight 9 6 Talen 9 7 Fabrieksinstellingen 9 8 Softwareversie 10 Oplossing van storingen 11 Onderhoud 12 Afvalverwerwijdering 13 Technische gegevens 14 Garantie NEDERLANDS Pagina 3 6 7 8 9 11 12 13 13 13 13 15 15 16 16 16 16 17 17 18 19 20 ...

Page 91: ...en voor de verluchting van het apparaat om de betrouwbare werking van het apparaat veilig te stellen en om het apparaat tegen oververhitting en een mogelijke zelfontbranding te beschermen Blokkeer de ventilatieopeningen niet Installeer het apparaat in overeenstemming met de door de fabrikant verstrekte gegevens Blokkeer nooit de ventilatieopeningen doordat u het apparaat op een bed bank tapijt of ...

Page 92: ...schokken of andere ongevallen leiden 1 13 Veiligheidscontrole Verzoek de klantenservicetechnicus na de beëindiging van onderhouds of reparatiewerkzaamheden aan dit apparaat om de uitvoering van een veiligheidscontrole om vast te stellen of het apparaat zich in een perfecte operationele toestand bevindt 1 14 Warmte Installeer het apparaat niet in de nabijheid van hete oppervlakken zoals bv radiator...

Page 93: ...aan een batterij tijdens het gebruik de opslag of het transport blootgesteld kan zijn lage luchtdruk op grote hoogte de vervanging van een batterij door een verkeerd type dat een beveiliging kan omzeilen bv bij een aantal lithiumbatterijtypes het weggooien van een batterij in vuur of in een hete oven of het mechanisch kneuzen of snijden van een batterij het achterlaten van een batterij in een omge...

Page 94: ...oorzichtig de antenne aan het linkergedeelte van de behuizing 2 Draai de antenne naar boven en trek alle elementen er compleet uit 3 Positioneer de antenne om tot de beste ontvangst te komen 2 4 Afstandsbediening Stand by Aan Uit wekker Uit Sluimer instellen Bronselectie openen sluiten Menu openen sluiten Wekker instellen Dimmer 3 trappigg Weergave starten pauzeren Titel selecteren Bluetooth koppe...

Page 95: ... 3 Selecteren Bevestigen 4 Bronselectie 5 Menu 6 Favorieten geheugenplaatsen 7 Wekker 8 Terug 1 4 3 1 Display 2 FM DAB antenne 3 USB aansluiting alleen voor Firmware Updates 4 Aansluiting stekkernetvoeding 5 Line Out aansluiting 6 Aux In aansluiting Achterzijde Bovenaanzicht 6 2 5 6 7 8 ...

Page 96: ... van het display verschijnt er een doorgestreept luidsprekersymbool Door nogmaals de toets in te drukken wordt het oorspronkelijke volume hersteld 3 4 Bijkomende informatie Door het herhaaldelijk indrukken van de toets INFO kan er afhankelijk van bron en zender bijkomende informatie weergegeven worden Beschrijving Naam van de zender van het actuele programma inhoud thema s etc Genre De programmast...

Page 97: ...ensembles ook handmatig instellen Roep daarvoor met de toets MENU het menu op en selecteer Handm afstmmn Daarna het gewenste kanaal selecteren en met OK bevestigen Nu wordt er informatie over het ensemble en wordt de signaalsterkte aangegeven Door nogmaals te drukken op de toets OK worden de betreffende zenders in de lijst opgeslagen 5 3 Stationslijst Druk op de toets MENU en bevestig Stationslijs...

Page 98: ... op de afstandsbediening even in te drukken Gebruik de toetsen OMHOOG OMLAAG of de NAVI GATE regelaar voor de selectie van een zender en druk op OK om te bevestigen Opmerking De geheugenplaatsen kunnen niet gewist worden er kan alleen met andere zenders over geschreven worden Opgeslagen zenders worden in het onderste gedeelte van het display door een ster met bijbehorend geheugenplaatsnummer gemar...

Page 99: ...r omschakeling naar mono ontvangst een lichte kwaliteitsverbetering gerealiseerd worden Druk daarvoor op de toets MENU en selecteer Audio instelling In het hiernavolgende menu Stereo toegestaan of Alleen mono selecteren De actuele instelling wordt door ü aangegeven 6 4 Favorieten geheugenplaatsen Om FM zenders op te slaan staan er 40 geheugenplaatsen favorieten ter beschikking 6 4 1 Opslaan van FM...

Page 100: ...het zoeken naar beschikbare Bluetooth apparaten Selecteer KENWOOD CR ST80DAB en start het koppelingsproces Nadat het Pairing voltooid werd verschijnt op het display Verbonden Nu kan de muziekweergave via het eindapparaat gestuurd worden Gebruik daarvoor een muziek app naar keuze De basisbediening van weergave pauze en titelsprong is via de betreffende toetsen op de afstandsbediening mogelijk Opmer...

Page 101: ...n U kunt daarbij uit 15 30 45 60 90 of 120 minuten kiezen Uit wist de vooraf ingestelde tijdspanne Druk daarvoor bij een gekozen audiobron op de toets MENU en kies Systeeminstellngn Vervolgens met de toets OMHOOG of OMLAAG in het menu navigeren en Slaapstand selecteren Via de toets OMHOOG of OMLAAG in het menu Slaaptijd inst de gewenste tijdspanne selecteren en met de toets OK bevestigen Met de to...

Page 102: ...Ter beschikking staat volgende keuze 15 30 45 60 90 120 minuten 9 2 7 Volume Gelieve hier het gewenste wekvolume in te stellen Opmerking Een geactiveerde wekker wordt met een wekkersymbool en met het nummer van de actieve wekker links onderaan op het display weergegeven In de stand by modus ziet u aanvullend ook nog de ingestelde wektijd 9 2 8 Uitschakelen van de wekker na het wekken Gelieve om de...

Page 103: ...t ü aangegeven 9 4 Tijd In het menu Tijd kunnen er instellingen voor tijd en datum doorgevoerd worden Daarbij staan volgende opties ter beschikking 9 4 1 Menu Tijd datum instellen Hier kunnen tijd en datum handmatig ingesteld worden Met de toets OMHOOG of OMLAAG op de afstandsbediening of met de NAVIGATE regelaar kunnen de waarden gewijzigd worden Met de toets LINKS RECHTS of OK worden de individu...

Page 104: ...jkheden Hoog Medium Laag Niveau voor dimmen Helderheidsinstelling voor werking en stand by Keuzemogelijkheden Medium Laag De geselecteerde opties zijn met ü gemarkeerd Met de toets DIMMER op de afstandsbedie ning kan de verlichting in 3 trappen ingesteld worden 9 6 Talen In het menu Talen kunt u de menutaal van de radio vastleggen Gelieve om een taal te selecteren de toets OMHOOG of OMLAAG te sele...

Page 105: ...s bevochtigde doek Gebruik geen reinigingsmiddelen die alcohol ammoniak of schuurmiddel bevatten Waarschuwingsinstructies betreffende de vorming van condensatie Condensatie dauw kan binnenin het apparaat tot ontwikkeling komen als er tussen de temperatuur van het apparaat en de omgevingstemperatuur een wezenlijk verschil bestaat Indien er zich binnenin het apparaat consensatie voordoet is een perf...

Page 106: ...afvoer van dit product beschermt u het milieu en de gezondheid van uw medemens Een onvakkundige of verkeerde afvoer brengt milieu en gezondheid in gevaar Bijkomende informatie over de recycling van dit product krijgt u van uw gemeente of van de gemeen telijke afvalverwerkende bedrijven Let op Het teken Pb onder het symbool voor batterijen geeft aan dat deze batterij lood bevat Het Bluetooth woordm...

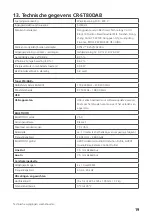
Page 107: ...mbereik BAND III 174 928 MHz 239 200 MHz FM afstembereik 87 50 MHz 108 00 MHz USB USB apparaten USB is alleen bedoeld voor software updates service Niet voor het afspelen van muziek of het opladen van apparaten BLUETOOTH BLUETOOTH versie V5 0 Vermogensklasse Klasse 1 Maximaal zendvermogen 7 52 dbm Reikwijdte ca 10 meter kan afhankelijk van omgeving afwijken Frequentiegebied 2 402 GHz 2 480 GHz BLU...

Page 108: ...ien als het product van verschilt van de producten die worden geleverd door de officiële importeur en als er geen vervangende onderdelen beschikbaar zijn voor het repareren van dit apparaat moet de gebruiker de kosten voor het transport van het apparaat naar en van het land van aankoop dragen Hetzelfde geldt als er geen garantiedekking kan worden aangeboden in het land in kwestie als gevolg van an...

Page 109: ...21 Te uwer informatie ...

Page 110: ......

Page 111: ......

Page 112: ......

Reviews: