background image

XV-C5SL

2-4

CN801

TO CN811
SHEET 3

FL Display

DI801

Power switch

S801

Operation switch

S802 S803 S804

Operation switch

S805 S806 S807

Remote controller

IC801

Standby LED

D801

Remote controller

IC802

CN802

CN812

POWER LED

D802

CN821

CN822

S1~S18  G1~G8  FL+  FL-

POWERSW

KEY0

KEY1

REMO1

STANDBYIND

REMO2

POWERTOP

COUT

YOUT

CbOUT

CrOUT

AUD_L  AUD_R  SPDIF

Y

Pb

Pr

J1602

S-VIDEO OUT

J1605

COMPONENT
VIDEO OUT

CN160

CN170

AVCI

AVCO

MUTE

DOUTCNT

TO CN611

SHEET 3

TO CN711  SHEET 5

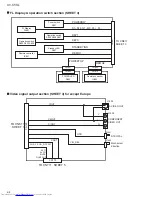
    FL Display & operation switch section (SHEET 4)

   Video signal output section (SHEET 4) for except Europe

S1601

S1602

NTSC/PAL

Mechanism
direction

NTB

V/H_SEL

Summary of Contents for XV-C5SL

Page 1: ... TV3 3 TV5 5 TV4 4 TV6 6 TV8 8 TV7 7 TV9 9 TV0 0 TV 10 MUTING 10 VFP ZOOM AUDIO DIMMER SUB TITLE REPEAT ANGLE 3D PHONIC AMP VOL EJECT DISPLAY TV DVD NEXT PREVIOUS SELECT CLEAR SLOW SLOW CH CH ENTER STANDBY ON TV DVD RETURN VOL VOL TITLE GROUP TV VIDEO CANCEL T O P MENU MENU ON SCREE N CHOICE Area Suffix B U K E Continental Europe EN Northern Europe EV Eastern Europe EE Russian Federation US Singap...

Page 2: ...utputs ANALOG OUT pin jack 2 0 Vrms 10 kΩ DIGITAL OUT COAXIAL 0 5 Vp p 75 Ω termination DIGITAL OUT OPTICAL 21 dBm to 15 dBm peak Audio characteristics Frequency response CD sampling frequency 44 1 kHz 2 Hz to 20 kHz DVD sampling frequency 48 kHz 2 Hz to 22 kHz 4 Hz to 20 kHz for DTS and Dolby Digital bitstream signals DVD sampling frequency 96 kHz 2 Hz to 44 kHz Dynamic range 16 bit More than 98 ...

Page 3: ...d metal parts of the product an tenna terminals knobs metal cabinet screw heads headphone jack control shafts etc to be sure the product is safe to operate without danger of electrical shock Do not use a line isolation transformer during this check Plug the AC line cord directly into the AC outlet Using a Leakage Current Tester measure the leakage current from each exposed metal parts of the cabin...

Page 4: ...ckup In order to maintain quality during transport and before installation both sides of the laser diode on the replacement optical pickup are shorted After replacement return the shorted parts to their original condition Refer to the text Do not use a tester to check the condition of the laser diode in the optical pickup The tester s internal power source can easily destroy the laser diode 1 6 Ha...

Page 5: ...function the laser is able to function 6 CAUTION Use of controls adjustments or performance of procedures other than those specified herein may result in hazardous radiation exposure CAUTION Please use enough caution not to see the beam directly or touch it in case of anadjustment or operation check VARNING Osynlig laserstrålning är denna del är öppnad och spårren är urkopplad Betrakta ej strålen ...

Page 6: ...s of the optical block Do not change the setting of these half fixed resistors for laser power adjustment 1 8 2 Destruction of Traverse Unit and Laser Pickup by Static Electricity Laser diodes are easily destroyed by static electricity charged on clothingor the human body Before repairing peripheral elements of the traverse unit or pickup be sure to take the following electrostatic protection 1 We...

Page 7: ...e the pattern side of this board is not covered with anything after removing the bottom cover of the main body be sure to pull out the power cord from the wall socket before disassembly and assembly procedure If turning the power on without the bottom cover be careful enough not to touch the power supply board Power supply board ...

Page 8: ... 1 Figure 2 1 Remove the three rubber caps on the bottom of the main body Remove the rubber caps by peeling them with your nails because they are only inserted in the holes See Figure 2 2 Remove the three screws A long and one screw B short attaching the bottom cover on the bottom of the main body 3 Lift the bottom cover and remove it Fig 1 Fig 2 Rubber cap and screw A Bottom cover A Rubber cap an...

Page 9: ...wire from the connector CN802 on the FL display board 4 Remove the main body from the top cover 5 Remove the three screws D attaching the mechanism as sembly 6 Disconnect the connector wires from the connector CN501 and CN502 on the servo control board 7 Disconnect the card wire from the connector CN611 on the servo control board Fig 3 Fig 4 Fig 5 Side fitting L Bottom plate C C C Side fitting R T...

Page 10: ...move the power cord from the socket P901 on the pow er supply board To remove the power supply board more easily remove the cap of the optical jack Fig 6 2 1 4 Removing the video output terminal board See Figure 7 Prior to the following procedure remove the bottom cover the mechanism assembly and the power supply board 1 Remove one screw G attaching the video output terminal board 2 Remove the two...

Page 11: ...s CN201 and CN202 on the DVD servo control board 4 Remove the two screws A attaching the DVD servo control board 5 While pushing the claw b of the DVD mechanism assem bly in the direction of the arrow remove the DVD servo control board from the projections c and d in an upward direction Caution In the assembly be sure to remove solder from the short land sections a after connecting the flexible wi...

Page 12: ... the thrust spring 3 Remove the lead screw from the section g and then re move the shaft 1 from the section h 4 Disengage the section i of the DVD pickup unit and then re move the DVD pickup unit with the shaft 1 5 Pull the shaft 1 out of the DVD pickup unit 6 Remove the two screws D attaching the SW actuator Fig 3 Fig 4 Fig 5 DVD traverse mechanism assembly Bracket DVD pickup unit Shaft 1 C Secti...

Page 13: ...ew to the section j of DVD pickup unit and then set the end of the lead screw to the section g 5 Attach the thrust spring See Figure 4 6 Attach the bracket See Figure 3 Fig 6 Fig 7 2 2 5 Removing the spindle motor board See Figure 8 Figure 9 Remove the DVD servo control board Remove the DVD traverse mechanism assembly 1 From the top side of the DVD traverse mechanism assem bly remove the feed moto...

Page 14: ... bracket 4 Disengage the claw f attaching the thrust spring and take out the thrust spring 5 Pull out the lead screw in the direction of the arrow 6 Remove the feed gear M 7 Remove the feed motor wire that is soldered to the spindle motor board 8 Remove the two screws G attaching the feed motor and take out the feed motor Fig 10 Fig 11 Fig 12 Traverse mechanism assembly Feed motor Bracket F F F C ...

Page 15: ...move the two screws I attaching the clamper base assem bly 3 Disconnect the wire from connector CN101 on the switch board while lifting the clamper base assembly slightly and remove the clamper base assembly 4 Remove the screw K attaching the roller holder assembly See Figure 1 5 Remove the three screws J attaching the roller holder as sembly and take out the roller holder assembly 6 Disconnect th...

Page 16: ...the symptoms that a customer points out First Initialize and then confirm whether the symptoms are improved or not After servicing before returning the main body to a customer Initialized main body should be returned to a customer 1 Set the main body at test mode 2 Press PAUSE key of the main body 3 When initialization is completed the FL display changes from 0 to 00 The left 0 of 00 is not always...

Page 17: ...layer DVD software 3 Remove the disc when the FL display changes from READING to disc information 4 Perform the same procedures as in 2 and 3 above by using the test disc CTS 1000 or commercial CD DA software 5 Set the main body at test mode and check that the FL display shows 0 NOTE Status of this adjustment can be judged by the number displayed at test mode as follows NOTE As for a disc used for...

Page 18: ... laser current value of over 65 mA is not normal Laser diode of the pickup has been deteriorated To return to test mode press STOP key of the main body 3 7 Flap adjustment of the pick up guide shaft Please perform flap adjustment of the pick up guide shaft in the following case Just after you exchange the pick up Just after you exchange the spindle motor Just after you exchange the traverse mechan...

Page 19: ...sembly 6 Remove the screws attaching the power supply board 7 Three card wires connected on the servo control board are substituted for the card wire for extension and are extended 8 The flexible wire orange of a pickup is turned down and the whole mechanism assembly is stood perpendicularly 9 The direction switch in a rear panel is made into the 2 sides 10 The card wire connected from the connect...

Page 20: ...anism with phillips screw driver until the maximum jitter value is displayed on the FL display In this model a bigger jitter value means a better result NOTE Reference values to judge whether the jitter is allowable or not are displayed instead of actual jitter values Please be sure to perform all initialization and optimization adjustment of front end parameter after adjusting POINT Turn the adju...

Page 21: ...ess POWER key of the main body When the stand by indicator is lighted upgrading is completed 7 Set the main body at test mode and perform initialization Then confirm the version of the firmware When up grade is completed Upgrade application initializing While upgrading blue screen After inserting the up grade disc Firmware upgrade Disc press UP NO DISC TV2 2 TV1 1 TV3 3 TV5 5 TV4 4 TV6 6 TV8 8 TV7...

Page 22: ... FL Dis play should light correctly without any unevenness All Function button All function buttons should worked correctly with moderate click feeling Insertion and extraction operation of a disk Push an EJECT key and a disk should eject smoothly without an allophone Moreover insert similarly Remote controller unit working Check the correctly operation in use of remote controller unit Reading of ...

Page 23: ...nues for several seconds and becomes NO DISC or an error display afterwards The rotation of DISC becomes high speed and abnormal and becomes NO DISC or an error display afterwards Is focus retraction OK Even when it retracts correctly if it is out of focus and makes repeated retries with a clicking sound it is in error Is tracking retraction OK If TE waveform reappears or fails to converge after t...

Page 24: ...of the motor 3 11 2 Disc Detection Distinction error no disc no RFENV Laser is defective Front End Processor is defective IC101 APC circuit is defective Q101 Q102 Pattern is defective Lines for CN101 All patterns which relate to pick up and patterns between IC101 IC101 For signal from IC101 to IC301 is signal output from IC101 21 ASOUT and IC101 36 RFENV and IC101 20 FE OUT 3 11 3 Traverse movemen...

Page 25: ... 3 traverse movement NG in Check points for each error when it is not normal Are not there caught of the feeding mech anism etc 3 11 10 Picture is distorted or abnormal sound occurs at intervals of several seconds Is the feed operation normal Are not there caught of the feeding mechanism etc 3 11 11Others The image is sometimes blocked and the image stops The image is blocked when going to outer t...

Page 26: ... Q6 Q5 D5 D4 Q4 LE 1 2 3 4 5 6 7 8 9 10 20 19 18 17 16 15 14 13 12 11 Symbol Description D0 D7 Data Inputs LE Latch enable Input active high OE Output enable Input active low Q0 Q7 Data outputs GND Connect to ground Vcc Power supply Operating modes Inputs Internal latches Outputs OE LE Dn Q0 to Q7 Enable and read register trasparant mode L L H H L H L H L H Latch and read register L L L L l h L H ...

Page 27: ... select 7 CCLK I Control data input terminal 8 CDTI I Control data input terminal 9 AOUTR O Rch negative analog output terminal 10 AOUTR O Rch positive analog output terminal 11 AOUTL O Lch negative analog output terminal 12 AOUTL O Lch positive analog output terminal 13 VSS Connect to ground 14 VDD Power supply terminal 15 DZFR O Rch data zero input detection terminal 16 DZFL O Lch data zero inpu...

Page 28: ...ut terminal 21 FS O Focus addition signal output terminal 22 VHALF O VHALF Voltage output terminal 23 MIRSL O MIRROR Slow envelope detection terminal 24 BDOSL O BDO Slow envelope detection terminal 25 VCC2 Power supply terminal 2 3 3V 26 FLTOP O Filter amplifier positive output terminal 27 FLTON O Filter amplifier negative output terminal 28 SAG O SAG Cancel detention terminal 29 DCAGC O FLT DC Cu...

Page 29: ...for CH2 OP AMP 8 GND Substrate ground 9 STBY1 I Input for CH1 2 3 stand by control 10 PowVcc1 Vcc for CH1 2 power block 11 VO2 O Inverted output of CH2 12 VO2 O Non inverted output of CH2 13 VO1 O Inverted output of CH1 14 VO1 O Non inverted output of CH1 15 VO4 O Non inverted output of CH4 16 VO4 O Inverted output of CH4 17 VO3 O Non inverted output of CH3 18 VO3 O Inverted output of CH3 19 PowVc...

Page 30: ...VH 1 2 3 4 5 6 7 8 9 10 11 12 13 14 28 27 26 25 24 23 22 21 20 19 18 17 16 15 29 30 28 27 26 25 24 23 22 21 20 19 18 17 16 15 BRAKE MODE Hall Bias SHORT BRAKE VH BR CNF SB FG2 FR VCC VCC R D Q CK Q ECR EC PS FG VCC VCC GSW VM RNF GAIN SWITCH 2 4 7 8 9 10 11 12 13 14 H1 H1 H2 H2 H3 H3 TSD PS TOROUE SENSE AMP GAIN CONTROL DRIVER HALL AMP TL A3 A2 A1 GND CURRENT SENSE AMP ...

Page 31: ... 13 H3 I Positive input for hall input AMP 3 14 H3 I Negative input for hall input AMP 3 15 VH I Hall bias terminal 16 BR Non connect 17 CNF Capacitor connection pin for phase compensation 18 SB I Short brake terminal 19 FG2 Non connect 20 FR Non connect 21 ECR I Torque control standard voltage input terminal 22 EC I Torque control voltage input terminal 23 PS O Start stop switch power save termin...

Page 32: ... 8 O SDRAM Address bus terminal 14 VSSio Connect to ground 15 16 MA7 6 O SDRAM Address bus terminal 17 VSS Connect to ground 18 MA5 O SDRAM Address bus terminal 19 VDDio Power supply terminal 3 3V 20 21 MA4 3 O SDRAM Address bus terminal 22 MCLK O SDRAM Clock output 23 VSSio Connect to ground 24 CKE O SDRAM Clock enable output Audio output processor Audio DSP MPEG Video decoder Video output proces...

Page 33: ...O SDRAM Data bus terminal 62 VDDio Power supply terminal 3 3V 63 64 MD30 31 I O SDRAM Data bus terminal 65 DQM3 O SDRAM Data byte enable 66 CS1 O SDRAM Extension bank chip select 67 VSSD Connect to ground 68 SPDIF O S PDIF Digital audio output terminal 69 VSSio Connect to ground 70 ADC I Digital audio input for digital micro can be used as GPIO 71 AOUT3 O Serial audio output data to audio DAC for ...

Page 34: ...1 8V 102 MVCKVDD Power supply terminal for main and video clock PLL 3 3V 103 SCEN I Scan chain test enable 104 MVCKVSS Connect to ground for main and video clock PLL 105 ACLKVSS Connect to ground for audio clock PLL 106 SCMD I Scan chain test mode 107 ACLKVDD Power supply terminal for audio clock PLL 3 3V 108 VDDDAK Power supply terminal for DAC digital 1 8V 109 VSSDAC Connect to ground for DAC di...

Page 35: ...ontrol 162 VSSio Connect to ground 163 168 AD13 8 I O Multiplexed address data bus terminal 169 VDDio Power supply terminal 3 3V 170 PWE1 I O Byte write enable for FLASH EEPROM SRAM or peripherals terminal 171 VSS Connect to ground 172 176 AD7 3 I O Multiplexed address data bus terminal 177 VSSio Connect to ground 178 180 AD2 0 I O Multiplexed address data bus terminal 181 VDDio Power supply termi...

Page 36: ...ock 216 DSTB I Parallel mode data valid serial mode left right clock 217 DVD0 I DVD Drive parallel data port 218 VSSio Connect to ground 219 223 DVD1 5 I DVD Drive parallel data port 224 VDDio Power supply terminal 3 3V 225226 DVD6 7 I DVD Drive parallel data port 227 MD0 I O SDRAM Data bus terminal 228 VSSio Connect to ground 229 MD1 I O SDRAM Data bus terminal 230 VSS Connect to ground 231232 MD...

Page 37: ... 512K x 32 512K x 32 I O control Sense AMP Output buffer LWE LDQM DQI Column decoder Latency burst length Programming register Symbol Description CLK System clock signal input CS Chip select input CKE Clock enable A0 A10 Address BA0 1 Bank select address RAS Row address strobe CAS Column address strobe WE Write enable DQM0 3 Data input output mask DQ0 31 Data input output VDD Power supply terminal...

Page 38: ...VREF Power supply terminal B5V 25 NC Not use 26 RESET I Reset input 27 POWERTOP O POWER LED Control signal 28 PLAYTOP Power supply terminal 29 POWERON O Power ON output 30 TCLOSE O Disc insert control signal output 31 TOPEN O Disc eject control signal output 32 LMMUTE O Muting output 33 SWOPEN I Disc insert eject detection switch input 34 SWUPDN I UP DOWN Detection switch of traverse mechanism 35 ...

Page 39: ...of DASP signal 9 17 CPUADR17 9 I System control address 18 VDD18 Power supply terminal for I O 1 8V 19 VSS Connect to ground 20 DRAMVDD18 Power supply terminal for DRAM 1 8V 21 DRAMVSS Connect to ground for DRAM 22 30 CPUADR8 0 I System control address 31 VDD3 Power supply terminal for I O 3 3V 32 VSS Connect to ground 33 DRAMVDD3 Power supply terminal for DRAM 3 3V DVD ROM Formatter CGEN CD PRE I...

Page 40: ... for DRAM 1 8V 59 DRAMVSS Connect to ground for DRAM 60 VSS Connect to ground 61 WOBBLEFIL Non connect 62 PWM6 O Connect to pick up unit 63 PWM7 O Short brake terminal 64 PWM8 Non connect 65 TBAL O Tracking balance adjustment output 66 FBAL O Focus balance adjustment output 67 TRSDRV O Traverse drive output 68 SPDRV O Spindle drive output 69 FG I Motor FG input 70 TILTP Non connect 71 TILT Non con...

Page 41: ... DSLF2 1 I Connect to capacitor 2 1 for DSL 109 AVDD Power supply terminal for analog circuit 3 3V 110 NARF I Equivalence RF 111 ARF I Equivalence RF 112 JITOUT O Output for jitter signal monitor 113 AVSS Connect to ground for analog circuit 114 DAC0 O Tracking drive output 115 DAC1 O Focus drive output 116 AVDD Power supply terminal for analog circuit 3 3V 117 AD0 I Focus error input 118 AD1 I Ph...

Page 42: ...D18 Power supply terminal for I O 1 8V 153 PO I Connect to ground 154 UATASEL I Connect to ground 155 VSS Connect to ground 156 VDD3 Power supply terminal for I O 3 3V 157 HDD1 I O ATAPI host data 1 158 HDD13 I O ATAPI host data 13 159 HDD2 I O ATAPI host data 2 160 HDD12 I O ATAPI host data 12 161 HDD3 I O ATAPI host data 3 162 VDD3 Power supply terminal for I O 3 3V 163 VSS Connect to ground 164...

Page 43: ...11 address lines will select the sector During block erase A19 A15 address lines will select the block DQ15 DQ0 Data Input Output To output data during read cycles and receive input data during write cycles Data is inter nally latched during a write cycle The outputs are in tri state when OE or CE is high CE Chip Enable To activate the device when CE is low OE Output Enable To gate the data output...

Page 44: ... No XA001 AV MULTIMEDIA COMPANY OPTICAL DISC CATEGORY 1644 Shimotsuruma Yamato Kanagawa 242 8514 Japan VICTOR COMPANY OF JAPAN LIMITED WPC Printed in Japan ...

Page 45: ... 2 TV1 1 TV3 3 TV5 5 TV4 4 TV6 6 TV8 8 TV7 7 TV9 9 TV0 0 TV 10 MUTING 10 VFP ZOOM AUDIO DIMMER SUB TITLE REPEAT ANGLE 3D PHONIC AMP VOL EJECT DISPLAY TV DVD NEXT PREVIOUS SELECT CLEAR SLOW SLOW CH CH ENTER STANDBY ON TV DVD RETURN VOL VOL TITLE GROUP TV VIDEO CANCEL T O P MENU MENU ON SCREE N CHOICE Area Suffix B U K E Continental Europe EN Northern Europe EV Eastern Europe EE Russian Federation U...

Page 46: ...ts side of the PWB diagrams the parts that are printed over with black such as the resistor diode and ICP or identified by the mark nearby are critical for safety When replacing them be sure to use the parts of the same type and rating as specified by the manufacturer Except the JC version ...

Page 47: ... FROM Pick up Unit FROM Spindle motor assembly FROM Loading motor assembly CN201 CN202 FM FM LM LM VH SM1 3 H1 H3 H1 H3 SPMUTE FG SPDRV SBRK DRVMUTE SWOPEN SWUPDN AD0 15 PWE0 LA0 3 AD8 19 LADD4 19 TRVSW TCLOSE TOPEN LMMUTE CN501 B3 3V S3 3V D3 3V FL FL B5V D5V 12V 12V M9V TO P961 SHEET 5 DOUTCNT S1OUT SPDIF DA Converter IC702 16 9MHz X301 OSC X701 LA0 LA3 AD0 AD3 OSC I1 O1 PCMCLK BCK AOUT0 LRCLK D...

Page 48: ...12 POWER LED D802 CN821 CN822 S1 S18 G1 G8 FL FL POWERSW KEY0 KEY1 REMO1 STANDBYIND REMO2 POWERTOP COUT YOUT CbOUT CrOUT AUD_L AUD_R SPDIF Y Pb Pr J1602 S VIDEO OUT J1605 COMPONENT VIDEO OUT CN160 CN170 AVCI AVCO MUTE DOUTCNT TO CN611 SHEET 3 TO CN711 SHEET 5 FL Display operation switch section SHEET 4 Video signal output section SHEET 4 for except Europe S1601 S1602 NTSC PAL Mechanism direction N...

Page 49: ...urope COUT YOUT CbOUT CrOUT S1OUT AUD_L AUD_R G B R C FUNCTION Y COMPOSITE AUDIO L R SCART Terminal Q2691 CN260 CN270 AVCI AVCO MUTE DOUTCNT SPDIF TO CN611 SHEET 3 TO CN711 SHEET 5 J2603 Q2753 Q2754 S2601 S2602 RGB_S COMP Mechanism direction RGB_S COMP V H_SEL ...

Page 50: ...4 C966 FEED BACK PC901 AC DC D951 C950 FL ON OFF Q951 Q952 D5V REG IC951 3 3V REG Q953 TO CN502 SHEET 3 VDISP D5V B5V D3 3V S3 3V TO CN501 SHEET 3 12V 12V P961 CN711 P962 POWERON B3 3V M8V F F AVCI AVCO J702 AV Compulink TO CN270 or CN170 SHEET 4 J703 J601 Optical digital OUT IC704 DOUTCNT SPDIF MUTE Q751 Q752 MUTE1 AUD_L AUD_R COUT1 Composite video OUT COAXIAL digital OUT Front analog audio OUT P...

Page 51: ...K 10K 0 022 9 1K 0 1 16 0 1 16 0 1 16 0 1 16 0 47 2 2 0 1 16 M9V MGND DGND D5V 10K 0 015 16 0 1 16 47 47 47K 30K NI 120P 27K 27K QGF1016F2 07W 22K 22K 0 1 16 1 1SS355 X MN103S26EGB H 10K 9 1K 0 1 16 SGND B5V 4 7K DGND B3 3 V DGND DTA144EE X 3 3k NAX0542 001X 1M 0 1 16 0 1 16 0 1 NI 0 1 16 4 7K 4 7K 0 1 16 0 1 16 0 1 16 1 16 1K 0 1 16 0 01 16 0 01 16 47K 47K 47K 0 001 0 1 16 0 018 16 47P 15K 0 001 ...

Page 52: ... 1 16 47 4 47 4 NI NI 150 150 150 470 470 0 1 16 0 1 16 NQR0007 002X NQR0007 002X NQR0007 002X 0 1 16 NQR0007 002X NQR0007 002X 0 1 16 0 1 16 0 1 16 0 1 16 0 1 16 NQR0007 002X 0 1 16 0 1 16 0 1 16 0 1 16 0 1 16 NQR0007 002X WE DQM2 DQM3 MD0 PWE1 MD1 MD2 MD3 MD4 MD5 MD6 MD7 MD10 MD24 MD8 MD11 MD25 MD12 SCLK MD13 MD14 MD16 MD15 DQM1 MA9 MA8 MA7 MA6 MA5 DQM0 WE CAS RAS CS0 MA12 MA13 MA10 MA2 MA1 MA0 ...

Page 53: ... NI NI NI NI NI 1K 220 0 10k 0 0 022 47k 39k 0 0 NC AOUTR DACDENA DAC0CS PCMCL K BCK AOUT0 LRCLK SSPCLK1 SSPOUT1 AOUTR AUD_R PROGRN STANDBYRED PRORED AUD_L 12V POWERSW REMO1 POWERSW KEYIN1 KEYIN2 REMO2 POWERTOP PLAYTOP FL S1 S2 S3 S4 12V B5V VDISP D5V POWERON AGND S3 3V D5GND D3 3V SGND DGND NTB S5 S6 S7 DAC0CS AGND S8 S9 RGB_S COMP S10 S11 DAC2CS SODCCS INTP DOUTCNT SPMUTE DAC1CS X6 ADSCIRQ DACDE...

Page 54: ... T QGF1205C1 15 0 1 0 1k QGF1016C1 19 QSW1003 001 NI NI GND QSW1003 001 NI EL 204 10SUBC KRA102M T KRC107M T QSW0651 001Z 1 0 1 50 QNN0395 001 0 0 QGF0503C1 40V NI QND0092 001 QGF1016C1 19 QSW1003 001 NI NI NI 47 6 3 QSW1003 001 GP1UE261XK KRC102S X 4 7 50 4 7 50 1 1k 470P 470P 1k 100k 1 1k 150 1 8K 2 2k 2 2K 430 680 GP1UE261XK 1k 330 CbOUT1 KEY0 POWERTOP D5V STADBYIND REMO1 DGND F CrOUT1 CbOUT1 M...

Page 55: ...K0151 001A WJK0152 001A 10 QQR0872 001Y 330P 10 QNS0089 001 22 0 001 1kV 100p DI106 2SD2264 T QQR0816 001 68K 1F4 T2 0 0033 1K 1F4 T2 1000 6 3 PC123Y22 MIP2C40MP 100 470 1K 22k 1 0 1 1SS244 T2 100 6 3 NI 22 35 470 10 GND 1 5 82 10K 47 0 1 100 6 3 1F4 T2 470 6 3 1F4 T2 1 UF304G F82 1F4 T2 470P 100 6 3 1SS133 T2 2SC3576 JVC T 10k 10K MTZ2 0B T2 22 25 330p 330 16 150p KRA104M T MM1565AF X 22 35 10 10...

Page 56: ...33 R655 R703 R704 R705 R707 R708 R709 R710 R711 R712 R713 R716 R717 R718 R719 R724 R725 R726 R727 R728 R729 R738 R751 R752 R753 R754 R755 R756 R757 R758 R759 R760 R761 R762 R763 R764 R765 R766 R783 R784 R851 R852 R853 R854 R855 R856 R857 R858 R859 R860 R861 R862 R863 R864 R865 R866 R867 R868 R869 R870 R871 R872 R873 R874 R875 R876 SW501 X301 X701 R700 R345 C335 C105 C106 C113 C119 C121 C124 C125 C...

Page 57: ...D902 D903 D904 D951 D952 D953 D954 D955 D956 D957 D960 D961 R794 FC901 FC902 IC704 IC951 IC952 J601 J703 K682 K791 L681 L901 L951 L953 L954 L955 L956 P961 P962 PC901 Q751 Q752 Q951 Q952 Q953 R682 R683 R767 R768 R769 R770 R771 R772 R773 R774 R790 R791 R792 R901 R903 R906 R910 R911 R913 R952 R953 R954 R960 R961 R962 R964 R965 R966 R967 R968 T901 R912 C1951 J611 C707 C705 D701 L709 R793 R743 Q791 J70...

Page 58: ...01 R802 R803 R804 S801 S802 S803 S804 S805 S806 S807 C807 CN801 CN821 CN802 R806 R807 Q801 C804 C803 CN812 IC802 D802 CN822 C806 D801 DI801 IC801 S801 S802 S803 S804 S805 S806 S807 C807 CN821 CN802 C804 C803 CN812 IC802 D802 CN822 FL Display board MEMO ...

Page 59: ...XV C5SL 2 7 MEMO 2 15 ...

Page 60: ...No XA001SCH XV C5SL VICTOR COMPANY OF JAPAN LIMITED AV MULTIMEDIA COMPANY OPTICAL DISC CATEGORY 1644 Shimotsuruma Yamato Kanagawa 242 8514 Japan Printed in japan 200305 V ...

Page 61: ...ents Exploded view of general assembly and parts list DVD Traverse mechanism assembly and parts list DVD Loading mechanism assembly and parts list Electrical parts list Packing materials and accessories parts list 3 2 3 4 3 6 3 8 3 13 Area Suffix B U K E Continental Europe EN Northern Europe EV Eastern Europe EE Russian Federation US Singapore UG Turkey South Africa Egypt UB Hong Kong ...

Page 62: ...dio output Power supply Servo control board FL display board BACK SIDE Remote control board BACK SIDE Video output board board 42 44 41 44 43 42 41 44 40 44 37 37 36 38 39 20 30 30 46 45 19 14 16 18 21 33 32 34 15 17 35 47 35 35 35 23 31 27 28 29 29 27 28 24 25 25 24 22 26 6 11 12 7 6 10 8 13 1 9 11 5 3 2 4 Except Europe Only Europe ...

Page 63: ...23 DVD LOADING MECHA 24 LV43132 001A INSULATOR x4 25 LE40860 001A S SCREW x4 26 LV21207 006A DVD ELEVATOR 27 VKZ4563 006 O RING x2 28 GV40133 001A SPECIAL SCREW x2 29 QYSBSF2006Z SCREW LOADER x2 30 QYSBSG3008Z TAPPING SCREW CHASSIS x3 31 QUQ110 0707BF FFC WIRE 32 LE31057 004A REAR PLATE B E EE EN EV 32 LE31057 005A REAR PLATE UB UG US 33 QYSBSGY3008N SPECIAL SCREW REAR PLATE 34 QYSBST3004Z SCREW R...

Page 64: ... DVD Traverse mechanism assembly and parts list JVG 31N CFD 4007ZY2 PG 641 1401B a a A A 11 13 12 20 3 14 15 16 10 21 19 18 2 24 17 9 8 7 6 5 24 4 22 23 23 24 22 1 EXL V92 1C 12 0mm 0 2mm 63 3mm 0 1mm Block No M2MM Grease ...

Page 65: ...GEAR M 8 LE40855 001A FEED GEAR E 9 LE40918 001A LEAD SCREW 10 QAL0452 001 PICK UP 11 LE20624 003A SW ACTUATOR 12 LE31011 001A LEAD SPRING 13 QYSPSFU1740Z SCREW 1 7mm x 4mm x2 14 LE31012 001A P U SPRING 15 QYSPSGU1430Z SCREW 1 4mm x 3mm 16 LV41121 002A SHAFT 17 LE31009 001A T SPRING 18 LE31010 001A BRACKET 19 QYSDSF2005Z SCREW 2mm x 5mm 20 QAL0405 001 FPC 21 QAR0273 001 SPINDLE MOTOR 22 QYSPSPU174...

Page 66: ...e A C C GAP A GAP A WASHER BOTH SIDE BACK SIDE 35 38 36 37 43 42 41 39 45 44 47 46 53 48 34 48 54 50 23 52 1 52 32 31 30 31 32 29 7 3 51 4 2 6 5 25 21 11 10 33 33 26 12 33 13 24 27 20 28 22 16 15 17 18 19 14 8 40 Grease FLM FD2 1M SLIT 131 3mm 0 1mm A 0 8 0 5mm 13 3 0 1mm 0 0 1mm 0 1mm 6 7 Block No M3MM 49 ...

Page 67: ...F2006Z SCREW 2mm x 6mm 24 LV42811 001A MOTOR PULLEY 25 QAR0219 001 LOADING MOTOR 26 VYSA1R4 056 SPACER 27 LV42833 001A BELT 28 LV33334 001A PULLEY GEAR 29 LV42814 001A ROLLER GEAR 30 LV42815 002A ROLLER SHAFT 31 LV42816 001A ROLLER x2 32 QYWDL265019 SLIT WASHER 6 5mm x 1mm x2 33 QYSBSF2006Z SCREW 2mm x 6mm x3 34 LV10649 007A CLAMPER BASE 35 LV33344 001A YOKE 36 LV42930 003A MAGNET 37 LV33346 003A ...

Page 68: ...R 0 1uF 16V K C253 NCB31CK 104X C CAPACITOR 0 1uF 16V K C255 NCB31CK 153X C CAPACITOR 0 015uF 16V K C256 NCB31CK 104X C CAPACITOR 0 1uF 16V K C257 NCB31CK 104X C CAPACITOR 0 1uF 16V K C258 NCB31CK 104X C CAPACITOR 0 1uF 16V K C259 NCB31CK 104X C CAPACITOR 0 1uF 16V K C260 NCB31CK 104X C CAPACITOR 0 1uF 16V K C261 NCB31CK 104X C CAPACITOR 0 1uF 16V K C262 NCB31CK 104X C CAPACITOR 0 1uF 16V K C263 N...

Page 69: ...J Symbol No Part No Part Name Description Local R105 NRS125J 270X MG RESISTOR 27Ω 1 2W J R106 NRSA63J 273X MG RESISTOR 27kΩ 1 16W J R107 NRSA63J 273X MG RESISTOR 27kΩ 1 16W J R110 NRSA63J 333X MG RESISTOR 33kΩ 1 16W J R111 NRVA63D 123X CMF RESISTOR 12kΩ 1 16W D R112 NRSA63J 822X MG RESISTOR 8 2kΩ 1 16W J R113 NRSA63J 822X MG RESISTOR 8 2kΩ 1 16W J R119 NRSA63J 2R2X MG RESISTOR 2 2Ω 1 16W J R120 NR...

Page 70: ...OR 2kΩ 1 16W D R756 NRVA63D 202X CMF RESISTOR 2kΩ 1 16W D R757 NRVA63D 222X CMF RESISTOR 2 2kΩ 1 16W D R758 NRVA63D 222X CMF RESISTOR 2 2kΩ 1 16W D R759 NRVA63D 472X CMF RESISTOR 4 7kΩ 1 16W D R760 NRVA63D 472X CMF RESISTOR 4 7kΩ 1 16W D R761 NRVA63D 201X CMF RESISTOR 200Ω 1 16W D R762 NRVA63D 201X CMF RESISTOR 200Ω 1 16W D R763 NRVA63D 201X CMF RESISTOR 200Ω 1 16W D R764 NRVA63D 201X CMF RESISTOR...

Page 71: ...50V Z C971 QCBB1HK 471Y C CAPACITOR 470pF 50V K C972 QCFB1HZ 105Y C CAPACITOR 1uF 50V Z C974 QETN1EM 476Z E CAPACITOR 47uF 25V M C976 QETN0JM 477Z E CAPACITOR 470uF 6 3V M C977 QCFB1HZ 105Y C CAPACITOR 1uF 50V Z C988 QETN1CM 107Z E CAPACITOR 100uF 16V M C989 QETN1EM 226Z E CAPACITOR 22uF 25V M C1639 QCFB1HZ 104Y C CAPACITOR 0 1uF 50V Z UB UG US C1781 QFLC1HJ 222Z M CAPACITOR 2200pF 50V J C1782 QFL...

Page 72: ...CK UB UG US J1605 QNN0430 001 PIN JACK UB UG US J2603 QNZ0516 001 RGB CONNECTOR B E EE EN EV K682 QQR1183 001Z FERRITE BEADS K791 QQR1183 001Z FERRITE BEADS P901 QGA7901C1 02 CONNECTOR W B 1 2 P961 QJK021 101000 E SI C WIRE C B P962 WJK0152 002A E SI C WIRE C B S1601 QSW1003 001 SLIDE SWITCH UB UG US S1602 QSW1003 001 SLIDE SWITCH UB UG US S2601 QSW1003 001 SLIDE SWITCH B E EE EN EV S2602 QSW1003 ...

Page 73: ...acking materials and accessories parts list COVER SA STAND SA FRONT STAND SA INST BOOK SA COVER SA INST BOOK SA Block No M4MM Only U K P5 P2 P4 P1 P3 P7 P6 A6 A5 A4 A5 A3 A1 A2 A12 A13 A14 A23 A24 A26 A9 A8 A7 A11 A27 A10 A25 ...

Page 74: ...h E EN A16 LET0227 005A INST BOOK Dutch E A17 LET0227 006A INST BOOK Spanish Italian EN A18 LET0227 007A INST BOOK Swedish Finnish Danish EN A19 LET0227 008A INST BOOK EE A20 LET0227 009A INST BOOK EV A21 LET0227 010A INST BOOK UB US A22 LET0227 012A INST BOOK UB UG US A23 LET0227 011A INST BOOK UG A24 LV30258 095A UB SHEET UB A25 LE31083 001A SHEET UB UG US A26 VNA3000 204 REGIST CARD B A27 QAM00...

Reviews: