background image

Additional information

41

Additional

information

XV-521BK [J] EN
LVT0435-001A

AV COMPU LINK remote control system (not available with
XV-421BK)

When you buy a separate TV, VCR, DVD player, receiver, or other component and
connect them to each other, you have to operate each component individually.  JVC’s
AV COMPU LINK remote control system meets the demands of a system made up of
single components and has the ease of operation of a single unit.

Connection and setup

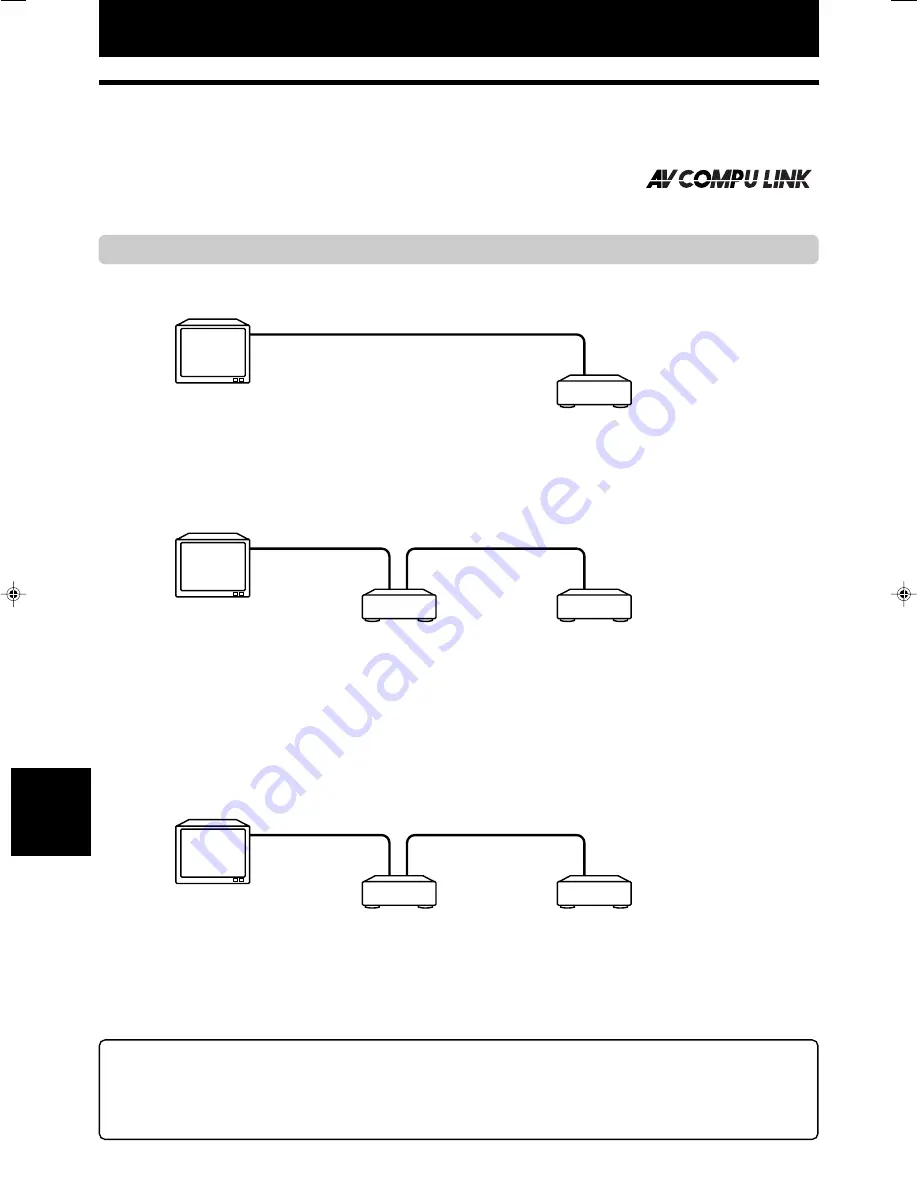
Using the AV COMPU LINK cable, connect the AV COMPU LINK terminals of each component to one another.

• If you connect a DVD player to a television via AV COMPU LINK, set the DVD player’s AV COMPU LINK setting as

follows.

• When connecting to VIDEO-1 input terminal of the television: DVD2
• When connecting to VIDEO-2 input terminal of the television: DVD3

• If you connect a DVD player to a television and VCR via AV COMPU LINK, set the VCR’s Remote Control Code and

DVD player’s AV COMPU LINK setting as follows.

• When connecting to VIDEO-1 input terminal of the television:

DVD player’s AV COMPU LINK setting: DVD2
VCR’s Remote Control Code: B

• When connecting to VIDEO-2 input terminal of the television:

DVD player’s AV COMPU LINK setting: DVD3
VCR’s Remote Control Code: A

• If you connect a DVD player to a television and receiver via AV COMPU LINK, set the DVD player’s AV COMPU LINK

setting to DVD1.

• The DVD player’s AV COMPU LINK setting is operated in the SYSTEM page of the preference display.

See page 38 for operation.

• For information on the connection between the TV and the Receiver, refer to the Receiver’s Instructions.

Additional information

IMPORTANT!

If you connect the component video output to your TV:
• set the DVD player’s AV COMPULINK setting to DVD1.
• make the video/audio connection between the DVD player and your receiver using the supplied audio/video cable,

and do not make the S-VIDEO connection.

DVD player

TV

To AV COMPU LINK (II or EX)

VCR (Video Cassette Recorder)

To AV COMPU LINK

Receiver

TV

To AV COMPU LINK (II or EX)

DVD player

DVD player

TV

To AV COMPU LINK (II or EX)

Summary of Contents for XV-421BK

Page 1: ... PLAY MODE TV RETURN DIGEST STROBE ZOOM TV 0 TV 100 TV 7 TV 8 TV 9 TV 4 TV 5 TV 6 TV 1 TV 2 TV 3 DISPLAY RETURN TV VIDEO ANGLE 3D PHONIC OPEN CLOSE DVD POWER TV POWER THEATER POSITION 4 5 6 7 8 9 10 10 0 REMOTE CONTROL PLAY B SKIP PAUSE STOP ENTER F SKIP B SEARCH F SEARCH 1 2 3 DVD PLAYER POWER STANDBY SHUTTLE DVD VDEO CD CD TITLE CHAP RESUME EACH THEATER DOLBY D I G I T A L 1 4 7 8 0 3D PHONIC SK...

Page 2: ... encouraged to try to correct the interference by one or more of the following measures Reorient or relocate the receiving antenna Increase the separation between the equipment and receiver Connect the equipment into an outlet on a circuit different from that to which the receiver is connected Consult the dealer or an experienced radio TV technician for help For Canada pour le Canada CAUTION TO PR...

Page 3: ...desired scene by specifying the chapter number CHAP SEARCH 22 To locate a desired position in the current title or track TIME SEARCH 22 To locate a desired scene from the digest display DIGEST 23 Special picture playback To advance a still picture frame by frame 24 To display still pictures STROBE 24 To playback in slow motion SLOW 25 To zoom a scene ZOOM 26 Changing the playback order To playback...

Page 4: ...with your 2 channel system Other functions 7 Multi language subtitles and sound You can select a subtitle or sound language from those recorded on the DVD VIDEO disc 7 Multi disc playback You can enjoy Audio CD discs and Video CD discs as well as DVD VIDEO discs 7 Operation from the on screen display User friendly on screen displays allow you to operate the unit easily Functions with mark only wor...

Page 5: ... playback After playing all titles tracks of the disc random playback ends The same title or track will not be played back more than once during random play To stop quit random playback in the middle Press STOP to stop playback The unit is still in random playback mode so pressing PLAY starts random playback again To quit random playback press STOP again while stopped The RANDOM indicator in the d...

Page 6: ...near a heating device When you re away When away on travel or otherwise for an extended period of time remove the plug from the wall outlet Do not insert foreign objects into the unit Do not insert wires hairpins coins etc into the unit Do not block the vents Blocking the vents may damage the unit Care of the cabinet When cleaning the unit use a soft cloth and follow the relevant instructions on t...

Page 7: ...ring playback reverses or advances playback rapidly SHUTTLE knob 19 25 for XV 521BK XV 523GD XV 525BK Performs rapid advance reverse playback operations Also used for slow motion playback of a picture for DVD VIDEO Video CD 1 SEARCH button 19 25 XV 421BK only Pressing 4 or during playback reverses or advances playback rapidly Each press of the button during rapid playback increases the playback sp...

Page 8: ...TV POWER button TV VIDEO button ANGLE ZOOM button TV ch button TV VOL button RETURN CHOICE button DISPLAY TIME button F SKIP F SEARCH button ENTER button 9 PLAY MODE CANCEL button SLOW UP DOWN LEFT CURSOR RIGHT AMP VOL TV VOL TITLE MENU TV ch AUDIO SUBTITLE CANCEL SHIFT TIME CHOICE PLAY MODE TV RETURN DIGEST STROBE ZOOM TV 0 TV 100 TV 7 TV 8 TV 9 TV 4 TV 5 TV 6 TV 1 TV 2 TV 3 DISPLAY RETURN TV VID...

Page 9: ...menu of a DVD VIDEO disc on the TV screen CURSOR 5 UP DOWN 2 LEFT 3 RIGHT buttons Used to select an item form a menu or on screen display or to change the setting of an item in the on screen display Infrared signal emitting window Point this window toward the remote sensor on the front panel when pressing buttons THEATER POSITION button 32 Selects a picture character from 4 options for DVD VIDEO V...

Page 10: ...l audio signals You must select the signal type correctly according to the external device connected to via the Preference display The XV 521BK 523GD 525BK provides both the OPTICAL and COAXIAL connectors while XV 421BK provides only the COAXIAL connector 7 COMPONENT VIDEO OUT jacks Y PB PR 13 Output component video signals 1 Title chapter track indicator 4 Function indicator 2 Time display 3 Disc...

Page 11: ...ing the preferences There are four pages LANGUAGE AUDIO DISPLAY and SYSTEM as shown in the right See page 35 for detailed information PARENTAL LOCK displays When no disc is inserted or a DVD VIDEO disc is stopped pressing the ENTER button while holding down the SHIFT button accesses the PARENTAL LOCK display in which you can set the level for limiting playback See page 39 for detailed information ...

Page 12: ...atic picture such as an on screen display or menu is displayed for over 5 minutes Pressing any button on the unit or the remote control unit will release the screen saver function and return to the previous display You can select one of several screen saver modes available see page 37 The screen saver function is not activated during Audio CD playback or after stopping Audio CD playback DVD Video ...

Page 13: ...e occasionally unacceptable even if is not displayed Note that some operations may not be accepted For example some discs may not allow rapid advance reverse or slow motion playback How to use numeric buttons To select a track title number To select a number between 1 and 10 Press the corresponding button for the number To select a number higher than 10 Use the 10 button Examples To select 13 10 3...

Page 14: ...e discs above may generate noise and damage speakers This unit can play back audio recorded in CD G CD EXTRA and CD TEXT discs Disc structure A DVD VIDEO disc is comprised of titles while an Audio CD Video CD is comprised of tracks Each title may be divided into some chapters For example if a DVD VIDEO disc contains some movies each movie may have its own title number and each movie may be divided...

Page 15: ... to your separate audio equipment See the following pages Getting started Connect VIDEO OUT of the unit directly to the video input of your TV Connecting VIDEO OUT of the unit to a TV via a VCR may cause a monitor problem when playing back a copy protected disc Connect the unit to an NTSC television Do not connect the unit to a PAL television NOTES Connect the unit to a TV equipped with stereo aud...

Page 16: ...onnect the unit s AUDIO OUT to any line level inputs such as AUX DVD CD etc of an audio amplifier or receiver To connect to an audio amplifier or receiver You can enjoy high quality audio by connecting the unit s audio output to your amplifier or receiver NOTES Audio cable not supplied Component video cable not supplied S video cable supplied TV The unit White Red Red Green Blue Red Green Blue Red...

Page 17: ...io video connections have been made insert the smaller plug of the supplied AC power cord to the unit s AC IN connector then insert the other end to the wall outlet Make sure that plugs are inserted firmly The STANDBY indicator lights and setup is completed Warning Disconnect the power cord if you are not going to use the unit for a long time Disconnect the power cord before cleaning the unit Disc...

Page 18: ...mpartment and press down lightly The batteries will last about six months with normal use If the functions of the remote control become erratic replace the batteries See below for more information Precautions for the safe use of batteries Observe the following precautions for the safe use of batteries If they are used improperly their life will be shortened they may burst or their contents may lea...

Page 19: ...trol unit is initially set for operating a JVC TV If there is more than one code listed for the manufacturer of your TV try them one by one until you succeed NOTES Example To enter the manufacturer code 01 Press 0 then 1 to SHIFT 9 1 TV 0 TV 100 TV 9 TV 1 10 0 TV VIDEO TV VOL DVD POWER TV POWER SHIFT TV ch Turns the TV on or off Changes the TV channels Adjusts the TV volume Selects the TV channels...

Page 20: ...he PLAY button on the front panel or the remote control unit In this operation the unit starts playback if the disc is set in the disc tray If no disc is set the disc tray opens You can also turn on the unit by pressing the OPEN CLOSE button on the front panel or the remote control unit In this case the disc tray opens Even if you press the POWER or DVD POWER TV POWER button to turn off the unit t...

Page 21: ...es playback at 5 times the normal speed Releasing the button returns the unit to normal playback or Press 4 or while holding down the SHIFT button Each press of 4 or while holding down the SHIFT button increases the playback speed from 2x to 60x the normal speed Pressing PLAY returns the unit to normal playback From the front panel For XV 521BK 523GD 525BK Use the SHUTTLE knob To advance playback ...

Page 22: ...back 7 While the disc you interrupt playback last time is still in the disc tray Press PLAY The unit starts playback from the position where you interrupted playback last time To clear the resume position memory Operate one of the followings Take out the disc from the tray Press STOP while stopped Turn on the unit by pressing DVD POWER TV POWER on the remote control or POWER on the front panel NOT...

Page 23: ... unit starts playback of the selected item With some discs you can also select items by entering the corresponding number using the numeric buttons which may cause the unit to automatically start playback When appears on the TV screen by pressing TITLE in step 1 The disc does not have a menu listing the titles When appears on the TV screen by pressing MENU in step 1 The disc does not have a menu T...

Page 24: ...ttons to specify the desired title or track number The unit starts playback from the selected title or track See page 10 for details about how to use the numeric buttons The selected title or track number appears in the display window on the front panel When appears on the TV screen The title or track you have specified is not contained in the disc This function does not work during Video CD playb...

Page 25: ... TIME SEARCH then press ENTER GO TO appears under the menu 3 Use the numeric buttons 0 9 to enter the time You can specify the elapsed time of the current title or track to set the location which you want to playback from When the chapter number is incorrect in step 3 Overwrite the incorrect number with the correct number When is displayed in the TV screen in step 4 The chapter you have selected i...

Page 26: ...track appears on the TV screen 2 Use CURSOR 2 3 5 to select the desired scene The selected scene is indicated by If there are more than 9 scenes the digest screen will have more than one page In this case pressing advances to the next page while pressing 4 returns to the previous page Selected time for DVD VIDEO for Audio CD for Video CD Selected time Selected time GO TO 2 3 4 0 0 DVD CONTROL REPE...

Page 27: ...ou want to view as continuous photographs press PAUSE The unit pauses playback 2 Press AUDIO STROBE while holding down SHIFT Nine continuous still pictures appear on the TV screen When the lower right scene is selected pressing CURSOR 3 advances to the next page if available Similarly when the upper left scene is selected pressing CURSOR 2 returns to the previous page if available When there are m...

Page 28: ...100 TV 7 TV 8 TV 9 TV 4 TV 5 TV 6 TV 1 TV 2 TV 3 DISPLAY RETURN TV VIDEO ANGLE 3D PHONIC OPEN CLOSE DVD POWER TV POWER THEATER POSITION 4 5 6 7 8 9 10 10 0 REMOTE CONTROL PLAY B SKIP PAUSE STOP ENTER F SKIP B SEARCH F SEARCH 1 2 3 4 3 7 8 1 SHUTTLE DVD VDEO CD CD CHAP RESUME EACH THEATER 1 4 7 8 0 SKIP OPEN CLOSE STOP PAUSE PLAY 1 To cancel strobe play Press AUDIO STROBE while holding down SHIFT N...

Page 29: ...L TITLE MENU TV ch AUDIO SUBTITLE CANCEL SHIFT TIME CHOICE PLAY MODE TV RETURN DIGEST STROBE ZOOM TV 0 TV 100 TV 7 TV 8 TV 9 TV 4 TV 5 TV 6 TV 1 TV 2 TV 3 DISPLAY RETURN TV VIDEO ANGLE 3D PHONIC OPEN CLOSE DVD POWER TV POWER THEATER POSITION 4 5 6 7 8 9 10 10 0 REMOTE CONTROL PLAY B SKIP PAUSE STOP ENTER F SKIP B SEARCH F SEARCH 1 2 3 4 3 7 8 2 3 1 4 2 Use CURSOR 2 3 5 to move the zoomed in scene ...

Page 30: ...VD POWER TV POWER THEATER POSITION 4 5 6 7 8 9 10 10 0 REMOTE CONTROL PLAY B SKIP PAUSE STOP ENTER F SKIP B SEARCH F SEARCH 1 2 3 4 3 7 8 2 1 3 REPEAT PROGRAM RANDOM Some DVD VIDEO discs may not be played back correctly in random mode NOTE When you specify a wrong selection Press PLAY MODE CANCEL while holding down the SHIFT The last selection programmed is erased To clear the program Press STOP 4...

Page 31: ...PBC CALL Repeat playback You can repeat playback of the current selection or all disc contents You can also repeat playback of a desired part To repeat the current selection or all disc contents REPEAT 7 In any condition except Video CD playback with PBC 1 Press PLAY MODE CANCEL The play mode menu appears on the TV screen 2 Use CURSOR 2 3 to move to REPEAT then press ENTER Each time you press ENTE...

Page 32: ... when pressing ENTER in step 2 during DVD playback You cannot repeat the selected portion because of the disc contents The A B REPEAT function cannot be used during program playback NOTES To repeat a desired part A B REPEAT 7 During playback 1 Press PLAY MODE CANCEL The play mode menu appears on the TV screen 2 Use CURSOR 2 3 to move to A B REPEAT then press ENTER at the beginning of the part you ...

Page 33: ...enjoy a variety of scene angles if the DVD VIDEO disc contains multi angle parts where multiple cameras were used to shoot the same scene from different angles At the beginning of multi angle parts appears on the TV screen To select a scene angle from the normal screen ANGLE 7 During DVD VIDEO playback 1 Press ANGLE ZOOM The Angle selectin display appears on the TV screen 2 Press ANGLE ZOOM or CUR...

Page 34: ...ARCH F SEARCH 1 2 3 4 3 7 8 1 2 2 For DVD VIDEO the selected language may be abbreviated on the TV screen See Appendix A Table of languages and their abbreviations at the end of this manual The Audio selection display will automatically disappear if you do not change the audio for 10 seconds To turn off the Audio selection display manually press ENTER When appears on the TV screen for a DVD VIDEO ...

Page 35: ... ANGLE 3D PHONIC OPEN CLOSE DVD POWER TV POWER THEATER POSITION 4 5 6 7 8 9 10 10 0 REMOTE CONTROL PLAY B SKIP PAUSE STOP ENTER F SKIP B SEARCH F SEARCH 1 2 3 4 3 7 8 Selecting the picture character You can select the quality of the image from among four options OFF 1 2 and 3 according to the type of programming picture tone or personal preferences To select the picture character THEATER POSITION ...

Page 36: ... PBC 1 00 08 TRACK TIME EACH Current track number Time Time mode for DVD VIDEO 1 25 2 25 25 3 3 TITLE CHAP TIME BITRATE Mbps Transmission rate Current title number Current chapter number Time When you play a DVD VIDEO disc recorded in Dolby Digital which contains more than 2 channels ACTION does not appear With a Video CD disc if the AUDIO setting is set to L or R you cannot activate the 3D Phonic...

Page 37: ...2 3 4 3 7 8 2 To change the time display mode only for Audio CD or Video CD without PBC press DISPLAY TIME while holding down SHIFT The time display mode cycles as below 7 While stopped You can check the total disc time and current selected track time of an Audio CD Video CD only from the front panel display window 1 Press DISPLAY TIME while holding down SHIFT When EACH and REMAIN are indicated th...

Page 38: ... move to the desired tab using CURSOR 2 3 2 Move to select the item you want to set by using CURSOR 5 3 Press CURSOR 2 3 to select the setting you want To turn off the preference display press RETURN CHOICE while holding down SHIFT or move to EXIT and press ENTER For details about each setting see the following paragraphs AUDIO DISPLAY SYSTEM MENU LANGUAGE ENGLISH ENGLISH ENGLISH ENGLISH EXIT AUDI...

Page 39: ...olby Digital decoder The following chart shows the relationship between types of playback discs and output signals The unit does not provide the DTS decoding function When playing a DVD VIDEO or Audio CD disc with DTS use a DTS decoder to get correct signals from your speakers Never use the unit s analog output jacks which output incorrect signals that may damage your speakers If you connect the a...

Page 40: ...you connect a normal TV to the unit When you play a wide picture recorded on a DVD VIDEO disc the picture is displayed with bands across the upper and lower portions of the screen 4 3 PS Pan Scan Conversion When you connect a normal TV to the unit When you play a wide picture recorded on a DVD VIDEO disc a portion of the picture is automatically cut off from the left and right sides of the image D...

Page 41: ...emorized OFF Pressing PLAY while stopped or on standby starts playback from the beginning of the disc AV COMPULINK MODE except XV 421BK If you use the AV Compulink system you must set this item correctly Select from the three options DVD1 DVD2 and DVD3 according to the equipment to be connected See page 41 AUTO STANDBY OFF OFF EXIT RESUME AUDIO DISPLAY SYSTEM LANGUAGE DVD 1 AV COMPULINK MODE PRESS...

Page 42: ... means no restriction Discs rated higher than the selected level are restricted Country Code US 1 EXIT Set Level PASS WORD NEW PASSWORD PRESS 0 9 KEY PARENTAL LOCK Country Code US 1 EXIT Set Level PASS WORD PRESS KEY ENTER PARENTAL LOCK Country Coce US EXIT Set Level PASS WORD PRESS KEY ENTER PARENTAL LOCK SLOW UP DOWN LEFT CURSOR RIGHT AMP VOL TV VOL TITLE MENU TV ch AUDIO SUBTITLE CANCEL SHIFT T...

Page 43: ...ears on the TV screen and you cannot go to next step The Parental lock is released and the unit starts playback When you enter the wrong password more than 3 times in step 2 above moves to NO automatically and CURSOR 5 do not work NOTE PARENTAL LOCK Temporary Level Change This DISC can t play now PASSWORD YES NO PRESS ENTER EXECUTE To change the settings PARENTAL LOCK You can change the Parental l...

Page 44: ...AV COMPU LINK setting as follows When connecting to VIDEO 1 input terminal of the television DVD player s AV COMPU LINK setting DVD2 VCR s Remote Control Code B When connecting to VIDEO 2 input terminal of the television DVD player s AV COMPU LINK setting DVD3 VCR s Remote Control Code A If you connect a DVD player to a television and receiver via AV COMPU LINK set the DVD player s AV COMPU LINK s...

Page 45: ... televisions indicates II Do not connect the terminal indicating II with the AV COMPU LINK terminal on a receiver If connected the system will not work correctly Connect the AUDIO OUT jacks of the DVD player to the audio input jacks of a receiver that indicating DVD Otherwise the system will not work correctly There may be no description about connections to a DVD player in the instruction manual ...

Page 46: ...guard function is activated Connection is incorrect Input selection of amplifier is incorrect The audio signal is derived from the unit s DIGITAL OUT Disc is dirty MONITOR TYPE is not correctly set Television is not correctly set Microcomputer malfunction due to lightning or static electricity Moisture condensation caused by a sudden change of temperature or humidity Remedy Plug in securely More c...

Page 47: ...ck 1 0 Vp p 75 Ω S VIDEO OUT S jack Y Output 1 0 Vp p 75 Ω C Output 286 mVp p 75 Ω Horizontal resolution 500 Lines Signal to noise ratio 65 dB Audio output ANALOG OUT pin jack 2 0 Vrms 10 kΩ DIGITAL OUT COAXIAL 0 5 Vp p 75 Ω termination OPTICAL 21 to 15 dBm Peak except XV 421BK Audio characteristics Frequency response CD sampling frequency 44 1 kHz 2 Hz to 20 kHz DVD sampling frequency 48 kHz 2 Hz...

Page 48: ...ingue IK Inupiak IN Indonesian IS Icelandic IW Hebrew JI Yiddish JW Javanese KA Georgian KK Kazakh KL Greenlandic KM Cambodian KN Kannada KO Korean KOR KS Kashmiri KU Kurdish KY Kirghiz LA Latin LN Lingala LO Laothian LT Lithuanian LV Latvian Lettish MG Malagasy MI Maori MK Macedonian ML Malayalam MN Mongolian MO Moldavian MR Marathi MS Malay MAY MT Maltese MY Burmese NA Nauru NE Nepali NL Dutch N...

Page 49: ... PR Puerto Rico PT Portugal PW Palau PY Paraguay QA Qatar RE Réunion RO Romania RU Russian Federation RW Rwanda ES Spain ET Ethiopia FI Finland FJ Fiji FK Falkland Islands Malvinas FM Micronesia Federated States of FO Faroe Islands FR France FX France Metropolitan GA Gabon GB United Kingdom GD Grenada GE Georgia GF French Guiana GH Ghana GI Gibraltar GL Greenland GM Gambia GN Guinea GP Guadeloupe ...

Page 50: ...ur JVC product you may contact your local JVC Dealer Or from the 48 Continental United States call toll free 800 882 2345 10 New Maple Avenue Pine Brook NJ 07058 9641 973 396 1000 5665 Corporate Avenue Cypress CA 90630 0024 714 229 8011 13 Cummings Park Woburn MA 01801 781 376 9100 705 Enterprise Street Aurora IL 60504 8149 630 851 7855 10700 Hammerly Suite 110 Houston TX 77043 713 935 9331 890 Du...

Page 51: ...to any attachment not provided with the products or if the model number or serial number has been altered tampered with defaced or removed 2 Initial installation and installation and removal for repair 3 Operational adjustments covered in the Owner s Manual normal maintenance video and audio head cleaning 4 Damage that occurs in shipment due to act of God and cosmetic damage 5 Signal reception pro...

Page 52: ...VICTOR COMPANY OF JAPAN LIMITED J VC EN 0300RIMUBNJSC ...

Reviews: