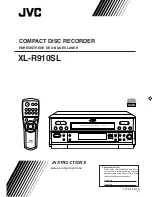


11
English
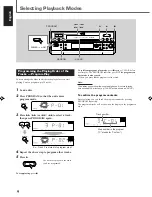
Recording on a CD-R/CD-RW
Before You Start Recording
• This unit has been designed to record on the following discs — both blank and unfinalized CD Recordable (CD-R) and
CD Rewritable (CD-RW).
• It should be noted that it may be unlawful to re-record pre-recorded tapes, records, or discs without the consent of the
owner of copyright in the sound or video recording, broadcast or cable programme and in any literary, dramatic, musical,
or artistic embodied therein.
• The sampling frequency rate converter built in the unit allows you to record a digital source if its sampling frequency is 32 kHz,
44.1 kHz, or 48 kHz. If no playback component is connected to the OPTICAL IN terminal or if the sampling frequency of the
connected component is not 32 kHz, 44.1 kHz, or 48 kHz, “UN LOCK” appears on the display (no recording is possible).
The sampling frequency indicator (32, 44, 48) lights up to indicate the sampling frequency of the incoming signals through the
OPTICAL IN terminal.
• You cannot record the entire Dolby Digital or DTS Digital Surround signals through the OPTICAL IN terminal.
• When you record onto an unfinalized CD-R or CD-RW, its recordings are not erased or overwritten. The recording starts from the
point following the last recorded track on the disc.
If you want to record on such a CD-RW from its beginning, you have to erase its contents first (see “Erasing the Tracks on a CD-
RW” on page 14. This is only possible on CD-RWs).
• The recording level is automatically set correctly when recording through the digital terminals, so it is not affected by the REC
LEVEL control.
• When an unfinalized CD-R or CD-RW is loaded, this unit checks the disc and automatically adjusts the laser for optimum
recording setting — Optimum Power Control (OPC).
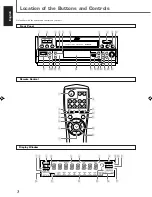
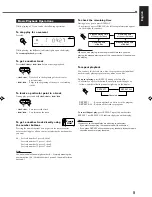
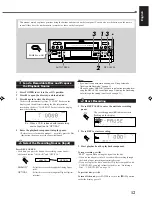
Adjusting the Recording Level through the
Analog Input Jacks
Before recording through the Analog Input jacks, adjust the
recording level properly.
To adjust the recording level, follow the procedure below
BEFORE you start recording procedure described on page 12:
1
Start playback on the playback component.
2
Check the level indicator on the display while listening to
the playback.
3
Adjust the REC LEVEL control so that the OVER
indicator will never lights up when the highest signal
comes in.
Note:
Do not turn the REC LEVEL control while recording; otherwise,
recording level will change.
REC LEVEL
MIN
MAX
The OVER indicator
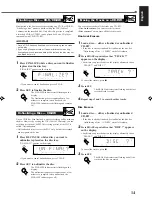
Using Automatic Tracking while Digital
Recording
Press AUTO TRACK so that the AUTO TRACK indicator
lights up on the display. A track marking is automatically
recorded.
• Each time you press the button, automatic tracking turns
on and off.
When automatic track marking is activated:
Track markings are recorded automatically at the points
where the tracks change.
Note:
When “ANALOG” is selected as the recording source (see
page 12), automatic track marking is canceled temporarily.
(The AUTO TRACK indicator goes off.)
When automatic track marking is deactivated:
No track mark is recorded on a disc. This means that, when
playing this disc, this unit (or another CD player compatible
with CD-R/CD-RW) will regard the entire recording as one
track (track 1). You will not be able to directly select a song
or navigate through songs.
To put a track mark manually while recording, press
SET at the place you want to put a track mark.
AUTO
TRACK
The AUTO TRACK indicator lights up.
SET
EN11-14.XL-R910[C]_f
01.3.13, 5:41 PM
11


