background image

XL-PG31/XL-PG51/XL-PV310

1-4

Preventing static electricity

Electrostatic discharge (ESD), which occurs when static electricity stored in the body, fabric, etc. is discharged, 
can destroy the laser diode in the traverse unit (optical pickup).  Take care to prevent this when performing repairs.

1.1. Grounding to prevent damage by static electricity

Static electricity in the work area can destroy the optical pickup (laser diode) in devices such as DVD players. 
Be careful to use proper grounding in the area where repairs are being performed. 

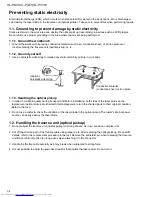
1.1.1. Ground the workbench

1. Ground the workbench by laying conductive material (such as a conductive sheet) or an iron plate over 
    it before placing the traverse unit (optical pickup) on it.

1.1.2. Ground yourself

1. Use an anti-static wrist strap to release any static electricity built up in your body.      

1.1.3. Handling the optical pickup

1. In order to maintain quality during transport and before installation, both sides of the laser diode on the 
   replacement optical pickup are shorted. After replacement, return the shorted parts to their original condition. 
  (Refer to the text.)

2. Do not use a tester to check the condition of the laser diode in the optical pickup. The tester's internal power 
    source can easily destroy the laser diode. 

1.2. Handling the traverse unit (optical pickup)

1. Do not subject the traverse unit (optical pickup) to strong shocks, as it is a sensitive, complex unit. 

2. Cut off the shorted part of the flexible cable using nippers, etc. after replacing the optical pickup. For specific 
    details, refer to the replacement procedure in the text. Remove the anti-static pin when replacing the traverse 
    unit. Be careful not to take too long a time when attaching it to the connector. 

3. Handle the flexible cable carefully as it may break when subjected to strong force. 

4. It is not possible to adjust the semi-fixed resistor that adjusts the laser power. Do not turn it

Conductive material 
(conductive sheet) or iron plate

(caption)
Anti-static wrist strap

Summary of Contents for XL-PG31

Page 1: ... Areas suffix MODEL XL PG31 BASE MODEL XL PV310 XL PG31 CAR KIT XL PG51 XL PG31 REMOTE R BATTERY Model composition explanation Contents Saftey Precautions Important for laser products Preventing static electricity Disassembly method Service parts unit Accessories servise parts list 1 2 1 3 1 4 1 5 1 7 1 9 B U K C Canada E Continental Europe J U S A U Other Areas ...

Page 2: ...akage currnet check Electrical shock hazard testing After re assembling the product always perform an isolation check on the exposed metal parts of the product antenna terminals knobs metal cabinet screw heads headphone jack control shafts etc to be sure the product is safe to operate without danger of electrical shock Do not use a line isolation transformer during this check Plug the AC line cord...

Page 3: ...f safety switches malfunction the laser is able to function 6 CAUTION Use of controls adjustments or performance of procedures other than those specified herein may result in hazardous radiation exposure VARNING Osynlig laserstrålning är denna del är öppnad och spårren är urkopplad Betrakta ej strålen VARO Avattaessa ja suojalukitus ohitettaessa olet alttiina näkymättömälle lasersäteilylle Älä kat...

Page 4: ...ality during transport and before installation both sides of the laser diode on the replacement optical pickup are shorted After replacement return the shorted parts to their original condition Refer to the text 2 Do not use a tester to check the condition of the laser diode in the optical pickup The tester s internal power source can easily destroy the laser diode 1 2 Handling the traverse unit o...

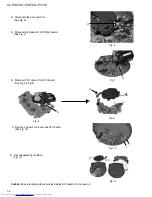
Page 5: ... 1 screw B from battery compartment See Fig 2 3 The bottom cabinet comes off Remove main parts 1 Disconnect the membrane C See Fig 3 Caution Pay attention not damage the membrane C during disconnection 2 Remove the screw D on rechargeable battery plate See Fig 4 3 Remove E battery plate and F battery plate See Fig 5 Fig 1 Fig 2 Fig 3 Fig 5 Fig 4 ...

Page 6: ...he Header H of CD Mechanism See Fig 7 6 Diconnect FCC cable H from PC board See Fig 8 Fig 9 Fig 7 Fig 9 Fig 8 Fig 6 7 Remove 2 screws I on door swtich PC board See Fig 10 Fig 10 8 Final disassembly condition Fig 11 Fig 11 Caution No serviceable parts are provided inside AC Adaptor Do not open it ...

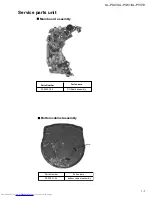
Page 7: ... PG31 XL PG51 XL PV310 1 7 Bottom cabinet assembly Parts Number Parts name 00 00031 04 bottom cabinet assembly Main board assembly Parts Number Parts name P C Board assembly 00 00031 02 Service parts unit ...

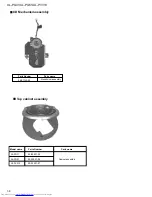
Page 8: ...PV310 1 8 Parts Nunber Parts name 98 01740 00 Mecahnism assembly CD Mechanism assembly Top cabinet assembly Model name Parts Number Parts name XL PG31 XL PG51 XL PV310 Cabinet assembly 00 00031 03 00 00031 06 00 00031 07 ...

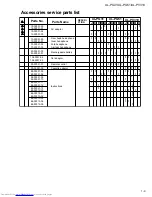
Page 9: ... control 00 00031 00 Cassette adaptor 88 00031 00 88 00031 06 88 00031 09 88 00031 10 88 00031 11 88 00031 12 88 00031 13 88 00310 00 88 00310 01 88 00310 02 88 00310 03 88 00310 04 88 00310 05 Instructions Accessories service parts list Parts No Parts Name XL PG31 XL PG51 XL PV310 J J J C C C E E E B B B U U U 1 1 1 1 1 1 1 1 1 1 1 1 1 1 1 1 1 1 1 1 1 1 1 1 1 1 1 1 1 1 1 1 1 1 1 1 1 1 1 1 1 1 1 1...

Page 10: ...d in Japan 200007 V VICTOR COMPANY OF JAPAN LIMITED AUDIO COMMUNICATION BUSINESS DIVISION PERSONAL MOBILE NETWORK B U 10 1 1chome Ohwatari machi Maebashi city 371 8543 Japan No 20851 XL PG31 XL PG51 XL PV310 ...

Reviews: